crwdns2933423:0crwdne2933423:0

Dell Inspiron 17-5755 Motherboard Replacement

crwdns2942213:0crwdne2942213:0

  1. Dell Inspiron 17-5755 Motherboard Replacement, Battery: crwdns2935265:01crwdnd2935265:01crwdnd2935265:01crwdne2935265:0
    • Make sure the computer has been shut down, and isn't plugged into an outlet before attempting to remove the battery.

  2. Dell Inspiron 17-5755 Motherboard Replacement: crwdns2935265:02crwdnd2935265:01crwdnd2935265:02crwdne2935265:0 Dell Inspiron 17-5755 Motherboard Replacement: crwdns2935265:02crwdnd2935265:02crwdnd2935265:02crwdne2935265:0
    • Find the battery release latch on the bottom side of the computer.

    • Slide the latch to the left until you hear a "click". This indicates that the battery has been released.

  3. Dell Inspiron 17-5755 Motherboard Replacement: crwdns2935265:03crwdnd2935265:01crwdnd2935265:01crwdne2935265:0
    • Safely remove the battery from the laptop.

  4. Dell Inspiron 17-5755 Motherboard Replacement, Keyboard: crwdns2935265:04crwdnd2935265:01crwdnd2935265:02crwdne2935265:0 Dell Inspiron 17-5755 Motherboard Replacement, Keyboard: crwdns2935265:04crwdnd2935265:02crwdnd2935265:02crwdne2935265:0
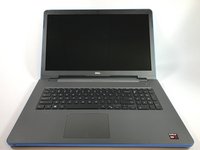
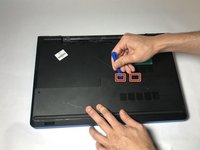
    • Open the display of the laptop as far as possible, and locate the tabs which secure the keyboard to the laptop.

  5. Dell Inspiron 17-5755 Motherboard Replacement: crwdns2935265:05crwdnd2935265:01crwdnd2935265:01crwdne2935265:0
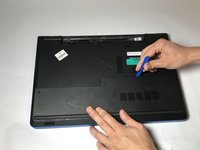
    • Use a plastic opening tool to gently release the tabs that secure the keyboard to the laptop.

  6. Dell Inspiron 17-5755 Motherboard Replacement: crwdns2935265:06crwdnd2935265:01crwdnd2935265:02crwdne2935265:0 Dell Inspiron 17-5755 Motherboard Replacement: crwdns2935265:06crwdnd2935265:02crwdnd2935265:02crwdne2935265:0
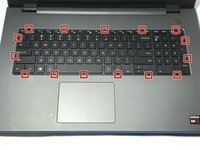
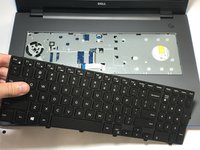
    • Carefully lift the keyboard from the laptop, being mindful of any attachments that it may have.

  7. Dell Inspiron 17-5755 Motherboard Replacement: crwdns2935265:07crwdnd2935265:01crwdnd2935265:03crwdne2935265:0 Dell Inspiron 17-5755 Motherboard Replacement: crwdns2935265:07crwdnd2935265:02crwdnd2935265:03crwdne2935265:0 Dell Inspiron 17-5755 Motherboard Replacement: crwdns2935265:07crwdnd2935265:03crwdnd2935265:03crwdne2935265:0
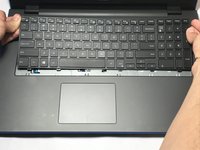
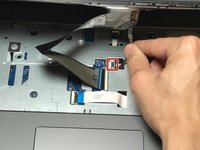
    • Lift the zero insertion force (ZIF) tab that secures the keyboard back light ribbon cable

    • Afterwards, carefully detach the backlight cable from the laptop.

  8. Dell Inspiron 17-5755 Motherboard Replacement: crwdns2935265:08crwdnd2935265:01crwdnd2935265:03crwdne2935265:0 Dell Inspiron 17-5755 Motherboard Replacement: crwdns2935265:08crwdnd2935265:02crwdnd2935265:03crwdne2935265:0 Dell Inspiron 17-5755 Motherboard Replacement: crwdns2935265:08crwdnd2935265:03crwdnd2935265:03crwdne2935265:0
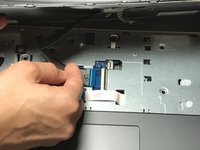
    • Gently release the ZIF tab that secures the keyboard ribbon cable to the laptop.

    • Afterwards, carefully slide the cable out of its slot.

  9. Dell Inspiron 17-5755 Motherboard Replacement: crwdns2935265:09crwdnd2935265:01crwdnd2935265:02crwdne2935265:0 Dell Inspiron 17-5755 Motherboard Replacement: crwdns2935265:09crwdnd2935265:02crwdnd2935265:02crwdne2935265:0
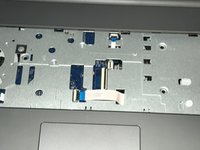
    • Now that the keyboard is detached from the laptop, you may safely remove it.

  10. Dell Inspiron 17-5755 Motherboard Replacement, Motherboard: crwdns2935265:010crwdnd2935265:01crwdnd2935265:01crwdne2935265:0
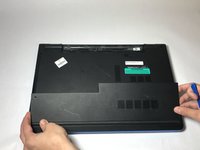
    • Use a Phillips #0 screwdriver to unscrew the two 8mm screws which secure the base cover.

  11. Dell Inspiron 17-5755 Motherboard Replacement: crwdns2935265:011crwdnd2935265:01crwdnd2935265:02crwdne2935265:0 Dell Inspiron 17-5755 Motherboard Replacement: crwdns2935265:011crwdnd2935265:02crwdnd2935265:02crwdne2935265:0
    • Locate the tabs that hold the base cover to the laptop and use a plastic opening tool to gently release the base cover.

  12. Dell Inspiron 17-5755 Motherboard Replacement: crwdns2935265:012crwdnd2935265:01crwdnd2935265:02crwdne2935265:0 Dell Inspiron 17-5755 Motherboard Replacement: crwdns2935265:012crwdnd2935265:02crwdnd2935265:02crwdne2935265:0
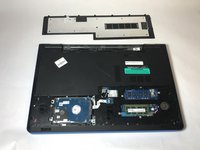
    • Now with the base cover removed, you may lift it off of the laptop and continue.

  13. Dell Inspiron 17-5755 Motherboard Replacement: crwdns2935265:013crwdnd2935265:01crwdnd2935265:03crwdne2935265:0 Dell Inspiron 17-5755 Motherboard Replacement: crwdns2935265:013crwdnd2935265:02crwdnd2935265:03crwdne2935265:0 Dell Inspiron 17-5755 Motherboard Replacement: crwdns2935265:013crwdnd2935265:03crwdnd2935265:03crwdne2935265:0
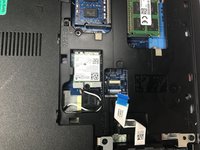
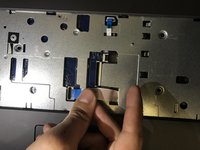
    • Disconnect the hard drive ribbon cable from the laptop by lifting the latch which secures it.

  14. Dell Inspiron 17-5755 Motherboard Replacement: crwdns2935265:014crwdnd2935265:01crwdnd2935265:01crwdne2935265:0
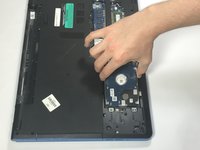
    • Use a Phillips #0 screwdriver to remove the four 8mm screws which secure the hard drive assembly to the laptop.

  15. Dell Inspiron 17-5755 Motherboard Replacement: crwdns2935265:015crwdnd2935265:01crwdnd2935265:02crwdne2935265:0 Dell Inspiron 17-5755 Motherboard Replacement: crwdns2935265:015crwdnd2935265:02crwdnd2935265:02crwdne2935265:0
    • Carefully remove the hard drive and its assembly from the laptop.

  16. Dell Inspiron 17-5755 Motherboard Replacement: crwdns2935265:016crwdnd2935265:01crwdnd2935265:03crwdne2935265:0 Dell Inspiron 17-5755 Motherboard Replacement: crwdns2935265:016crwdnd2935265:02crwdnd2935265:03crwdne2935265:0 Dell Inspiron 17-5755 Motherboard Replacement: crwdns2935265:016crwdnd2935265:03crwdnd2935265:03crwdne2935265:0
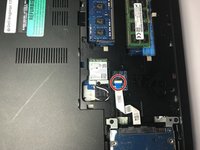
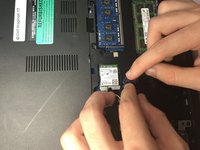
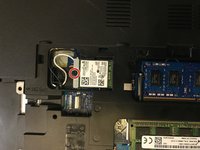
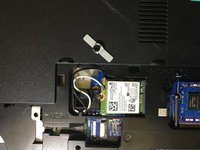
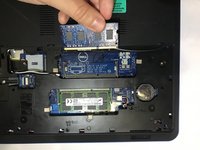
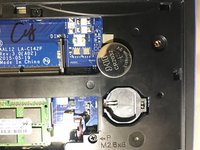
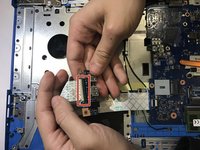
    • Remove the 3mm screw which secures the wireless card bracket.

    • After removing the screw, remove the wireless card bracket, along with the antenna cables secured to the wireless card.

    • Afterwards, you may slide and remove the wireless card from the motherboard.

  17. Dell Inspiron 17-5755 Motherboard Replacement: crwdns2935265:017crwdnd2935265:01crwdnd2935265:03crwdne2935265:0 Dell Inspiron 17-5755 Motherboard Replacement: crwdns2935265:017crwdnd2935265:02crwdnd2935265:03crwdne2935265:0 Dell Inspiron 17-5755 Motherboard Replacement: crwdns2935265:017crwdnd2935265:03crwdnd2935265:03crwdne2935265:0
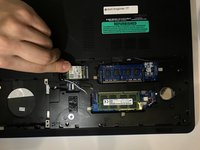
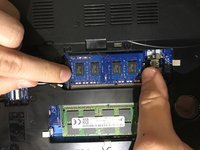
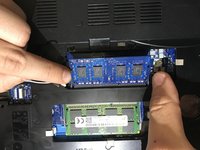
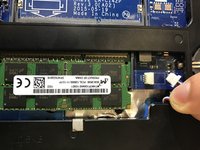
    • Gently spread apart the securing clips on each end of the memory-module slot until the memory module pops out.

    • Slide and remove the memory module afterwards.

  18. Dell Inspiron 17-5755 Motherboard Replacement: crwdns2935265:018crwdnd2935265:01crwdnd2935265:02crwdne2935265:0 Dell Inspiron 17-5755 Motherboard Replacement: crwdns2935265:018crwdnd2935265:02crwdnd2935265:02crwdne2935265:0
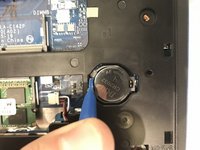
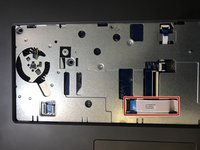
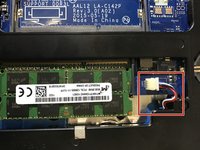
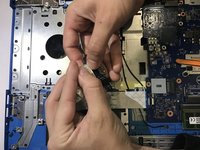
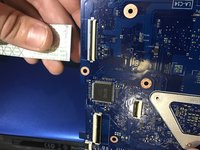
    • Use a plastic opening tool to gently pry the CMOS battery found at the bottom right of the laptop out of the socket.

  19. Dell Inspiron 17-5755 Motherboard Replacement: crwdns2935265:019crwdnd2935265:01crwdnd2935265:03crwdne2935265:0 Dell Inspiron 17-5755 Motherboard Replacement: crwdns2935265:019crwdnd2935265:02crwdnd2935265:03crwdne2935265:0 Dell Inspiron 17-5755 Motherboard Replacement: crwdns2935265:019crwdnd2935265:03crwdnd2935265:03crwdne2935265:0
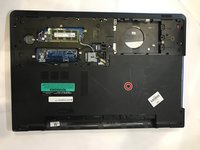
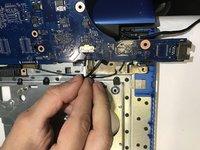
    • Use a Phillips #0 screwdriver to remove the 3mm screw which secures the optical-drive assembly to the computer base

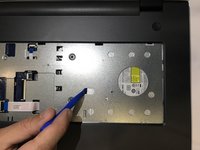
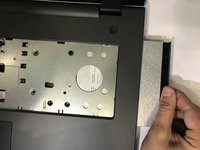
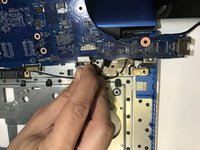
    • Turn the computer over and using a plastic opening tool, push the optical-drive assembly out of the optical drive bay.

    • Afterwards, safely pull the optical-drive assembly out of the optical-drive bay.

  20. Dell Inspiron 17-5755 Motherboard Replacement: crwdns2935265:020crwdnd2935265:01crwdnd2935265:03crwdne2935265:0 Dell Inspiron 17-5755 Motherboard Replacement: crwdns2935265:020crwdnd2935265:02crwdnd2935265:03crwdne2935265:0 Dell Inspiron 17-5755 Motherboard Replacement: crwdns2935265:020crwdnd2935265:03crwdnd2935265:03crwdne2935265:0
    • Turn the computer over

    • Lift the latch securing the optical drive ribbon cable, and disconnect it from the motherboard.

    • Afterwards, use a Phillips #0 screwdriver to remove the four 5mm screws.

  21. Dell Inspiron 17-5755 Motherboard Replacement: crwdns2935265:021crwdnd2935265:01crwdnd2935265:02crwdne2935265:0 Dell Inspiron 17-5755 Motherboard Replacement: crwdns2935265:021crwdnd2935265:02crwdnd2935265:02crwdne2935265:0
    • Turn over the laptop, and safely disconnect the speaker cable.

  22. Dell Inspiron 17-5755 Motherboard Replacement: crwdns2935265:022crwdnd2935265:01crwdnd2935265:01crwdne2935265:0
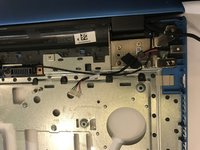
    • Remove the antenna cables from the routing guides on the computer base.

  23. Dell Inspiron 17-5755 Motherboard Replacement: crwdns2935265:023crwdnd2935265:01crwdnd2935265:02crwdne2935265:0 Dell Inspiron 17-5755 Motherboard Replacement: crwdns2935265:023crwdnd2935265:02crwdnd2935265:02crwdne2935265:0
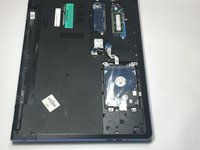
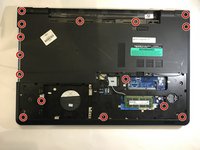
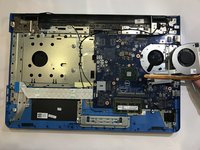
    • Use a Phillips #0 screwdriver to remove the 15 screws that secure the computer base to the palm rest assembly.

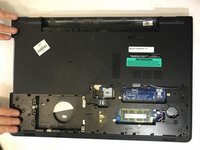
    • Afterwards, safely pry the computer base from the palm rest assembly using a plastic opening tool.

    • There are 3 different screws used: Three 2mm screws on the edge of the optical drive, two 3mm screws located where the battery was, and ten 8mm screws.

  24. Dell Inspiron 17-5755 Motherboard Replacement: crwdns2935265:024crwdnd2935265:01crwdnd2935265:02crwdne2935265:0 Dell Inspiron 17-5755 Motherboard Replacement: crwdns2935265:024crwdnd2935265:02crwdnd2935265:02crwdne2935265:0
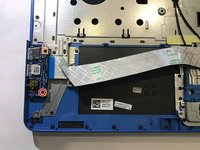
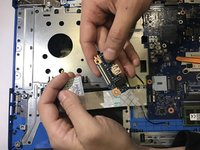
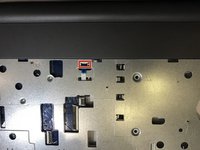
    • Use a Phillips #0 screwdriver to remove the 5mm screw that secures the I/O board to the palm-rest assembly.

  25. Dell Inspiron 17-5755 Motherboard Replacement: crwdns2935265:025crwdnd2935265:01crwdnd2935265:03crwdne2935265:0 Dell Inspiron 17-5755 Motherboard Replacement: crwdns2935265:025crwdnd2935265:02crwdnd2935265:03crwdne2935265:0 Dell Inspiron 17-5755 Motherboard Replacement: crwdns2935265:025crwdnd2935265:03crwdnd2935265:03crwdne2935265:0
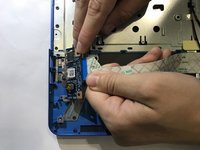
    • Lift the I/O board and turn it over.

    • Afterwards, lift the ZIF latch and disconnect the I/O-board cable from the I/O board.

  26. Dell Inspiron 17-5755 Motherboard Replacement: crwdns2935265:026crwdnd2935265:01crwdnd2935265:03crwdne2935265:0 Dell Inspiron 17-5755 Motherboard Replacement: crwdns2935265:026crwdnd2935265:02crwdnd2935265:03crwdne2935265:0 Dell Inspiron 17-5755 Motherboard Replacement: crwdns2935265:026crwdnd2935265:03crwdnd2935265:03crwdne2935265:0
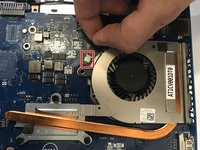
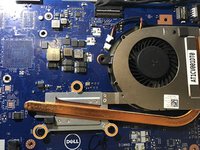
    • Disconnect the fan cable from the motherboard.

    • Use a Phillips #0 screwdriver to remove the heat-sink screws in sequential order, as indicated by the numbers on the heat-sink assembly.

    • Afterwards lift the heat-sink assembly off the motherboard.

  27. Dell Inspiron 17-5755 Motherboard Replacement: crwdns2935265:027crwdnd2935265:01crwdnd2935265:03crwdne2935265:0 Dell Inspiron 17-5755 Motherboard Replacement: crwdns2935265:027crwdnd2935265:02crwdnd2935265:03crwdne2935265:0 Dell Inspiron 17-5755 Motherboard Replacement: crwdns2935265:027crwdnd2935265:03crwdnd2935265:03crwdne2935265:0
    • Turn the computer over and open the display as far as possible.

    • Lift the latches for the power button board cable and disconnect it along with the touchpad cable from the motherboard.

  28. Dell Inspiron 17-5755 Motherboard Replacement: crwdns2935265:028crwdnd2935265:01crwdnd2935265:01crwdne2935265:0
    • Close the display and turn the computer over.

    • Proceed to lift the latch which secures the ZIF display cable to the motherboard.

    • Disconnect the display cable from the motherboard.

  29. Dell Inspiron 17-5755 Motherboard Replacement: crwdns2935265:029crwdnd2935265:01crwdnd2935265:02crwdne2935265:0 Dell Inspiron 17-5755 Motherboard Replacement: crwdns2935265:029crwdnd2935265:02crwdnd2935265:02crwdne2935265:0
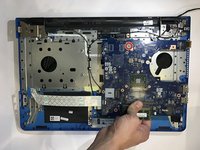
    • Use a Phillips# 0 screwdriver to remove the 3mm screw that secures the motherboard to the palm-rest assembly.

    • Afterwards, carefully peel the I/O board cable off the palm-rest assembly.

  30. Dell Inspiron 17-5755 Motherboard Replacement: crwdns2935265:030crwdnd2935265:01crwdnd2935265:03crwdne2935265:0 Dell Inspiron 17-5755 Motherboard Replacement: crwdns2935265:030crwdnd2935265:02crwdnd2935265:03crwdne2935265:0 Dell Inspiron 17-5755 Motherboard Replacement: crwdns2935265:030crwdnd2935265:03crwdnd2935265:03crwdne2935265:0
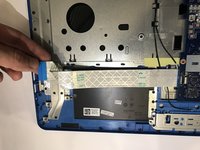
    • Turn the motherboard over.

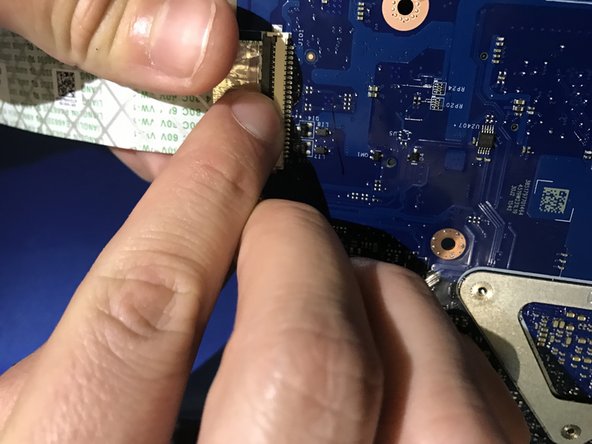
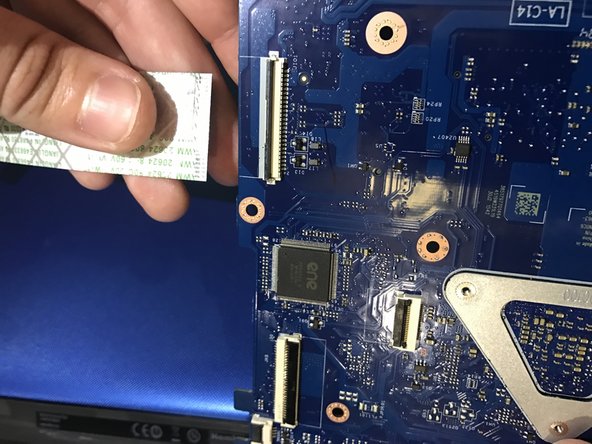
    • Lift the latch to disconnect the I/O-board cable from the motherboard.

  31. Dell Inspiron 17-5755 Motherboard Replacement: crwdns2935265:031crwdnd2935265:01crwdnd2935265:03crwdne2935265:0 Dell Inspiron 17-5755 Motherboard Replacement: crwdns2935265:031crwdnd2935265:02crwdnd2935265:03crwdne2935265:0 Dell Inspiron 17-5755 Motherboard Replacement: crwdns2935265:031crwdnd2935265:03crwdnd2935265:03crwdne2935265:0
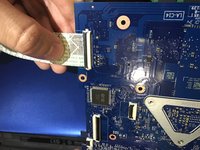
    • Disconnect the power-adapter port cable from the motherboard.

    • Afterwards you may safely remove the motherboard from the laptop.

crwdns2915888:0crwdne2915888:0

To reassemble your device, follow these instructions in reverse order.

crwdns2935229:03crwdne2935229:0

Jeff

crwdns2935283:002/15/17crwdne2935283:0

385 crwdns2915208:0crwdne2915208:0

crwdns2935297:03crwdne2935297:0

crwdns2915084:0crwdne2915084:0

USF Tampa, Team S6-G1, Lacy Spring 2017 crwdns2935289:0USF Tampa, Team S6-G1, Lacy Spring 2017crwdne2935289:0

USFT-LACY-S17S6G1

crwdns2931471:03crwdne2931471:0

crwdns2935297:05crwdne2935297:0

crwdns2944067:00crwdne2944067:0

crwdns2917038:0crwdne2917038:0

crwdns2936625:0crwdne2936625:0:

crwdns2936751:024crwdne2936751:0 0

crwdns2936753:07crwdne2936753:0 1

crwdns2936753:030crwdne2936753:0 5

crwdns2942667:0crwdne2942667:0 2,367