crwdns2915892:0crwdne2915892:0
If you are dealing with issues like network stability or even network failure on your Dell Inspiron 16-7610 laptop, follow this guide to replace the Wi-Fi card in the laptop. A new network card should improve the Wi-Fi performance when compared to the older card.
Before beginning this repair, power off your laptop, unplug from the AC adapter, and unplug the battery from the motherboard.
crwdns2942213:0crwdne2942213:0
-
-
Flip the device over, so the backside is facing up.
-
Use a Phillips #00 screwdriver to remove four 4.00 mm screws.
-
Use the Phillips #00 screwdriver to unscrew or loosen two captive screws at the right and left corner near the hinges.
-
Three of the screws are dummy screws, only screwed into retainers. They are not holding anything in and can be left in place for simplicity.
-
-
-
-Use the opening tool between the seams of the top and bottom case to pry the back case off of the laptop.
-
Undo the clips gently as you pry the back of the device to avoid breaking them when removing the back case.
-
Remove the back case from the device.
-
-
-
-
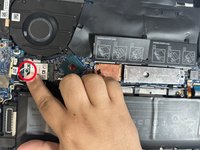
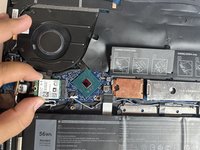
Use a Phillips #00 screwdriver to remove the screw that secures the Wi-Fi card bracket to the system board.
-
Lift the Wi-Fi card bracket off of the Wi-Fi card.
-
-
crwdns2935267:0crwdne2935267:0Tweezers$4.99
-
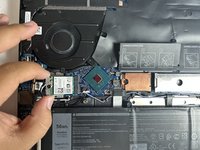
Slide a thin, ESD-safe pry tool or tweezers under the wire until it's snug against the connector, and pry straight up from the board to disconnect the coaxial cables from the Wi-Fi card.
-
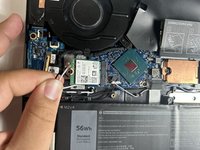
Slide the Wi-Fi card from the slot to remove it from the device.
-


To reassemble your device, follow these instructions in reverse order.

crwdns2935287:0crwdne2935287:0

Gateway, Team 1-3, Pee Spring 2023 crwdns2935289:0Gateway, Team 1-3, Pee Spring 2023crwdne2935289:0
GCC-PEE-S23S1G3
crwdns2931471:04crwdne2931471:0
crwdns2935297:06crwdne2935297:0