crwdns2933423:0crwdne2933423:0

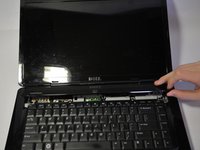
Dell Inspiron 1545 Display Replacement

crwdns2942213:0crwdne2942213:0

  1. Dell Inspiron 1545 Display Replacement, Battery: crwdns2935265:01crwdnd2935265:01crwdnd2935265:01crwdne2935265:0
    • Before attempting to remove the battery ensure that the laptop is disconnected from all power sources and turned off.

    • Turn the laptop over to its back.

  2. Dell Inspiron 1545 Display Replacement: crwdns2935265:02crwdnd2935265:01crwdnd2935265:01crwdne2935265:0
    • Slide the release latch while simultaneously pulling backwards on the battery.

  3. Dell Inspiron 1545 Display Replacement: crwdns2935265:03crwdnd2935265:01crwdnd2935265:01crwdne2935265:0
    • Slide the battery out of the battery bay.

  4. Dell Inspiron 1545 Display Replacement, Center Control Cover: crwdns2935265:04crwdnd2935265:01crwdnd2935265:01crwdne2935265:0
    • After removing the battery, remove the two screws (3mm Phillips #1) beneath it. These screws hold the Center Control Cover in place.

  5. Dell Inspiron 1545 Display Replacement: crwdns2935265:05crwdnd2935265:01crwdnd2935265:01crwdne2935265:0
    • Flip the laptop over to the front and open the display as far as possible.

  6. Dell Inspiron 1545 Display Replacement: crwdns2935265:06crwdnd2935265:01crwdnd2935265:03crwdne2935265:0 Dell Inspiron 1545 Display Replacement: crwdns2935265:06crwdnd2935265:02crwdnd2935265:03crwdne2935265:0 Dell Inspiron 1545 Display Replacement: crwdns2935265:06crwdnd2935265:03crwdnd2935265:03crwdne2935265:0
    • The Center Control Cover is VERY fragile, be careful when using prying tools.

    • Pry the Center Control Cover from the laptop. On the right there is a small divot, it is advised that you start removing the panel from here.

    • Carefully lift the Center Control Cover away from the laptop.

  7. Dell Inspiron 1545 Display Replacement, Keyboard: crwdns2935265:07crwdnd2935265:01crwdnd2935265:01crwdne2935265:0
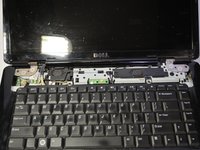
    • Remove the two screws (5mm Phillips #1) at the top of the keyboard.

  8. Dell Inspiron 1545 Display Replacement: crwdns2935265:08crwdnd2935265:01crwdnd2935265:01crwdne2935265:0
    • Slide the keyboard out and away from the laptop and lift it up to access the keyboard connector.

    • Do not pull hard on the keyboard while removing it, you may damage the keyboard or the keyboard connector.

  9. Dell Inspiron 1545 Display Replacement: crwdns2935265:09crwdnd2935265:01crwdnd2935265:01crwdne2935265:0
    • Lift the connector latch that secures the keyboard cable to the connector on the motherboard and remove the cable.

  10. Dell Inspiron 1545 Display Replacement: crwdns2935265:010crwdnd2935265:01crwdnd2935265:01crwdne2935265:0
    • Lift the keyboard up and away from the laptop.

  11. Dell Inspiron 1545 Display Replacement, Display: crwdns2935265:011crwdnd2935265:01crwdnd2935265:01crwdne2935265:0
    • Remove the two screws (5.5mm, Phillips #1) from the laptop base.

  12. Dell Inspiron 1545 Display Replacement: crwdns2935265:012crwdnd2935265:01crwdnd2935265:01crwdne2935265:0
    • Remove black and white wires from the WLAN that lead to the display by pulling straight up.

    • Unwind the wires so they can be freely pulled through in the next step.

  13. Dell Inspiron 1545 Display Replacement: crwdns2935265:013crwdnd2935265:01crwdnd2935265:01crwdne2935265:0
    • Turn the laptop over to its standard position.

    • Disconnect the Wed cable and Camera1 cable from the respective Motherboard connectors as marked. Unsecure the wires so they are loose.

    • Pull the black and white wires previously connected to the WLAN through the hole.

  14. Dell Inspiron 1545 Display Replacement: crwdns2935265:014crwdnd2935265:01crwdnd2935265:01crwdne2935265:0
    • Remove the Camera1 cable, the Wed cable, and the black and white wires from the routing guides.

    • Remove the four screws (5mm Phillips #1) (two on either side) that secure the display assembly.

  15. Dell Inspiron 1545 Display Replacement: crwdns2935265:015crwdnd2935265:01crwdnd2935265:01crwdne2935265:0
    • Lift the display assembly off the computer.

crwdns2915888:0crwdne2915888:0

To reassemble your device, follow these instructions in reverse order.

crwdns2935229:010crwdne2935229:0

Nathan Lemay

crwdns2935283:004/16/14crwdne2935283:0

3.052 crwdns2915208:0crwdne2915208:0

crwdns2935297:015crwdne2935297:0

crwdns2915084:0crwdne2915084:0

Cal Poly, Team 9-14, Regan Spring 2014 crwdns2935289:0Cal Poly, Team 9-14, Regan Spring 2014crwdne2935289:0

CPSU-REGAN-S14S9G14

crwdns2931471:04crwdne2931471:0

crwdns2935297:015crwdne2935297:0

crwdns2944067:03crwdne2944067:0

AWESOME, but how to know if display is faulty or some issue in the other device causing blank screen

Kumar Bhrigu - crwdns2934203:0crwdne2934203:0

put it back toghther, then plug in a external monitor

Feyrowan -

crwdns2917038:0crwdne2917038:0

crwdns2936625:0crwdne2936625:0:

crwdns2936751:024crwdne2936751:0 1

crwdns2936753:07crwdne2936753:0 5

crwdns2936753:030crwdne2936753:0 26

crwdns2942667:0crwdne2942667:0 5,523