crwdns2933423:0crwdne2933423:0

Dell Inspiron 1525 Heat Sink Replacement

crwdns2942213:0crwdne2942213:0

  1. Dell Inspiron 1525 Heat Sink Replacement, Battery: crwdns2935265:01crwdnd2935265:01crwdnd2935265:01crwdne2935265:0
    • Locate the battery release switch on the bottom of the laptop.

  2. Dell Inspiron 1525 Heat Sink Replacement: crwdns2935265:02crwdnd2935265:01crwdnd2935265:02crwdne2935265:0 Dell Inspiron 1525 Heat Sink Replacement: crwdns2935265:02crwdnd2935265:02crwdnd2935265:02crwdne2935265:0
    • Slide the battery release switch away from the lock symbol until you hear the battery click.

    • Slide the battery towards the back of the laptop until it comes free.

  3. Dell Inspiron 1525 Heat Sink Replacement, Bottom Cover: crwdns2935265:03crwdnd2935265:01crwdnd2935265:02crwdne2935265:0 Dell Inspiron 1525 Heat Sink Replacement, Bottom Cover: crwdns2935265:03crwdnd2935265:02crwdnd2935265:02crwdne2935265:0
    • Remove/loosen the eight 4.80 mm Phillips #1 screws securing the bottom panel.

    • The screws may only need to be loosened, as they are generally retained by plastic washers.

    • Remove the bottom panel.

  4. Dell Inspiron 1525 Heat Sink Replacement, Heat Sink: crwdns2935265:04crwdnd2935265:01crwdnd2935265:03crwdne2935265:0 Dell Inspiron 1525 Heat Sink Replacement, Heat Sink: crwdns2935265:04crwdnd2935265:02crwdnd2935265:03crwdne2935265:0 Dell Inspiron 1525 Heat Sink Replacement, Heat Sink: crwdns2935265:04crwdnd2935265:03crwdnd2935265:03crwdne2935265:0
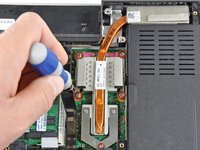
    • Loosen the five #1 Phillips screws securing the heat sink and clean it with compressed air

    • These screws are attached to the heat sink assembly.

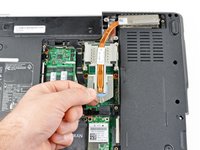
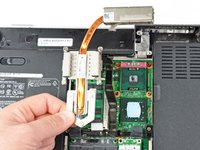
    • Gently lift the heat sink from side indicated in the picture.

    • The heat sink may feel like it is glued to the chips because of the thermal paste. Gently wiggle the heat sink back and forth to help break it free.

    • Be sure to thoroughly clean off the old thermal paste and apply new thermal paste before reinstalling the heat sink. Follow our thermal paste application guide for detailed instructions.

crwdns2915888:0crwdne2915888:0

To reassemble your device, follow these instructions in reverse order.

crwdns2935229:05crwdne2935229:0

crwdns2944067:00crwdne2944067:0

crwdns2917038:0crwdne2917038:0

crwdns2936625:0crwdne2936625:0:

crwdns2936751:024crwdne2936751:0 1

crwdns2936753:07crwdne2936753:0 9

crwdns2936753:030crwdne2936753:0 14

crwdns2942667:0crwdne2942667:0 7,859