crwdns2933423:0crwdne2933423:0

Dell Inspiron 1521 Display Assembly Replacement

crwdns2942213:0crwdne2942213:0

  1. Dell Inspiron 1521 Display Assembly Replacement, Battery: crwdns2935265:01crwdnd2935265:01crwdnd2935265:01crwdne2935265:0
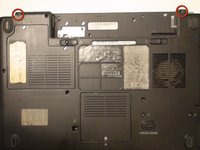
    • Rotate the laptop so its bottom is facing up.

  2. Dell Inspiron 1521 Display Assembly Replacement: crwdns2935265:02crwdnd2935265:01crwdnd2935265:03crwdne2935265:0 Dell Inspiron 1521 Display Assembly Replacement: crwdns2935265:02crwdnd2935265:02crwdnd2935265:03crwdne2935265:0 Dell Inspiron 1521 Display Assembly Replacement: crwdns2935265:02crwdnd2935265:03crwdnd2935265:03crwdne2935265:0
    • Identify the lock mechanisms holding the battery in place.

    • Slide each button outward with your fingers to disengage the battery.

    • Pull the battery off with your hand to separate it from the laptop.

  3. Dell Inspiron 1521 Display Assembly Replacement, Keyboard: crwdns2935265:03crwdnd2935265:01crwdnd2935265:03crwdne2935265:0 Dell Inspiron 1521 Display Assembly Replacement, Keyboard: crwdns2935265:03crwdnd2935265:02crwdnd2935265:03crwdne2935265:0 Dell Inspiron 1521 Display Assembly Replacement, Keyboard: crwdns2935265:03crwdnd2935265:03crwdnd2935265:03crwdne2935265:0
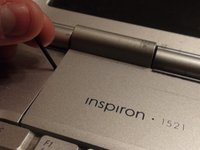
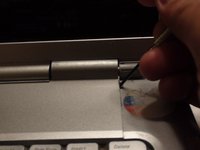
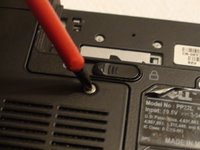
    • Find the two small indentations of the sides of the panel covering the power button.

    • Pry up both sides of the panel by sticking the plastic opener tool in each indentation and prying up.

  4. Dell Inspiron 1521 Display Assembly Replacement: crwdns2935265:04crwdnd2935265:01crwdnd2935265:01crwdne2935265:0
    • Now that the panel is loose simply pull the panel off with your hand.

  5. Dell Inspiron 1521 Display Assembly Replacement: crwdns2935265:05crwdnd2935265:01crwdnd2935265:03crwdne2935265:0 Dell Inspiron 1521 Display Assembly Replacement: crwdns2935265:05crwdnd2935265:02crwdnd2935265:03crwdne2935265:0 Dell Inspiron 1521 Display Assembly Replacement: crwdns2935265:05crwdnd2935265:03crwdnd2935265:03crwdne2935265:0
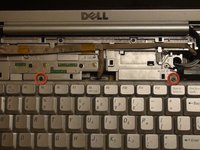
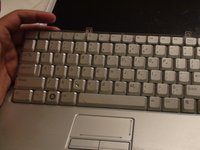
    • Locate the two 5 mm Phillips #1 screws holding down the keyboard that were underneath the panel.

    • Remove these screws with a Phillips #1 screwdriver.

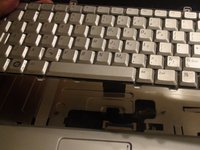
    • With the screws removed pull the keyboard up with your hand.

  6. Dell Inspiron 1521 Display Assembly Replacement: crwdns2935265:06crwdnd2935265:01crwdnd2935265:03crwdne2935265:0 Dell Inspiron 1521 Display Assembly Replacement: crwdns2935265:06crwdnd2935265:02crwdnd2935265:03crwdne2935265:0 Dell Inspiron 1521 Display Assembly Replacement: crwdns2935265:06crwdnd2935265:03crwdnd2935265:03crwdne2935265:0
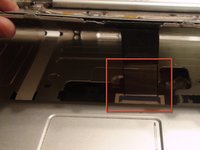
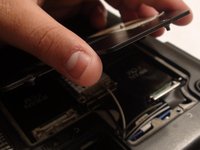
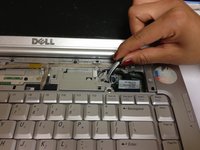
    • Locate the connector that links the keyboard to the laptop.

    • Gently pull the connector toward the screen of the laptop with your figers to disconnect it.

  7. Dell Inspiron 1521 Display Assembly Replacement, Display Assembly: crwdns2935265:07crwdnd2935265:01crwdnd2935265:03crwdne2935265:0 Dell Inspiron 1521 Display Assembly Replacement, Display Assembly: crwdns2935265:07crwdnd2935265:02crwdnd2935265:03crwdne2935265:0 Dell Inspiron 1521 Display Assembly Replacement, Display Assembly: crwdns2935265:07crwdnd2935265:03crwdnd2935265:03crwdne2935265:0
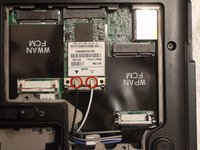
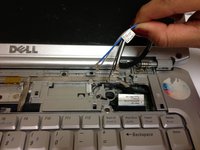
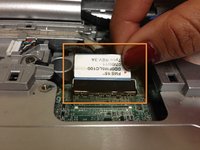
    • Locate the two Phillips #1 screws holding the Wireless Local Area Network (WLAN) panel in place.

    • Remove these two screws with a Phillips #1 screwdriver.

    • Remove the WLAN panel by pulling it up with your hand.

  8. Dell Inspiron 1521 Display Assembly Replacement: crwdns2935265:08crwdnd2935265:01crwdnd2935265:03crwdne2935265:0 Dell Inspiron 1521 Display Assembly Replacement: crwdns2935265:08crwdnd2935265:02crwdnd2935265:03crwdne2935265:0 Dell Inspiron 1521 Display Assembly Replacement: crwdns2935265:08crwdnd2935265:03crwdnd2935265:03crwdne2935265:0
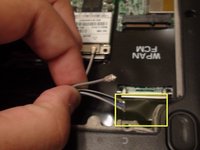
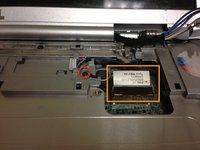
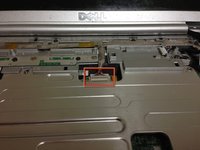
    • Disconnect the black and white wires attached to the WLAN card by pulling up on the connectors with your fingers.

    • During reassembly, the black and white wires reconnect to the WLAN card near the black and white triangles, respectively.

    • Remove the remaining wires from their protective sleeve by hand.

    • The wires in the sleeve are only used in other Dell laptop models. During reassembly they do not connect to anything so just place them back into the sleeve.

  9. Dell Inspiron 1521 Display Assembly Replacement: crwdns2935265:09crwdnd2935265:01crwdnd2935265:02crwdne2935265:0 Dell Inspiron 1521 Display Assembly Replacement: crwdns2935265:09crwdnd2935265:02crwdnd2935265:02crwdne2935265:0
    • Pull the wires that you disconnected in the previous step through the hole in the top of the laptop.

  10. Dell Inspiron 1521 Display Assembly Replacement: crwdns2935265:010crwdnd2935265:01crwdnd2935265:03crwdne2935265:0 Dell Inspiron 1521 Display Assembly Replacement: crwdns2935265:010crwdnd2935265:02crwdnd2935265:03crwdne2935265:0 Dell Inspiron 1521 Display Assembly Replacement: crwdns2935265:010crwdnd2935265:03crwdnd2935265:03crwdne2935265:0
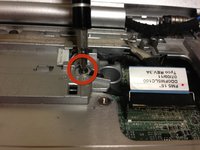
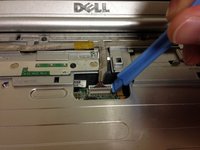
    • Detach the Phillips #1 grounding screw with a Phillips #1 screwdriver.

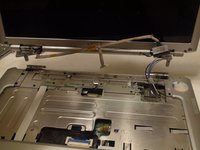
    • Disconnect the display cable by pulling up on the rectangular tab with your fingers.

  11. Dell Inspiron 1521 Display Assembly Replacement: crwdns2935265:011crwdnd2935265:01crwdnd2935265:03crwdne2935265:0 Dell Inspiron 1521 Display Assembly Replacement: crwdns2935265:011crwdnd2935265:02crwdnd2935265:03crwdne2935265:0 Dell Inspiron 1521 Display Assembly Replacement: crwdns2935265:011crwdnd2935265:03crwdnd2935265:03crwdne2935265:0
    • When disconnecting the camera/microphone cable, pull up by the white plug. Pulling on the cable itself can damage it.

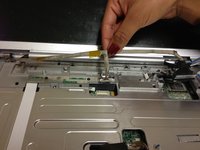
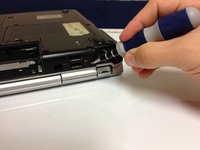
    • Disconnect the camera/microphone cable by prying it upward with the plastic opener tool.

    • Separate the camera/microphone cable from the case by pulling it up with your fingers.

  12. Dell Inspiron 1521 Display Assembly Replacement: crwdns2935265:012crwdnd2935265:01crwdnd2935265:03crwdne2935265:0 Dell Inspiron 1521 Display Assembly Replacement: crwdns2935265:012crwdnd2935265:02crwdnd2935265:03crwdne2935265:0 Dell Inspiron 1521 Display Assembly Replacement: crwdns2935265:012crwdnd2935265:03crwdnd2935265:03crwdne2935265:0
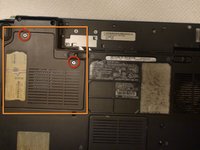
    • Remove the two 10 mm Phillips #1 screws from the bottom of the laptop that attach the lid assembly to the laptop with a Phillips #1 screwdriver.

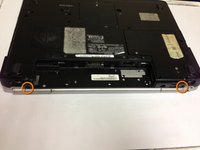
    • Remove the two 10 mm Phillips #1 screws from the back of the laptop that also attach the lid assembly to the laptop with a Phillips #1 screwdriver.

  13. Dell Inspiron 1521 Display Assembly Replacement: crwdns2935265:013crwdnd2935265:01crwdnd2935265:02crwdne2935265:0 Dell Inspiron 1521 Display Assembly Replacement: crwdns2935265:013crwdnd2935265:02crwdnd2935265:02crwdne2935265:0
    • There is a risk of dropping the lid or base of the laptop, or damaging cables. Make sure no cables are still attached.

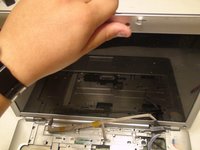
    • Remove the lid by pulling it up from the base of the laptop with both hands.

crwdns2915888:0crwdne2915888:0

To reassemble your device, follow these instructions in reverse order.

Christopher McCormack

crwdns2935283:009/27/12crwdne2935283:0

42 crwdns2915208:0crwdne2915208:0

crwdns2935297:02crwdne2935297:0

crwdns2915084:0crwdne2915084:0

Cal Poly, Team 15-47, Forte Fall 2012 crwdns2935289:0Cal Poly, Team 15-47, Forte Fall 2012crwdne2935289:0

CPSU-FORTE-F12S15G47

crwdns2931471:05crwdne2931471:0

crwdns2935297:09crwdne2935297:0

crwdns2944067:00crwdne2944067:0

crwdns2917038:0crwdne2917038:0

crwdns2936625:0crwdne2936625:0:

crwdns2936751:024crwdne2936751:0 0

crwdns2936753:07crwdne2936753:0 0

crwdns2936753:030crwdne2936753:0 13

crwdns2942667:0crwdne2942667:0 2,122