crwdns2933423:0crwdne2933423:0

Dell Inspiron 15-5559 Hard Drive Replacement

crwdns2942213:0crwdne2942213:0

  1. Dell Inspiron 15-5559 Hard Drive Replacement, Back Panel: crwdns2935265:01crwdnd2935265:01crwdnd2935265:02crwdne2935265:0 Dell Inspiron 15-5559 Hard Drive Replacement, Back Panel: crwdns2935265:01crwdnd2935265:02crwdnd2935265:02crwdne2935265:0
    • Use a Phillips #1 screwdriver to remove the two 2.5x8mm screws on the back panel.

  2. Dell Inspiron 15-5559 Hard Drive Replacement: crwdns2935265:02crwdnd2935265:01crwdnd2935265:02crwdne2935265:0 Dell Inspiron 15-5559 Hard Drive Replacement: crwdns2935265:02crwdnd2935265:02crwdnd2935265:02crwdne2935265:0
    • Place the plastic spudger in the slot. Using the flat side of the spudger pry the back panel upward and off.

    • Do not be afraid to use a bit of muscle, as the panel does not come off without some force.

  3. Dell Inspiron 15-5559 Hard Drive Replacement, Hard Drive: crwdns2935265:03crwdnd2935265:01crwdnd2935265:03crwdne2935265:0 Dell Inspiron 15-5559 Hard Drive Replacement, Hard Drive: crwdns2935265:03crwdnd2935265:02crwdnd2935265:03crwdne2935265:0 Dell Inspiron 15-5559 Hard Drive Replacement, Hard Drive: crwdns2935265:03crwdnd2935265:03crwdnd2935265:03crwdne2935265:0
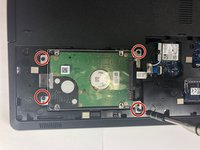
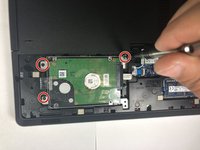
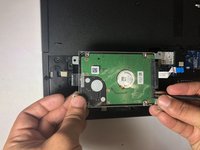
    • Remove each of the four (4) 2.5x8mm screws that anchor the hard drive using a Phillips #1 screwdriver.

  4. Dell Inspiron 15-5559 Hard Drive Replacement: crwdns2935265:04crwdnd2935265:01crwdnd2935265:01crwdne2935265:0
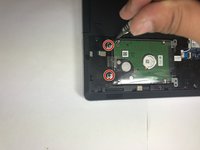
    • Use the plastic spudger to remove the hard drive conductive tape by lifting the black clasp holding it down, then pulling the conductive tape toward the left to remove it.

    • It does not take much force to remove the conductive tape. Remove it gently so that you do not damage it.

  5. Dell Inspiron 15-5559 Hard Drive Replacement: crwdns2935265:05crwdnd2935265:01crwdnd2935265:02crwdne2935265:0 Dell Inspiron 15-5559 Hard Drive Replacement: crwdns2935265:05crwdnd2935265:02crwdnd2935265:02crwdne2935265:0
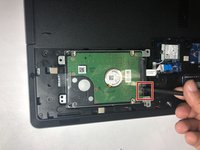
    • Place the plastic spudger underneath the hard drive at the indicated position.

    • Use the spudger along with your other hand to gently remove the hard drive.

crwdns2915888:0crwdne2915888:0

To reassemble your device, follow these instructions in reverse order.

crwdns2935229:04crwdne2935229:0

Kyla Ward

crwdns2935283:003/19/18crwdne2935283:0

649 crwdns2915208:0crwdne2915208:0

crwdns2935297:04crwdne2935297:0

crwdns2915084:0crwdne2915084:0

Baylor, Team S5-G5, Williams Spring 2018 crwdns2935289:0Baylor, Team S5-G5, Williams Spring 2018crwdne2935289:0

BU-WILLIAMS-S18S5G5

crwdns2931471:03crwdne2931471:0

crwdns2935297:05crwdne2935297:0

crwdns2947412:02crwdne2947412:0

The blue part came off is that important?

walterandradeconde - crwdns2934203:0crwdne2934203:0

can i put this in a harddrive enclosure?

chiggly 123 - crwdns2934203:0crwdne2934203:0

crwdns2917038:0crwdne2917038:0

crwdns2936625:0crwdne2936625:0:

crwdns2936751:024crwdne2936751:0 1

crwdns2936753:07crwdne2936753:0 5

crwdns2936753:030crwdne2936753:0 17

crwdns2942667:0crwdne2942667:0 5,509