crwdns2915892:0crwdne2915892:0
In this guide, you will learn how to replace a Dell Inspiron 15-3542 LCD.
The screen on a laptop serves as an output device for the operating system. One of the ways that a screen is damaged is when you see multiple color lines on the screen. The most common cause of screen damage occurs from dropping the laptop. Applying too much pressure on the screen will also cause the screen to break. Therefore, always make sure your laptop screen is handled with care.
crwdns2942213:0crwdne2942213:0
-
-
Power off the laptop.
-
Flip the laptop over so the bottom is facing up.
-
Slide the right button to the unlock symbol.
-
Slide the left button to the other unlock symbol.
-
While holding the left button, use your right finger to raise the battery up from the laptop.
-
-
-
Flip the laptop over so the top is facing up and open the laptop.
-
Using both hands, unsnap the tabs around the perimeter of the bezel and remove it from the laptop.
-
-
-
-
Remove the four screws from the corners of the LCD using a Phillips screwdriver.
-
Lift the screen up and place it on the keyboard.
-
-
-
Gently peel off the yellow clear tape securing the video connector.
-
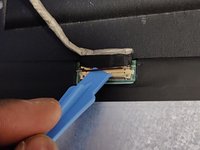
Use an opening tool to flip open the video connector bracket.
-
Disconnect the cable from the LCD screen and remove the LCD from the laptop.
-


To reassemble your device, follow these instructions in reverse order.
To reassemble your device, follow these instructions in reverse order.
crwdns2935221:0crwdne2935221:0
crwdns2935229:02crwdne2935229:0
crwdns2915084:0crwdne2915084:0

York University, Team S3-G48, Melo-Thaiss Fall 2020 crwdns2935289:0York University, Team S3-G48, Melo-Thaiss Fall 2020crwdne2935289:0
YORK-MELO-THAISS-F20S3G48
crwdns2934841:01crwdne2934841:0
crwdns2935303:01crwdne2935303:0