crwdns2933423:0crwdne2933423:0

Dell Inspiron 15 7579 Display Replacement

crwdns2942213:0crwdne2942213:0

  1. Dell Inspiron 15 7579 Display Replacement, Back Panel: crwdns2935265:01crwdnd2935265:01crwdnd2935265:01crwdne2935265:0
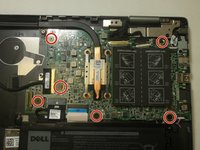
    • Remove the ten 7.9 mm screws with the Phillips PH0 screwdriver.

  2. Dell Inspiron 15 7579 Display Replacement: crwdns2935265:02crwdnd2935265:01crwdnd2935265:02crwdne2935265:0 Dell Inspiron 15 7579 Display Replacement: crwdns2935265:02crwdnd2935265:02crwdnd2935265:02crwdne2935265:0
    • Insert metal spudger into a gap in between the back panel and the back of the screen.

    • Pry off the back panel using the metal spudger as a lever, and remove the back panel by lifting the rest off by hand.

  3. Dell Inspiron 15 7579 Display Replacement, Fan: crwdns2935265:03crwdnd2935265:01crwdnd2935265:02crwdne2935265:0 Dell Inspiron 15 7579 Display Replacement, Fan: crwdns2935265:03crwdnd2935265:02crwdnd2935265:02crwdne2935265:0
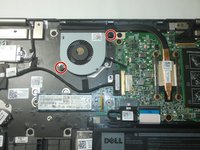
    • Remove the two 7.9 mm screws from the fan with a Phillips #0 screwdriver.

  4. Dell Inspiron 15 7579 Display Replacement: crwdns2935265:04crwdnd2935265:01crwdnd2935265:02crwdne2935265:0 Dell Inspiron 15 7579 Display Replacement: crwdns2935265:04crwdnd2935265:02crwdnd2935265:02crwdne2935265:0
    • Unplug the wires from the port.

    • Be sure to pull from the plastic connector, not the wires.

  5. Dell Inspiron 15 7579 Display Replacement: crwdns2935265:05crwdnd2935265:01crwdnd2935265:01crwdne2935265:0
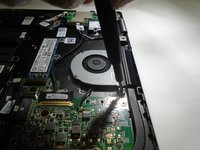
    • Carefully lift the fan out of the computer.

  6. Dell Inspiron 15 7579 Display Replacement, SSD M.2 Drive: crwdns2935265:06crwdnd2935265:01crwdnd2935265:01crwdne2935265:0
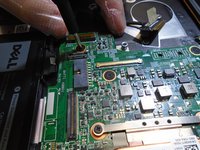
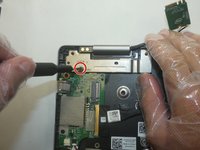
    • Remove the single 3.6 mm screw holding the left side of the M.2 SSD card with a Phillips PH0 screwdriver.

  7. Dell Inspiron 15 7579 Display Replacement: crwdns2935265:07crwdnd2935265:01crwdnd2935265:01crwdne2935265:0
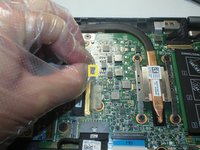
    • Gently pull out the SSD card at the angle it is relaxed in to remove it. It is easiest to do this by hand.

    • Be gentle when pulling the SSD card out. It should take little effort to get it to slide out properly.

  8. Dell Inspiron 15 7579 Display Replacement, Motherboard: crwdns2935265:08crwdnd2935265:01crwdnd2935265:02crwdne2935265:0 Dell Inspiron 15 7579 Display Replacement, Motherboard: crwdns2935265:08crwdnd2935265:02crwdnd2935265:02crwdne2935265:0
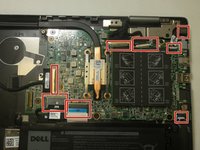
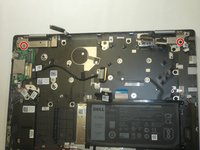
    • Remove the six 2.1 mm screws with the Phillips #0 screwdriver.

  9. Dell Inspiron 15 7579 Display Replacement: crwdns2935265:09crwdnd2935265:01crwdnd2935265:02crwdne2935265:0 Dell Inspiron 15 7579 Display Replacement: crwdns2935265:09crwdnd2935265:02crwdnd2935265:02crwdne2935265:0
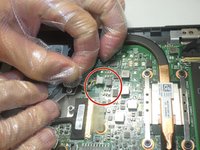
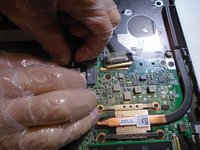
    • Unplug the eight ribbon cables connected to the motherboard.

  10. Dell Inspiron 15 7579 Display Replacement: crwdns2935265:010crwdnd2935265:01crwdnd2935265:01crwdne2935265:0
    • Lift the motherboard up from the side opposite of the external ports and remove it from the laptop.

  11. Dell Inspiron 15 7579 Display Replacement, Display: crwdns2935265:011crwdnd2935265:01crwdnd2935265:02crwdne2935265:0 Dell Inspiron 15 7579 Display Replacement, Display: crwdns2935265:011crwdnd2935265:02crwdnd2935265:02crwdne2935265:0
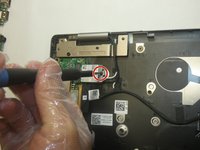
    • Remove the screw that holds the Wi-Fi card in place with a Phillips #0 screwdriver.

    • Disconnect the black and white coaxial cables from the Wi-Fi card.

    • Remove the Wi-Fi card from its port.

  12. Dell Inspiron 15 7579 Display Replacement: crwdns2935265:012crwdnd2935265:01crwdnd2935265:02crwdne2935265:0 Dell Inspiron 15 7579 Display Replacement: crwdns2935265:012crwdnd2935265:02crwdnd2935265:02crwdne2935265:0
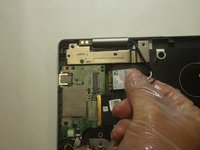
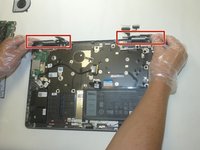
    • Remove the two screws from the metal plates with the Phillips #0 screwdriver.

  13. Dell Inspiron 15 7579 Display Replacement: crwdns2935265:013crwdnd2935265:01crwdnd2935265:03crwdne2935265:0 Dell Inspiron 15 7579 Display Replacement: crwdns2935265:013crwdnd2935265:02crwdnd2935265:03crwdne2935265:0 Dell Inspiron 15 7579 Display Replacement: crwdns2935265:013crwdnd2935265:03crwdnd2935265:03crwdne2935265:0
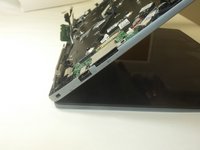
    • Lift up the two hinges perpendicularly to the board beneath it.

    • It may be difficult to lift up the hinges, so it may take some force to remove them.

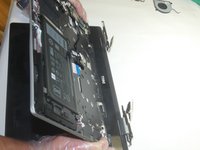
    • Lift up on the keyboard at an angle from the laptop and gently pull away from hinges.

crwdns2915888:0crwdne2915888:0

To reassemble your device, follow these instructions in reverse order.

Andrew Steven McNay

crwdns2935283:009/20/21crwdne2935283:0

97 crwdns2915208:0crwdne2915208:0

crwdns2935295:0crwdne2935295:0

crwdns2915084:0crwdne2915084:0

The Citadel Military College of South Carolina, Team 2-11, Eggleston Fall 2021 crwdns2935289:0The Citadel Military College of South Carolina, Team 2-11, Eggleston Fall 2021crwdne2935289:0

CMCSC-EGGLESTON-F21S2G11

crwdns2931471:03crwdne2931471:0

crwdns2935297:03crwdne2935297:0

crwdns2944067:00crwdne2944067:0

crwdns2917038:0crwdne2917038:0

crwdns2936625:0crwdne2936625:0:

crwdns2936751:024crwdne2936751:0 1

crwdns2936753:07crwdne2936753:0 10

crwdns2936753:030crwdne2936753:0 36

crwdns2942667:0crwdne2942667:0 1,042