crwdns2915892:0crwdne2915892:0
If your laptop is unresponsive or you have a consistently low battery life, we recommend starting with our troubleshooting guide. If those tips don't solve your problem, then follow this guide to replace your battery.
crwdns2942213:0crwdne2942213:0
-
-
Remove the ten 7.9 mm screws with the Phillips PH0 screwdriver.
-
-
-
Insert metal spudger into a gap in between the back panel and the back of the screen.
-
Pry off the back panel using the metal spudger as a lever, and remove the back panel by lifting the rest off by hand.
-
-
-
-
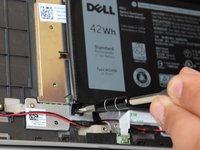
Remove the two 7.8 mm long screws on the left side of the battery with the Phillips #1 screwdriver.
-
-
-
Pull out the fabric clip that attaches the battery to the main board from the connector by hand.
-
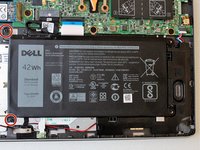
Remove the battery from the device.
-


To reassemble your device, follow these instructions in reverse order.
crwdns2935221:0crwdne2935221:0
crwdns2935229:010crwdne2935229:0
crwdns2935287:0crwdne2935287:0

Cal Poly, Team S24-G9, Maness Spring 2018 crwdns2935289:0Cal Poly, Team S24-G9, Maness Spring 2018crwdne2935289:0
CPSU-MANESS-S18S24G9
crwdns2931471:04crwdne2931471:0
crwdns2935297:06crwdne2935297:0
crwdns2947412:02crwdne2947412:0
Thanks! Very helpful and to the point!
You ARE TECHNICALLY missing one step however, removing the fabric ribbon from the old battery at the end. Yes, it seems like common sense but…
Anyways, thanks.
Thanks for the help, worked well.
Remember the connector needs to be removed from the old battery and re-installed in the new. I used a small slotted screwdriver.
A. Holness
June 7, 2020