crwdns2933423:0crwdne2933423:0

Dell Inspiron 14 5100 Power Adapter Port Replacement

crwdns2942213:0crwdne2942213:0

  1. Dell Inspiron 14 5100 Power Adapter Port Replacement, Dell Inspiron 14 5100 Disassembly: crwdns2935265:01crwdnd2935265:01crwdnd2935265:03crwdne2935265:0 Dell Inspiron 14 5100 Power Adapter Port Replacement, Dell Inspiron 14 5100 Disassembly: crwdns2935265:01crwdnd2935265:02crwdnd2935265:03crwdne2935265:0 Dell Inspiron 14 5100 Power Adapter Port Replacement, Dell Inspiron 14 5100 Disassembly: crwdns2935265:01crwdnd2935265:03crwdnd2935265:03crwdne2935265:0
    • Make sure to disconnect the power source to the device.

    • Remove nine screws securing the base cover of the laptop's keyboard assembly using the Phillips #0 screwdriver.

    • There are 2 sets of screws.

    • Remove the 3 captive screws.

    • Remove the 6M2*6 screws.

  2. Dell Inspiron 14 5100 Power Adapter Port Replacement: crwdns2935265:02crwdnd2935265:01crwdnd2935265:02crwdne2935265:0 Dell Inspiron 14 5100 Power Adapter Port Replacement: crwdns2935265:02crwdnd2935265:02crwdnd2935265:02crwdne2935265:0
    • Pry open the laptop to separate the base cover from the keyboard assembly.

    • You may use your fingertips or use plastic opening tools.

  3. Dell Inspiron 14 5100 Power Adapter Port Replacement, Power Adapter Port: crwdns2935265:03crwdnd2935265:01crwdnd2935265:02crwdne2935265:0 Dell Inspiron 14 5100 Power Adapter Port Replacement, Power Adapter Port: crwdns2935265:03crwdnd2935265:02crwdnd2935265:02crwdne2935265:0
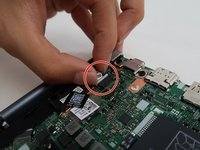
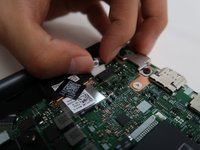
    • Disconnect the power-adapter port cable from the motherboard.

  4. Dell Inspiron 14 5100 Power Adapter Port Replacement: crwdns2935265:04crwdnd2935265:01crwdnd2935265:02crwdne2935265:0 Dell Inspiron 14 5100 Power Adapter Port Replacement: crwdns2935265:04crwdnd2935265:02crwdnd2935265:02crwdne2935265:0
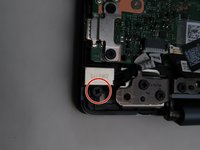
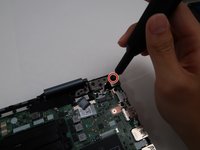
    • Remove the two screws securing the power adapter port to the keyboard assembly using the Phillips #0 screwdriver.

  5. Dell Inspiron 14 5100 Power Adapter Port Replacement: crwdns2935265:05crwdnd2935265:01crwdnd2935265:01crwdne2935265:0
    • Remove the power adapter port and remove it from the device.

crwdns2915888:0crwdne2915888:0

To reassemble your device, follow these instructions in reverse order.

crwdns2935229:02crwdne2935229:0

Ting-Hao Lao

crwdns2935283:009/17/19crwdne2935283:0

588 crwdns2915208:0crwdne2915208:0

crwdns2935297:05crwdne2935297:0

crwdns2915084:0crwdne2915084:0

Embry-Riddle Aeronautical University, Team S15-G2, Lamothe Fall 2019 crwdns2935289:0Embry-Riddle Aeronautical University, Team S15-G2, Lamothe Fall 2019crwdne2935289:0

ERAU-LAMOTHE-F19S15G2

crwdns2931471:04crwdne2931471:0

crwdns2935297:08crwdne2935297:0

crwdns2944067:00crwdne2944067:0

crwdns2917038:0crwdne2917038:0

crwdns2936625:0crwdne2936625:0:

crwdns2936751:024crwdne2936751:0 2

crwdns2936753:07crwdne2936753:0 5

crwdns2936753:030crwdne2936753:0 20

crwdns2942667:0crwdne2942667:0 3,066