crwdns2933423:0crwdne2933423:0

Dell Inspiron 13z 5323 Memory Module Replacement

  1. Dell Inspiron 13z 5323 Memory Module Replacement, Popping up the Memory Module: crwdns2935265:01crwdnd2935265:01crwdnd2935265:01crwdne2935265:0
    • WARNING: Before working inside your computer, read the safety information that shipped with your computer and follow the steps in "Before You Begin".

    • CAUTION: To prevent damage to the memory-module connector, do not use tools to spread the memory-module securing clips.

    • Close the display and turn the computer over.

    • Use your fingertips to carefully spread apart the securing clips on each end of the memory-module connector until the memory module pops up.

  2. Dell Inspiron 13z 5323 Memory Module Replacement, Removing the Memory Module: crwdns2935265:02crwdnd2935265:01crwdnd2935265:02crwdne2935265:0 Dell Inspiron 13z 5323 Memory Module Replacement, Removing the Memory Module: crwdns2935265:02crwdnd2935265:02crwdnd2935265:02crwdne2935265:0
    • Remove the memory module from the memory-module connector.

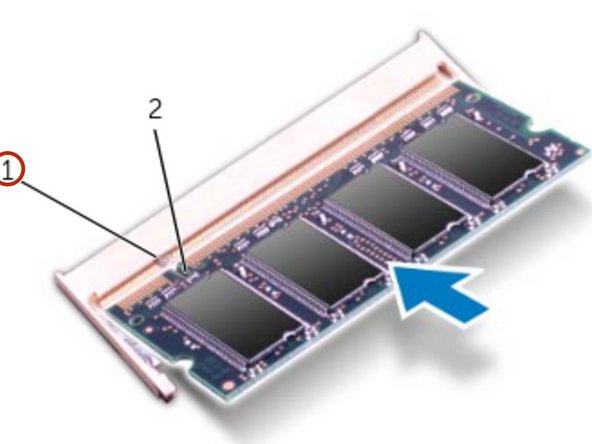
  3. Dell Inspiron 13z 5323 Memory Module Replacement, Align the Notch: crwdns2935265:03crwdnd2935265:01crwdnd2935265:02crwdne2935265:0 Dell Inspiron 13z 5323 Memory Module Replacement, Align the Notch: crwdns2935265:03crwdnd2935265:02crwdnd2935265:02crwdne2935265:0
    • CAUTION: If you need to install memory modules in two connectors, install a memory module in the connector labeled "DIMM A" before you install a memory module in the connector labeled "DIMM B."

    • Align the notch on the memory module with the tab on the memory-module connector.

  4. Dell Inspiron 13z 5323 Memory Module Replacement, Installing the Memory Module: crwdns2935265:04crwdnd2935265:01crwdnd2935265:01crwdne2935265:0
    • Slide the memory module firmly into the connector at a 45-degree angle, and press the memory module down until it clicks into place. If you do not hear the click, remove the memory module and reinstall it.

    • NOTE: If the memory module is not in stalled properly, the computer may not boot.

crwdns2915888:0crwdne2915888:0

To reassemble your device, follow these instructions in reverse order.

Terrence15

crwdns2935283:012/18/17crwdne2935283:0

79,585 crwdns2915208:0crwdne2915208:0

crwdns2935297:0441crwdne2935297:0

crwdns2915084:0crwdne2915084:0

RampUP America, Inc. crwdns2935289:0RampUP America, Inc.crwdne2935289:0

Community

crwdns2931471:043crwdne2931471:0

crwdns2935297:01,985crwdne2935297:0

crwdns2947412:00crwdne2947412:0

crwdns2917038:0crwdne2917038:0

crwdns2936625:0crwdne2936625:0:

crwdns2936751:024crwdne2936751:0 0

crwdns2936753:07crwdne2936753:0 1

crwdns2936753:030crwdne2936753:0 1

crwdns2942667:0crwdne2942667:0 152