crwdns2915892:0crwdne2915892:0
This guide provides step by step instructions to remove your Dell Inspiron 13- 7359 cooling fan. You will need a phillips head #0 screwdriver and a small plastic spudger.
crwdns2942213:0crwdne2942213:0
-
-
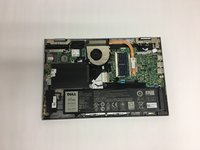
Flip your device over so the back cover is facing you.
-
Using a Phillips #0 Screwdriver, remove the ten 7mm screws holding the back cover in place.
-
-
-
Insert a plastic opening and run it along the edge of the back cover. Do this until the entire back cover can be removed.
-
-
-
-
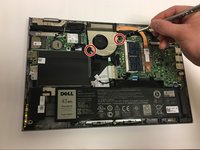
Unscrew and remove the 2 of the 7mm Phillips head screws holding the cooling fan in place.
-
-
-
Hold the cooling fan with one hand.
-
With the other hand, grab hold of the part of the copper heat sink that is attached to the cooling fan.
-
Carefully pull the cooling fan away from the attached part so that it becomes fully disconnected.
-


To reassemble your device, follow these instructions in reverse order.
To reassemble your device, follow these instructions in reverse order.
crwdns2935221:0crwdne2935221:0
crwdns2935229:02crwdne2935229:0
crwdns2915084:0crwdne2915084:0

Baylor, Team S1-G6, Johnson Spring 2018 crwdns2935289:0Baylor, Team S1-G6, Johnson Spring 2018crwdne2935289:0
BU-JOHNSON-S18S1G6
crwdns2931471:03crwdne2931471:0
crwdns2935297:05crwdne2935297:0