crwdns2915892:0crwdne2915892:0
This is a simple step-by-step guide on how to remove and replace a screen display for a Dell Inspiron 13-5368. You will need a Philips Head J-0 screwdriver and a pry tool in order to perform this task. This is a relatively easy task and will take about 8 minutes to complete.
crwdns2942213:0crwdne2942213:0
-
-
Remove the nine 6mm Phillips #0 screws that secure the back cover of the laptop.
-
-
-
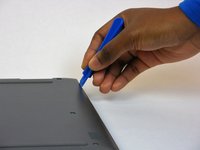
Use a spudger / pry tool to pry up and remove the back cover.
-
-
-
-
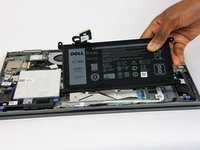
Remove the four 3mm Phillips #0 screws at the corners of the battery that secure it to the laptop.
-
-
-
Pull the battery cable's black tab towards the battery to disconnect it from the motherboard.
-
-
-
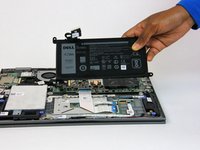
Lift the battery straight up out of the housing.
-
-
-
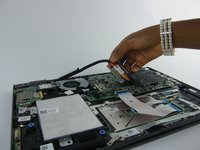
Unscrew the four screws securing the heatsink and remove it.
-
Remember to reapply a small amount of thermal paste, then screw the heatsink onto the motherboard in numberical order (i.e. 1, 2, 3, 4).
-


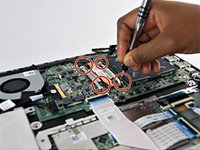
Remember to clean off any old thermal paste, then apply a small amount of new thermal paste (dime size will be fine). Screw the heatsink on in numerical order so the thermal paste is evenly distributed on the processor. To reassemble your device, follow these instructions in reverse order.
crwdns2935221:0crwdne2935221:0
crwdns2935227:0crwdne2935227:0
crwdns2935287:0crwdne2935287:0

USF Tampa, Team S14-G6, Boczar Fall 2017 crwdns2935289:0USF Tampa, Team S14-G6, Boczar Fall 2017crwdne2935289:0
USFT-BOCZAR-F17S14G6
crwdns2931471:04crwdne2931471:0
crwdns2935297:013crwdne2935297:0
crwdns2947410:01crwdne2947410:0
Is it normal for the heatsink to be loose right in front of the fan? The black part of the heatsink?