crwdns2933423:0crwdne2933423:0

Dell Inspiron 13 7378 Heat Sink Replacement

crwdns2942213:0crwdne2942213:0

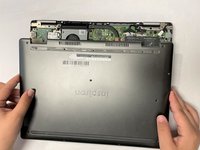
  1. Dell Inspiron 13 7378 Heat Sink Replacement, Back Cover: crwdns2935265:01crwdnd2935265:01crwdnd2935265:01crwdne2935265:0
    • Set the laptop with its underside facing up for improved accessibility.

  2. Dell Inspiron 13 7378 Heat Sink Replacement: crwdns2935265:02crwdnd2935265:01crwdnd2935265:02crwdne2935265:0 Dell Inspiron 13 7378 Heat Sink Replacement: crwdns2935265:02crwdnd2935265:02crwdnd2935265:02crwdne2935265:0
    • Using a Phillips #00 screwdriver, extract the nine 3 mm screws located on the back of the laptop.

  3. Dell Inspiron 13 7378 Heat Sink Replacement: crwdns2935265:03crwdnd2935265:01crwdnd2935265:03crwdne2935265:0 Dell Inspiron 13 7378 Heat Sink Replacement: crwdns2935265:03crwdnd2935265:02crwdnd2935265:03crwdne2935265:0 Dell Inspiron 13 7378 Heat Sink Replacement: crwdns2935265:03crwdnd2935265:03crwdnd2935265:03crwdne2935265:0
    • Carefully pry open the back of the back of the laptop using opening picks.

    • Carefully raise and detach the back cover from the laptop.

    • Exercise caution to prevent damaging or cracking the device's back cover.

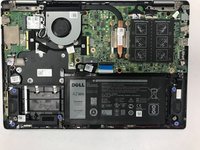
  4. Dell Inspiron 13 7378 Heat Sink Replacement, Heat Sink: crwdns2935265:04crwdnd2935265:01crwdnd2935265:01crwdne2935265:0
    • Carefully remove the four screws securing the heat sink by using a Phillips screwdriver.

  5. Dell Inspiron 13 7378 Heat Sink Replacement: crwdns2935265:05crwdnd2935265:01crwdnd2935265:02crwdne2935265:0 Dell Inspiron 13 7378 Heat Sink Replacement: crwdns2935265:05crwdnd2935265:02crwdnd2935265:02crwdne2935265:0
    • Check to see if the fan will obstruct the removal process and if so, remove the fan first before removing the heat sink to prevent any damage.

    • In the absence of any obstacles impeding the removal process, gently lift and extract the heat sink from its position.

  6. Dell Inspiron 13 7378 Heat Sink Replacement: crwdns2935265:06crwdnd2935265:01crwdnd2935265:01crwdne2935265:0
    • Before you install a new compatible cooling system, place a fresh coat of thermal paste in the center of where the previous cooling system used to be.

crwdns2915888:0crwdne2915888:0

Replace the back cover to complete the process.

crwdns2935229:03crwdne2935229:0

Javier Perez

crwdns2935283:002/08/22crwdne2935283:0

277 crwdns2915208:0crwdne2915208:0

crwdns2935297:02crwdne2935297:0

crwdns2915084:0crwdne2915084:0

Gateway, Team 1-3, Saknee Spring 2022 crwdns2935289:0Gateway, Team 1-3, Saknee Spring 2022crwdne2935289:0

GCC-SAKNEE-S22S1G3

crwdns2931471:05crwdne2931471:0

crwdns2935297:016crwdne2935297:0

crwdns2944067:00crwdne2944067:0

crwdns2917038:0crwdne2917038:0

crwdns2936625:0crwdne2936625:0:

crwdns2936751:024crwdne2936751:0 1

crwdns2936753:07crwdne2936753:0 5

crwdns2936753:030crwdne2936753:0 16

crwdns2942667:0crwdne2942667:0 287