crwdns2933423:0crwdne2933423:0

Dell Chromebook 3100 2-in-1 Display Replacement

crwdns2942213:0crwdne2942213:0

  1. Dell Chromebook 3100 2-in-1 Display Replacement, Back Cover: crwdns2935265:01crwdnd2935265:01crwdnd2935265:02crwdne2935265:0 Dell Chromebook 3100 2-in-1 Display Replacement, Back Cover: crwdns2935265:01crwdnd2935265:02crwdnd2935265:02crwdne2935265:0
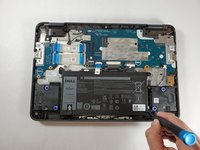
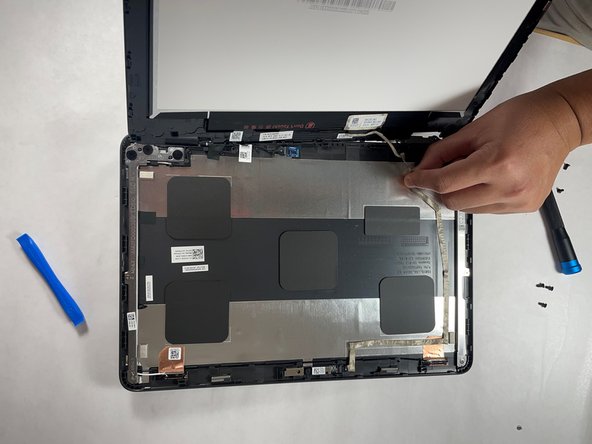
    • Using a Phillips #1 screwdriver, remove all nine of the 5 mm screws from the back cover.

  2. Dell Chromebook 3100 2-in-1 Display Replacement: crwdns2935265:02crwdnd2935265:01crwdnd2935265:02crwdne2935265:0 Dell Chromebook 3100 2-in-1 Display Replacement: crwdns2935265:02crwdnd2935265:02crwdnd2935265:02crwdne2935265:0
    • Use the opening tool to pry the back cover off of the device.

  3. Dell Chromebook 3100 2-in-1 Display Replacement, Battery: crwdns2935265:03crwdnd2935265:01crwdnd2935265:02crwdne2935265:0 Dell Chromebook 3100 2-in-1 Display Replacement, Battery: crwdns2935265:03crwdnd2935265:02crwdnd2935265:02crwdne2935265:0
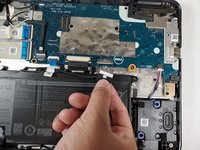
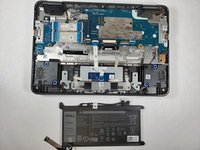
    • Disconnect the battery cable from the connector on the system board.

  4. Dell Chromebook 3100 2-in-1 Display Replacement: crwdns2935265:04crwdnd2935265:01crwdnd2935265:03crwdne2935265:0 Dell Chromebook 3100 2-in-1 Display Replacement: crwdns2935265:04crwdnd2935265:02crwdnd2935265:03crwdne2935265:0 Dell Chromebook 3100 2-in-1 Display Replacement: crwdns2935265:04crwdnd2935265:03crwdnd2935265:03crwdne2935265:0
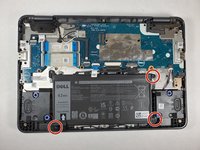
    • Using a Phillips #1 screwdriver, remove the three 4 mm screws that secure the battery.

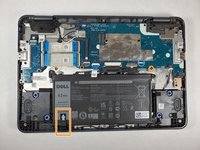
    • Remove the adhesive tape that secures the battery in place.

  5. Dell Chromebook 3100 2-in-1 Display Replacement: crwdns2935265:05crwdnd2935265:01crwdnd2935265:02crwdne2935265:0 Dell Chromebook 3100 2-in-1 Display Replacement: crwdns2935265:05crwdnd2935265:02crwdnd2935265:02crwdne2935265:0
    • Carefully remove the battery from the device.

  6. Dell Chromebook 3100 2-in-1 Display Replacement, Display: crwdns2935265:06crwdnd2935265:01crwdnd2935265:02crwdne2935265:0 Dell Chromebook 3100 2-in-1 Display Replacement, Display: crwdns2935265:06crwdnd2935265:02crwdnd2935265:02crwdne2935265:0
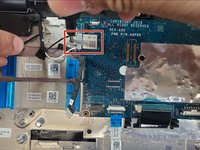
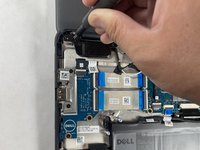
    • Remove the single 3 mm screw that secures the WLAN bracket to the system board using a Phillips #1 screwdriver.

    • Lift the WLAN bracket from the system board.

    • After lifting the bracket, carefully unplug the two coaxial cables.

  7. Dell Chromebook 3100 2-in-1 Display Replacement: crwdns2935265:07crwdnd2935265:01crwdnd2935265:01crwdne2935265:0
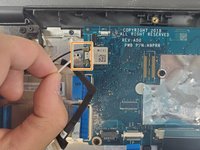
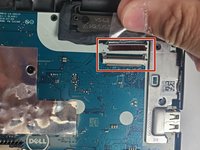
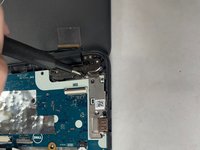
    • Remove the single 4 mm screw that secures the eDP bracket to the motherboard using a Phillips #1 screwdriver.

    • Remove the eDP bracket.

  8. Dell Chromebook 3100 2-in-1 Display Replacement: crwdns2935265:08crwdnd2935265:01crwdnd2935265:02crwdne2935265:0 Dell Chromebook 3100 2-in-1 Display Replacement: crwdns2935265:08crwdnd2935265:02crwdnd2935265:02crwdne2935265:0
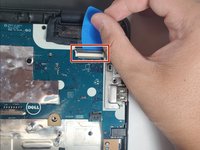
    • Disconnect the display cable from the motherboard by using a plastic opening pick.

  9. Dell Chromebook 3100 2-in-1 Display Replacement: crwdns2935265:09crwdnd2935265:01crwdnd2935265:01crwdne2935265:0
    • Open the system to 180 degrees and place the computer on a flat surface, with the display hinges facing up.

  10. Dell Chromebook 3100 2-in-1 Display Replacement: crwdns2935265:010crwdnd2935265:01crwdnd2935265:03crwdne2935265:0 Dell Chromebook 3100 2-in-1 Display Replacement: crwdns2935265:010crwdnd2935265:02crwdnd2935265:03crwdne2935265:0 Dell Chromebook 3100 2-in-1 Display Replacement: crwdns2935265:010crwdnd2935265:03crwdnd2935265:03crwdne2935265:0
    • Remove the three (on both hinges) 5 mm display hinge bracket screws that secure the display assembly to the system using a Phillips #1 screwdriver.

  11. Dell Chromebook 3100 2-in-1 Display Replacement: crwdns2935265:011crwdnd2935265:01crwdnd2935265:01crwdne2935265:0
    • Remove the display assembly from the system.

  12. Dell Chromebook 3100 2-in-1 Display Replacement: crwdns2935265:012crwdnd2935265:01crwdnd2935265:02crwdne2935265:0 Dell Chromebook 3100 2-in-1 Display Replacement: crwdns2935265:012crwdnd2935265:02crwdnd2935265:02crwdne2935265:0
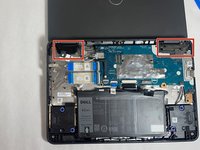
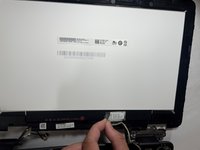
    • Use the opening tool to open the display panel starting from the pry points located above the left and right hinges.

    • Work your way around, through the left and right side of the panel, and carefully flip the display panel over.

  13. Dell Chromebook 3100 2-in-1 Display Replacement: crwdns2935265:013crwdnd2935265:01crwdnd2935265:02crwdne2935265:0 Dell Chromebook 3100 2-in-1 Display Replacement: crwdns2935265:013crwdnd2935265:02crwdnd2935265:02crwdne2935265:0
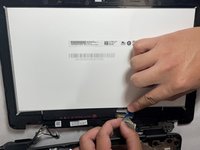
    • Peel back the adhesive tape securing the display cable on the back of the display panel and separate the display.

crwdns2915888:0crwdne2915888:0

To reassemble your device, follow these instructions in reverse order.

crwdns2935227:0crwdne2935227:0

M Ali

crwdns2935283:011/03/21crwdne2935283:0

301 crwdns2915208:0crwdne2915208:0

crwdns2935297:02crwdne2935297:0

crwdns2915084:0crwdne2915084:0

Gateway, Team 1-1, Pee Fall 2021 crwdns2935289:0Gateway, Team 1-1, Pee Fall 2021crwdne2935289:0

GCC-PEE-F21S1G1

crwdns2931471:05crwdne2931471:0

crwdns2935297:05crwdne2935297:0

crwdns2944067:00crwdne2944067:0

crwdns2917038:0crwdne2917038:0

crwdns2936625:0crwdne2936625:0:

crwdns2936751:024crwdne2936751:0 2

crwdns2936753:07crwdne2936753:0 10

crwdns2936753:030crwdne2936753:0 43

crwdns2942667:0crwdne2942667:0 1,594