crwdns2915892:0crwdne2915892:0
Having trouble with broken or stick keys on your keyboard? This guide will provide you simple step-by-step instructions on replacing your keyboard for the Chromebook 13-7310.
crwdns2942213:0crwdne2942213:0
-
-
Remove the eleven 3mm Phillips #1 screws.
-
-
-
Use a plastic opening tool to gently remove the back panel.
-
-
-
Use your fingers to remove the connecting cable to the battery unit. Firmly grab the cord closest to the motherboard connection and pull straight back.
-
-
-
Remove the four 2mm screws on the sides of the battery.
-
-
-
To remove the battery, lift up on one side to get your fingers underneath and lift away.
-
-
-
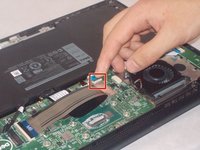
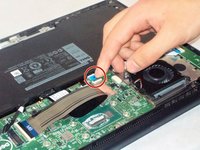
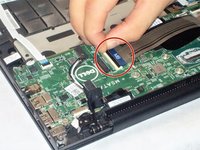
Gently pull to unplug fan connector.
-
-
-
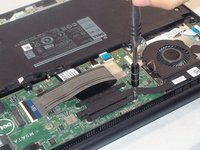
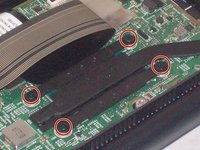
Remove the eight 2mm screws securing the motherboard in place.
-
-
-
-
Release cable for the LED charging indicator by pulling up on connector.
-
-
-
Pull up on connector tab to release IO board cable.
-
-
-
Pull up on connector tab to release touchpad cable.
-
-
-
Release the keyboard backlight cable.
-
-
-
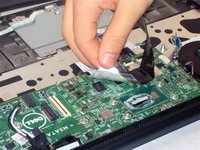
Gently lift up the motherboard to remove it.
-
-
-
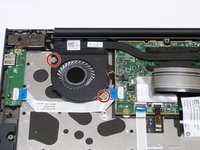
Using the #1 Philips screwdriver, remove the two, 2mm screws securing the fan assembly.
-
-
crwdns2935267:0crwdne2935267:0Tweezers$4.99
-
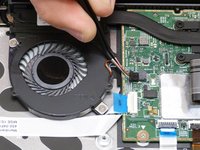
Using your fingernails, pull the cooling fan cables loose from the motherboard.
-
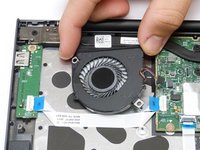
Finally, lift the fan assembly away from the computer.
-
-
-
Remove the single 2mm screw securing the IO board to the laptop.
-
-
-
Pull up on the connector to release the IO board cable from the motherboard.
-
-
-
Gently lift up the keyboard and remove.
-


To reassemble your device, follow these instructions in reverse order.
crwdns2935221:0crwdne2935221:0
crwdns2935229:03crwdne2935229:0
crwdns2935287:0crwdne2935287:0

UMass Dartmouth, Team S5-G1, Gulbrandsen Fall 2018 crwdns2935289:0UMass Dartmouth, Team S5-G1, Gulbrandsen Fall 2018crwdne2935289:0
UMASSD-GULBRANDSEN-F18S5G1
crwdns2931471:03crwdne2931471:0
crwdns2935297:05crwdne2935297:0
crwdns2947410:01crwdne2947410:0
I’ve never pulled apart a computer before, and this guide was perfect! thanks