crwdns2915892:0crwdne2915892:0
In this guide, we will be removing and replacing the solid-state drive.
crwdns2942213:0crwdne2942213:0
-
-
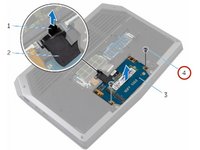
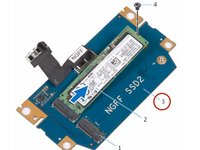
Remove the screws that secure the solid-state drive bracket to the solid-state drive assembly.
-
-
-
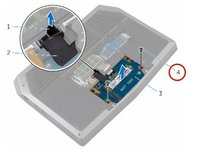
Using the pull tab, pivot the solid-state drive bracket and peel off the bracket from the tabs on the computer base.
-
-
-
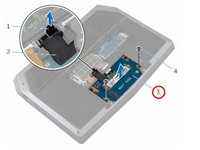
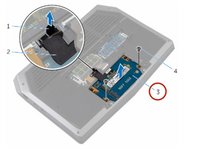
Using the pull tab, disconnect the solid-state drive cable from the system board.
-
-
-
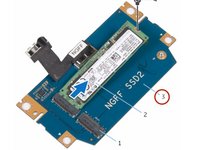
Remove the screws that secure the solid-state drive assembly to the computer base.
-
-
-
Lift the solid-state drive assembly off the computer base.
-
-
-
-
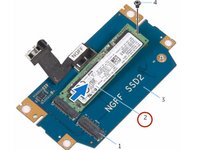
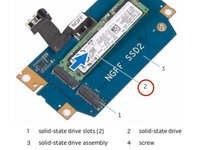
Remove the screw that secures the solid-state drive to the solid-state drive assembly.
-
-
-
Slide and lift the solid-state drive off the solid-state drive assembly.
-
-
-
Slide the NEW solid-state drive into the slot on the solid-state drive assembly.
-
-
-
Replace the screw that secures the solid-state drive to the solid-state drive assembly.
-
-
-
Align the screw holes on the solid-state drive assembly with the screw holes on the computer base.
-
-
-
Replace the screws that secure the solid-state drive assembly to the computer base.
-
-
-
Connect the solid-state drive cable to the system board.
-
-
-
Align the screw holes on the solid-state drive bracket with the screw holes on the solid-state drive assembly.
-
-
-
Replace the screws that secure the solid-state drive bracket to the solid-state drive assembly.
-


To reassemble your device, follow these instructions in reverse order.
To reassemble your device, follow these instructions in reverse order.

crwdns2915084:0crwdne2915084:0

RampUP America, Inc. crwdns2935289:0RampUP America, Inc.crwdne2935289:0
Community
crwdns2931471:043crwdne2931471:0
crwdns2935297:01 991crwdne2935297:0