crwdns2915892:0crwdne2915892:0
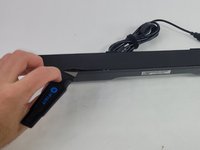
If the volume knob on your soundbar isn't working, you may want to replace it. This guide should help you do that.
crwdns2942213:0crwdne2942213:0
-
-
Use a Jimmy to peel off the screen stuck to the front of the speaker.
-
Start from any corner and use the Jimmy to get under the screen. Once one side lifts up, you can use your fingers to peel the rest off.
-
-
-
Remove ten 6 mm screws using a Phillips #1 screwdriver.
-
-
-
-
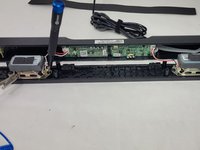
Lift the front panel off of the rest of the device.
-
Remove the 4 mm screws from the speakers using a JIS #1 screwdriver.
-
Remove the front panel from the device.
-
-
-
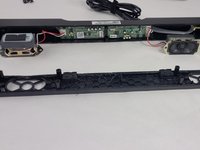
Apply a light downward pressure on the circuit board next to the volume control.
-
While doing, so carefully remove the clear piece of plastic connected to the side of the soundbar using the Halberd Spudger.
-
-
-
Grab the knob and rock it back and forth until you can get the Jimmy under it. Then, use the Jimmy to pull it out of the soundbar.
-


To reassemble your device, follow these instructions in reverse order.
To reassemble your device, follow these instructions in reverse order.
crwdns2915084:0crwdne2915084:0

UMass Dartmouth, Team 4-6, Shaddix Spring 2024 crwdns2935289:0UMass Dartmouth, Team 4-6, Shaddix Spring 2024crwdne2935289:0
UMASSD-SHADDIX-S24S4G6
crwdns2931471:04crwdne2931471:0
crwdns2935297:06crwdne2935297:0