crwdns2915892:0crwdne2915892:0
If the device cannot be switched on at all, the power board is probably defective. Here we show how it can be replaced. When buying spare parts, look for the appropriate code from DeLonghi: Cod.DeLonghi 52.......... It can be found on a sticker on the circuit board.
crwdns2942213:0crwdne2942213:0
-
-
Remove all attachments such as water tank, pulp drawer, brew group.
-
Turn the machine with the back facing you.
-
Remove five Torx T20 security screws.
-
-
-
Lift out the back.
-
The following components are immediately visible:
-
grinder
-
pump
-
flowmeter
-
-
-
-
Also slide the cover - if not already done - on the water tank side backwards and remove it.
-
-
-
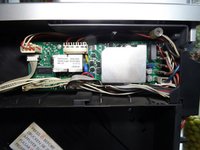
The power board is located under the cover. It is fixed with four screws in the corners and connected with a lot of cables.
-
Move the cables a bit to the side and unscrew the four Phillips screws in the corners.
-
-
-
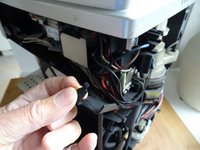
The cables have many different connectors and can almost not be confused. Make a special note of where the flat connectors are connected.
-
The flat connectors can be disconnected more easily if you lift the cover in the corner of the device to the side.
-
Lift the board out a few centimeters.
-
Carefully loosen all connections. Some are secured with latches that you have to push away first.
-


Work through the steps in reverse order to reassemble your device.
Work through the steps in reverse order to reassemble your device.
crwdns2935221:0crwdne2935221:0
crwdns2935227:0crwdne2935227:0
crwdns2934873:0crwdne2934873:0
100%

crwdns2934883:0oldturkey03crwdne2934883:0 crwdns2934875:0crwdne2934875:0
crwdns2934877:0crwdne2934877:0 ›
crwdns2947410:01crwdne2947410:0
Just wanted to say thanks for posting this; successfully fixed my machine today. The cables are an absolute pita to get off the old board and I did need tweezers and needle point pliers.