crwdns2933423:0crwdne2933423:0
crwdns2947577:0crwdnd2947577:0crwdne2947577:0
DKnight MagicBox II Front Panel Assembly Replacement

DKnight MagicBox II Front Panel Assembly Replacement

Anthony

crwdns2944109:0crwdnd2944109:0Anthonycrwdnd2944109:0crwdnd2944109:0crwdnd2944109:0crwdne2944109:0

crwdns2944111:0Dzi 15, 2016crwdne2944111:0

crwdns2931287:05crwdne2931287:0
crwdns2937801:0crwdne2937801:0

crwdns2915892:0crwdne2915892:0

crwdns2942287:0crwdne2942287:0

You will need to follow this guide step-by-step in order to separate the device into two piece. In doing so you will be able to replace the front panel, if damaged, as well as get to the other components inside of the device.

crwdns2942213:0crwdne2942213:0

crwdns2943215:0crwdne2943215:0

  1. DKnight MagicBox II Front Panel Assembly Replacement, Front Panel Assembly: crwdns2935265:01crwdnd2935265:01crwdnd2935265:02crwdne2935265:0 DKnight MagicBox II Front Panel Assembly Replacement, Front Panel Assembly: crwdns2935265:01crwdnd2935265:02crwdnd2935265:02crwdne2935265:0
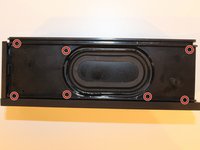
    • Using Blue Plastic opening tool pry the top rubber cover, then using the same tool remove the bottom panel

  2. DKnight MagicBox II Front Panel Assembly Replacement: crwdns2935265:02crwdnd2935265:01crwdnd2935265:03crwdne2935265:0 DKnight MagicBox II Front Panel Assembly Replacement: crwdns2935265:02crwdnd2935265:02crwdnd2935265:03crwdne2935265:0 DKnight MagicBox II Front Panel Assembly Replacement: crwdns2935265:02crwdnd2935265:03crwdnd2935265:03crwdne2935265:0
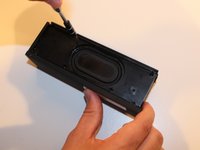
    • There are four prongs on the grill in the corners, closest to the power button switch. Use the plastic opening tool to release all four prongs from the panel, and then slide the plastic opening tool along the edge of the grill to allow it to easily slide off.

  3. DKnight MagicBox II Front Panel Assembly Replacement: crwdns2935265:03crwdnd2935265:01crwdnd2935265:02crwdne2935265:0 DKnight MagicBox II Front Panel Assembly Replacement: crwdns2935265:03crwdnd2935265:02crwdnd2935265:02crwdne2935265:0
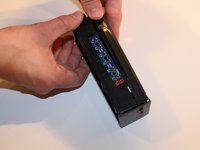
    • On the back panel (Opposite to the side containing the two speakers), Use the Philips head PH1 to remove all 7 screws (Screws: Head PH1 , Length 7cm).

  4. DKnight MagicBox II Front Panel Assembly Replacement: crwdns2935265:04crwdnd2935265:01crwdnd2935265:02crwdne2935265:0 DKnight MagicBox II Front Panel Assembly Replacement: crwdns2935265:04crwdnd2935265:02crwdnd2935265:02crwdne2935265:0
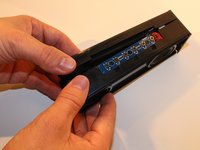
    • Pull apart the two faces to separate the back panel from the front face plate.

crwdns2915888:0crwdne2915888:0

To reassemble your device, follow these instructions in reverse order.

crwdns2935229:02crwdne2935229:0

Anthony

crwdns2935283:002/04/16crwdne2935283:0

695 crwdns2915208:0crwdne2915208:0

crwdns2935297:03crwdne2935297:0

crwdns2915084:0crwdne2915084:0

USF Tampa, Team 17-1, Blackwell Winter 2016 crwdns2935289:0USF Tampa, Team 17-1, Blackwell Winter 2016crwdne2935289:0

USFT-BLACKWELL-W16S17G1

crwdns2931471:04crwdne2931471:0

crwdns2935297:03crwdne2935297:0

crwdns2947412:00crwdne2947412:0

crwdns2917038:0crwdne2917038:0

crwdns2936625:0crwdne2936625:0:

crwdns2936751:024crwdne2936751:0 0

crwdns2936753:07crwdne2936753:0 0

crwdns2936753:030crwdne2936753:0 2

crwdns2942667:0crwdne2942667:0 1,587