crwdns2915892:0crwdne2915892:0
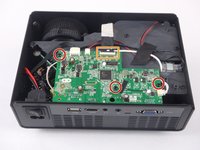
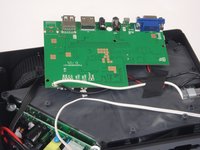
The motherboard controls the operation of the projector. The LED bulb is wired to the motherboard and provides light for the projector to illuminate. Use this guide if the replacement motherboard includes the LED bulb.
This guide is also used to allow access to the lens, speaker, fan, imager, or power supply circuit.
crwdns2942213:0crwdne2942213:0
-
-
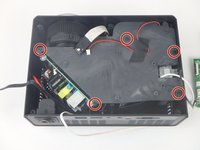
Place the projector upside down to access the screws on the bottom.
-
Remove the five 7mm long screws using a #3 Phillips screwdriver at least 2 inches long.
-
-
-
Flip the projector over and then remove the cover by lifting it up.
-
-
-
-
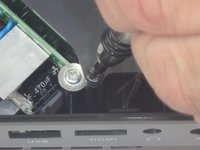
Remove the three 6mm PH2 phillips head screws.
-
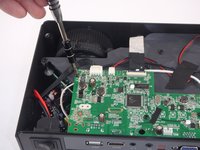
Disconnect the ribbon cable by flipping up the latch on the connector and then pull the ribbon out.
-
-
-
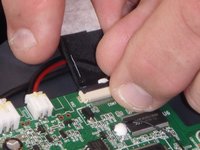
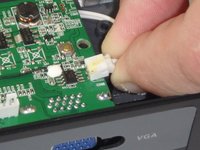
Disconnect the three wire connectors. Grasp both sides of the connector and pull apart.
-
Lift the motherboard up and place it out of the way.
-
-
-
Remove the five 7mm PH2 phillips head screws on the black plate and lift the plate out.
-
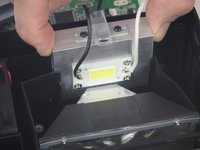
Lift the aluminum heat sink up to remove it from the projector.
-


To reassemble your device, follow these instructions in reverse order.
To reassemble your device, follow these instructions in reverse order.
crwdns2935221:0crwdne2935221:0
crwdns2935229:02crwdne2935229:0
crwdns2915084:0crwdne2915084:0

USF Tampa, Team S5-G3, Eyestone Spring 2018 crwdns2935289:0USF Tampa, Team S5-G3, Eyestone Spring 2018crwdne2935289:0
USFT-EYESTONE-S18S5G3
crwdns2931471:03crwdne2931471:0
crwdns2935297:09crwdne2935297:0
crwdns2947412:02crwdne2947412:0
I have one of these, and it no longer projects an image. I have 12.1vdc at the motherboard where the positive and negative wire are soldered in.
After de-soldering the wires, I used my bench supply to put 12vdc to the wires, still nothing. If I apply power directly to the COB, the COB will illuminate. What is the silver component held to the heat sink? Mine is labeled ‘Kavass BW-80B 250V 5A’. I have not been able to find ANY documentation for that item to be able to determine what it is, does, or what a suitable replacement might be.
what kind of bulb does it use