crwdns2933423:0crwdne2933423:0

crwdns2942213:0crwdne2942213:0

crwdns2936621:0crwdne2936621:0

crwdns2935311:0crwdnd2935311:0crwdne2935311:0 crwdns2935313:0LG G3crwdnd2935313:0crwdnd2935313:0crwdne2935313:0

  1. Démontage du LG G3 D855, Démontage du LG G3 D855: crwdns2935265:01crwdnd2935265:01crwdnd2935265:02crwdne2935265:0 Démontage du LG G3 D855, Démontage du LG G3 D855: crwdns2935265:01crwdnd2935265:02crwdnd2935265:02crwdne2935265:0
    • Enlevez facilement la coque arrière avec vos ongles.

  2. Démontage du LG G3 D855: crwdns2935265:02crwdnd2935265:01crwdnd2935265:01crwdne2935265:0
    • Enlevez la batterie.

  3. Démontage du LG G3 D855: crwdns2935265:03crwdnd2935265:01crwdnd2935265:02crwdne2935265:0 Démontage du LG G3 D855: crwdns2935265:03crwdnd2935265:02crwdnd2935265:02crwdne2935265:0
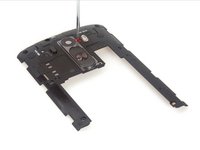
    • Enlevez ces 12 vis et enlevez la façade arrière. A l'inverse des iPhone, ces vis sont toutes de la même taille. La partie supérieure va avec le circuit du bouton d'allumage alors que la partie inférieure va avec le haut-parleur.

  4. Démontage du LG G3 D855: crwdns2935265:04crwdnd2935265:01crwdnd2935265:02crwdne2935265:0 Démontage du LG G3 D855: crwdns2935265:04crwdnd2935265:02crwdnd2935265:02crwdne2935265:0
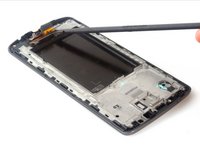
    • Enlevez la plus petite vis et soulevez le cache du circuit du bouton d'allumage et des boutons de volume.

  5. Démontage du LG G3 D855: crwdns2935265:05crwdnd2935265:01crwdnd2935265:03crwdne2935265:0 Démontage du LG G3 D855: crwdns2935265:05crwdnd2935265:02crwdnd2935265:03crwdne2935265:0 Démontage du LG G3 D855: crwdns2935265:05crwdnd2935265:03crwdnd2935265:03crwdne2935265:0
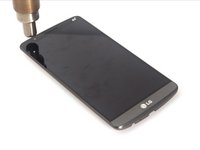
    • Retirez prudemment le bouton d'allumage et les boutons de volume de leurs adhésifs.

  6. Démontage du LG G3 D855: crwdns2935265:06crwdnd2935265:01crwdnd2935265:01crwdne2935265:0
    • Et finalement retirez le circuit.

  7. Démontage du LG G3 D855: crwdns2935265:07crwdnd2935265:01crwdnd2935265:02crwdne2935265:0 Démontage du LG G3 D855: crwdns2935265:07crwdnd2935265:02crwdnd2935265:02crwdne2935265:0
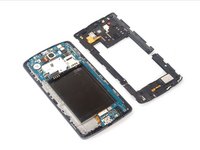
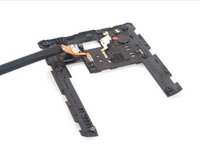
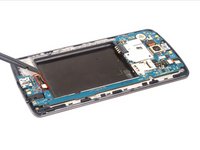
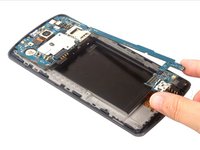
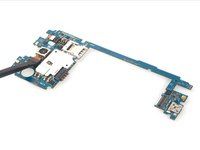
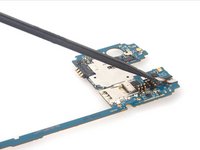
    • Débranchez le numériseur et les connecteurs de l'écran LCD. Les deux cameras sont légèrement maintenues dans le cadre du téléphone. Enlevez prudemment la carte mère avec les caméras.

  8. Démontage du LG G3 D855: crwdns2935265:08crwdnd2935265:01crwdnd2935265:02crwdne2935265:0 Démontage du LG G3 D855: crwdns2935265:08crwdnd2935265:02crwdnd2935265:02crwdne2935265:0
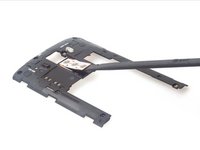
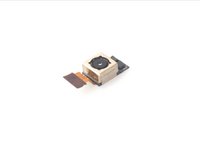
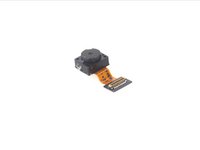
    • Débranchez la camera arrière de la carte mère.

  9. Démontage du LG G3 D855: crwdns2935265:09crwdnd2935265:01crwdnd2935265:02crwdne2935265:0 Démontage du LG G3 D855: crwdns2935265:09crwdnd2935265:02crwdnd2935265:02crwdne2935265:0
    • Puis enlevez la camera frontale.

  10. Démontage du LG G3 D855: crwdns2935265:010crwdnd2935265:01crwdnd2935265:01crwdne2935265:0
    • Débranchez le cable d'antenne.

  11. Démontage du LG G3 D855: crwdns2935265:011crwdnd2935265:01crwdnd2935265:01crwdne2935265:0
    • Débranchez le vibreur.

  12. Démontage du LG G3 D855: crwdns2935265:012crwdnd2935265:01crwdnd2935265:01crwdne2935265:0
    • Débranchez le haut-parleur avant.

  13. Démontage du LG G3 D855: crwdns2935265:013crwdnd2935265:01crwdnd2935265:01crwdne2935265:0
    • Débranchez la prise jack.

  14. Démontage du LG G3 D855: crwdns2935265:014crwdnd2935265:01crwdnd2935265:03crwdne2935265:0 Démontage du LG G3 D855: crwdns2935265:014crwdnd2935265:02crwdnd2935265:03crwdne2935265:0 Démontage du LG G3 D855: crwdns2935265:014crwdnd2935265:03crwdnd2935265:03crwdne2935265:0
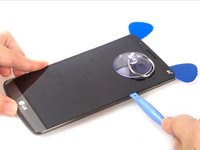
    • Tout d'abord, séparez l'écran de l’adhésif à l'avant. Puis chauffez les bords de l'écran pour faire fondre la colle. Puis utilisez un médiator de guitare et un outil d'ouverture pour séparer l'écran.

  15. Démontage du LG G3 D855: crwdns2935265:015crwdnd2935265:01crwdnd2935265:02crwdne2935265:0 Démontage du LG G3 D855: crwdns2935265:015crwdnd2935265:02crwdnd2935265:02crwdne2935265:0
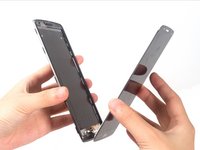
    • Pour finir, enlevez la dalle LCD de l'écran.

  16. Démontage du LG G3 D855: crwdns2935265:016crwdnd2935265:01crwdnd2935265:01crwdne2935265:0
    • Le démontage du LG G3 est terminé.

crwdns2934873:0crwdne2934873:0

en fr

100%

crwdns2934885:0crwdne2934885:0 crwdns2934875:0crwdne2934875:0
crwdns2934877:0crwdne2934877:0 ›

Sophia

crwdns2935283:003/25/14crwdne2935283:0

43.810 crwdns2915208:0crwdne2915208:0

crwdns2935297:062crwdne2935297:0

crwdns2944067:016crwdne2944067:0

Are you able to put it back together?

Ivan Gergi - crwdns2934203:0crwdne2934203:0

Yes the are surprisingly easy to put back together

Hunter destroyer unit -

I have one that is not booting at all. Before that, If it was shut off or if the battery was drained completely it would not power up, even if the battery was at 100%. I would have to remove the battery and hold the power button down for at least 30 seconds. That is not working anymore, it just ill not power on. This reminds me of issues with laptops that typically involve a CMOS battery that is dead or very low. Is there a similar battery (that can be reasonably replaced) in a phone? For it to keep time and retain certain firmware settings I would think there would have to be something like that in there somewhere....

boxfreind - crwdns2934203:0crwdne2934203:0

Hi boxfreind, i've had a similar issue as of heaps of people (search youtuble for blue screen of death). i too thought of the old laptop days of cmos battery and before i seen this site i thought that vibrator motor was the battery lol. anyway, i cant boot my Lg up after 1 year of service (just like many others). people adivse that trying to remove the motherboard and 'clean it' tends to work... i didn't think that was the reason and thought perhaps removing the motherboard was just actually disconnecting the battery from the motherboard to drain the power... but alas, if no battery CMOS then that cant be the reason.

madmac -

quite easy to remove the back , thanks!

Mie Mohd - crwdns2934203:0crwdne2934203:0

crwdns2917038:0crwdne2917038:0

crwdns2936625:0crwdne2936625:0:

crwdns2936751:024crwdne2936751:0 2

crwdns2936753:07crwdne2936753:0 17

crwdns2936753:030crwdne2936753:0 93

crwdns2942667:0crwdne2942667:0 77,681