crwdns2933423:0crwdne2933423:0

Crosley CR42 Lid Hinge Replacement

crwdns2942213:0crwdne2942213:0

  1. Crosley CR42 Lid Hinge Replacement, Lid Hinge: crwdns2935265:01crwdnd2935265:01crwdnd2935265:01crwdne2935265:0
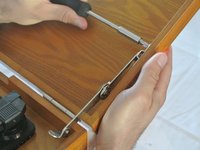
    • Open the lid and find the door hinge.

  2. Crosley CR42 Lid Hinge Replacement: crwdns2935265:02crwdnd2935265:01crwdnd2935265:02crwdne2935265:0 Crosley CR42 Lid Hinge Replacement: crwdns2935265:02crwdnd2935265:02crwdnd2935265:02crwdne2935265:0
    • Remove the two 12 mm screws that attach the hinge to the box.

  3. Crosley CR42 Lid Hinge Replacement, Step 3: crwdns2935265:03crwdnd2935265:01crwdnd2935265:02crwdne2935265:0 Crosley CR42 Lid Hinge Replacement, Step 3: crwdns2935265:03crwdnd2935265:02crwdnd2935265:02crwdne2935265:0
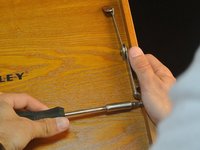
    • Remove the 2 screws that attach the hinge to the top of the box.

    • When reassembling, it is easier to attach the top screws first and then the bottom screws.

    • The picture displayed is from disassembly and is only used to show the location of the bottom screws. The top screws should be attached first.

crwdns2915888:0crwdne2915888:0

To reassemble your device, follow these instructions in reverse order.

Jason

crwdns2935283:001/26/14crwdne2935283:0

103 crwdns2915208:0crwdne2915208:0

crwdns2935295:0crwdne2935295:0

crwdns2915084:0crwdne2915084:0

Cal Poly, Team 1-38, Maness Winter 2014 crwdns2935289:0Cal Poly, Team 1-38, Maness Winter 2014crwdne2935289:0

CPSU-MANESS-W14S1G38

crwdns2931471:04crwdne2931471:0

crwdns2935297:05crwdne2935297:0

crwdns2944067:00crwdne2944067:0

crwdns2917038:0crwdne2917038:0

crwdns2936625:0crwdne2936625:0:

crwdns2936751:024crwdne2936751:0 0

crwdns2936753:07crwdne2936753:0 9

crwdns2936753:030crwdne2936753:0 20

crwdns2942667:0crwdne2942667:0 3,168