crwdns2933423:0crwdne2933423:0

Crosley CR42 Bushings Replacement

crwdns2942213:0crwdne2942213:0

  1. Crosley CR42 Bushings Replacement, Bushings: crwdns2935265:01crwdnd2935265:01crwdnd2935265:02crwdne2935265:0 Crosley CR42 Bushings Replacement, Bushings: crwdns2935265:01crwdnd2935265:02crwdnd2935265:02crwdne2935265:0
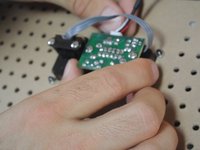
    • Turn the device around so the line out port faces you.

    • Remove the ten 12 mm screws with the Phillips screwdriver.

  2. Crosley CR42 Bushings Replacement: crwdns2935265:02crwdnd2935265:01crwdnd2935265:03crwdne2935265:0 Crosley CR42 Bushings Replacement: crwdns2935265:02crwdnd2935265:02crwdnd2935265:03crwdne2935265:0 Crosley CR42 Bushings Replacement: crwdns2935265:02crwdnd2935265:03crwdnd2935265:03crwdne2935265:0
    • Pull the line out port toward you so you can view the inside of the Crosley.

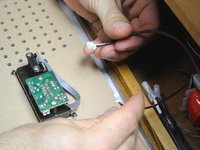
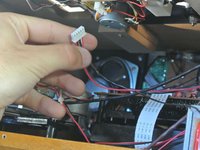
    • Locate the wires that connect the line out port to the inside of the device.

  3. Crosley CR42 Bushings Replacement: crwdns2935265:03crwdnd2935265:01crwdnd2935265:03crwdne2935265:0 Crosley CR42 Bushings Replacement: crwdns2935265:03crwdnd2935265:02crwdnd2935265:03crwdne2935265:0 Crosley CR42 Bushings Replacement: crwdns2935265:03crwdnd2935265:03crwdnd2935265:03crwdne2935265:0
    • Pull on the two connections to remove them from the back of the line out port.

    • Remove the antenna wire from the line out port, then remove the line out port and set it aside.

  4. Crosley CR42 Bushings Replacement: crwdns2935265:04crwdnd2935265:01crwdnd2935265:02crwdne2935265:0 Crosley CR42 Bushings Replacement: crwdns2935265:04crwdnd2935265:02crwdnd2935265:02crwdne2935265:0
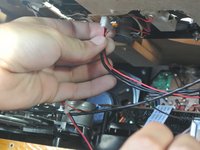
    • Remove the red and black connection underneath the turntable.

  5. Crosley CR42 Bushings Replacement: crwdns2935265:05crwdnd2935265:01crwdnd2935265:01crwdne2935265:0
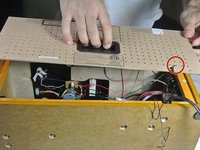
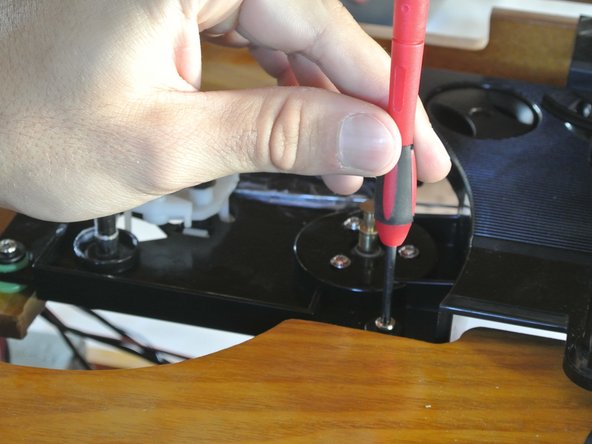
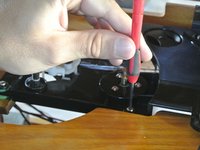
    • Position yourself in front of the turntable to unscrew the three bushing bolts.

  6. Crosley CR42 Bushings Replacement: crwdns2935265:06crwdnd2935265:01crwdnd2935265:03crwdne2935265:0 Crosley CR42 Bushings Replacement: crwdns2935265:06crwdnd2935265:02crwdnd2935265:03crwdne2935265:0 Crosley CR42 Bushings Replacement: crwdns2935265:06crwdnd2935265:03crwdnd2935265:03crwdne2935265:0
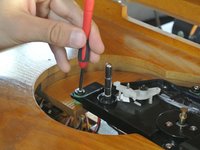
    • Unscrew the three bushing bolts with the Phillips screw driver.

  7. Crosley CR42 Bushings Replacement: crwdns2935265:07crwdnd2935265:01crwdnd2935265:02crwdne2935265:0 Crosley CR42 Bushings Replacement: crwdns2935265:07crwdnd2935265:02crwdnd2935265:02crwdne2935265:0
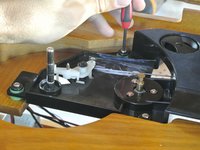
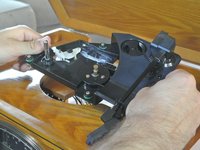
    • Pull the turntable out from the casing.

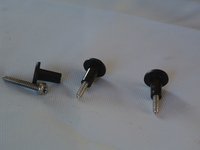
    • Remove the three bushing bolts.

  8. Crosley CR42 Bushings Replacement: crwdns2935265:08crwdnd2935265:01crwdnd2935265:03crwdne2935265:0 Crosley CR42 Bushings Replacement: crwdns2935265:08crwdnd2935265:02crwdnd2935265:03crwdne2935265:0 Crosley CR42 Bushings Replacement: crwdns2935265:08crwdnd2935265:03crwdnd2935265:03crwdne2935265:0
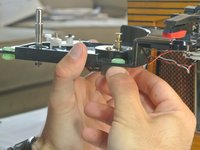
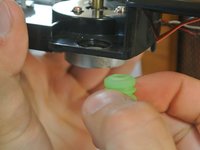
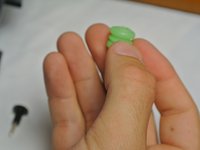
    • Pinch the rubber bushing at the bottom, then pull downwards to remove it.

    • Repeat the previous step for the other two bushings.

crwdns2915888:0crwdne2915888:0

To reassemble your device, follow these instructions in reverse order.

crwdns2935227:0crwdne2935227:0

Roberto Rosila

crwdns2935283:001/26/14crwdne2935283:0

319 crwdns2915208:0crwdne2915208:0

crwdns2935297:03crwdne2935297:0

crwdns2915084:0crwdne2915084:0

Cal Poly, Team 1-38, Maness Winter 2014 crwdns2935289:0Cal Poly, Team 1-38, Maness Winter 2014crwdne2935289:0

CPSU-MANESS-W14S1G38

crwdns2931471:04crwdne2931471:0

crwdns2935297:05crwdne2935297:0

crwdns2944067:00crwdne2944067:0

crwdns2917038:0crwdne2917038:0

crwdns2936625:0crwdne2936625:0:

crwdns2936751:024crwdne2936751:0 1

crwdns2936753:07crwdne2936753:0 8

crwdns2936753:030crwdne2936753:0 24

crwdns2942667:0crwdne2942667:0 3,062