crwdns2915892:0crwdne2915892:0
The heating element brings the device up to temperature allowing the pot to pressurize and cook. A failure of the heating element will cause the pot not to heat properly.
crwdns2942213:0crwdne2942213:0
-
-
Remove the power cord from the wall outlet first, disconnecting power from the device.
-
-
-
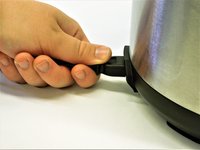
Orient the device with with the LED facing away from the user allowing access to the input jack of the power cord.
-
-
-
Grasp the power cord input connector firmly with forefinger and thumb.
-
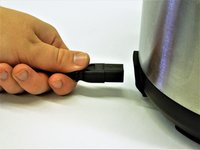
Without tugging, apply pulling force until the connector is free from device
I want just the electric cord only that’s work on Crock-Pot 6 qt thank you
-
-
-
Orient the crock pot where the lid locked and unlocked icons are visible.
-
Grasp the handle firmly and turn the lid clockwise until the arrow and the lid unlocked icon are facing each other.
-
Remove the lid.
Bobber Valve Gasket
SKU: SAP_196077000000link no longer works because 10qt piece discontinued. They are shipping me valve for 8qt lid to see if it works. I have attached part number for 8 qt bobber valve gasket.
Thanks
-
-
-
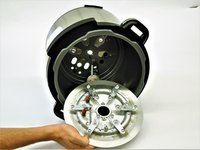
Remove the inner pot and set it aside for reassembly.
-
-
-
-
Carefully rotate the Crock-Pot so that the bottom is facing upward, allowing access to the electrical panel.
-
Remove the two 12.4 mm screws with a Phillips #2 screwdriver.
-
-
-
Rotate the electrical panel cover counter clockwise and pull up until the panel comes free.
-
-
-
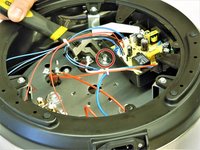
Remove 3 nuts, 3 washers, 3 spacers, and 3 lock washers using an adjustable wrench to free the heating element from the Crock-Pot housing.
-
-
-
Remove the 10mm screw and metal plate beneath the electrical nodes using a Phillips #2 screwdriver.
-
-
-
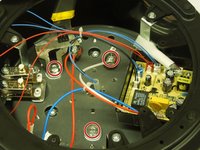
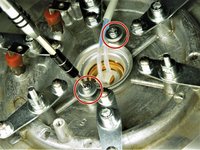
Remove the 2 red wires from the terminal post by unscrewing the 10mm screw using a Phillips #2 screwdriver and label terminal post as red.
-
Remove 1 white wire from terminal post by unscrewing the 10mm screw using a Phillips #2 screwdriver and label terminal post as white.
-
-
-
Reorient the crockpot on its side to prepare for the heating element removal.
-
-
-
Carefully pull the heating element out and rotate it until bottom side is facing up out of the pot.
-
-
-
Remove both 19mm screws from the cutout switch housing using a Phillips #2 screwdriver, freeing the heating element from the device.
-
Carefully remove the heating element from the device.
The screws have been replaced with triwng screws but found torc t7 works fine.
-


To reassemble your device, follow these instructions in reverse order.
To reassemble your device, follow these instructions in reverse order.
crwdns2935221:0crwdne2935221:0
crwdns2935229:03crwdne2935229:0
crwdns2915084:0crwdne2915084:0

The Citadel Military College of South Carolina, Team S3-G9, Eggleston Fall 2018 crwdns2935289:0The Citadel Military College of South Carolina, Team S3-G9, Eggleston Fall 2018crwdne2935289:0
CMCSC-EGGLESTON-F18S3G9
crwdns2931471:04crwdne2931471:0
crwdns2935297:07crwdne2935297:0
crwdns2947410:01crwdne2947410:0
where do you get a heating element?