crwdns2915892:0crwdne2915892:0
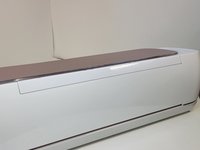
In the event that the door of your Cricut Maker won't stay closed because it's damaged, it could be time for a replacement. Follow this step-by-step guide to change the lid on your own.
First make sure the connecting magnets are clear of debris, which may be preventing them from closing. If there are any obstructions, clear these away and the magnets should stick once again. However, in the event that there is no obstruction, perform a magnetic test on the lid magnet to the front door to determine if you need to replace the lid.
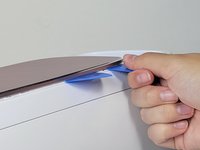
In step one, you must pry glue from plastic, so be gentle to avoid breaking or damaging the lid further.
crwdns2942213:0crwdne2942213:0
-
-
To remove the cover from the connecting joint, use an iFixit opening tool, and pry around the perimeter of the cover to release it.
-
Remove the cover from the connecting joint and set it aside.
-
-
-
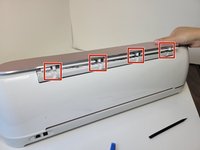
Remove the four, 10 mm Torx TR8 security screws holding the lid in place.
-
-
-
-
Turn the device around, so that the back is facing you.
-
Wedge one or two iFixit opening picks in the seam connecting the Top Door to the device, and use the iFixit opening tool to pry upwards along the seam.
-
These actions should reveal the cylindrical connectors.
-
-
-
Press down on the lid.
-
Push the lid outwards to free it from the jointed clasps.
-


To reassemble your device, follow these instructions in reverse order.
To reassemble your device, follow these instructions in reverse order.
crwdns2935221:0crwdne2935221:0
crwdns2935229:03crwdne2935229:0

crwdns2915084:0crwdne2915084:0

Austin Community College, Team 9-1, Watkins Fall 2022 crwdns2935289:0Austin Community College, Team 9-1, Watkins Fall 2022crwdne2935289:0
AUSTINCC-WATKINS-F22S9G1
crwdns2931471:03crwdne2931471:0
crwdns2935297:027crwdne2935297:0
crwdns2947412:02crwdne2947412:0
Where i can buy Cricut Maker Top Door/ Lid Replacement?
Our Circut Maker lid will not stay open. It closes on its own within a few seconds. I was wondering if there was a fix or a repair I could do. It is 10 months old and Circut told us it wasn’t covered under the two year warranty.
K. Moore