crwdns2933423:0crwdne2933423:0

Cricut Maker 3 Blade Housing Replacement

  1. Cricut Maker 3 Blade Housing Replacement, Prepare your Cricut for disassembly: crwdns2935265:01crwdnd2935265:01crwdnd2935265:03crwdne2935265:0 Cricut Maker 3 Blade Housing Replacement, Prepare your Cricut for disassembly: crwdns2935265:01crwdnd2935265:02crwdnd2935265:03crwdne2935265:0 Cricut Maker 3 Blade Housing Replacement, Prepare your Cricut for disassembly: crwdns2935265:01crwdnd2935265:03crwdnd2935265:03crwdne2935265:0
    • Be very careful not to cut yourself when working near the Cricut's small, sharp blade, located in the tool holder within the Cricut.

    • Power off the Cricut and unplug all cables.

  2. Cricut Maker 3 Blade Housing Replacement, Open the Cricut: crwdns2935265:02crwdnd2935265:01crwdnd2935265:02crwdne2935265:0 Cricut Maker 3 Blade Housing Replacement, Open the Cricut: crwdns2935265:02crwdnd2935265:02crwdnd2935265:02crwdne2935265:0
    • Open the Cricut by lifting the top silver lid. The front tray will also open.

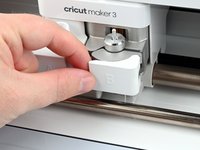
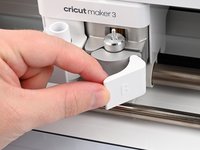
  3. Cricut Maker 3 Blade Housing Replacement, Open the clamp: crwdns2935265:03crwdnd2935265:01crwdnd2935265:02crwdne2935265:0 Cricut Maker 3 Blade Housing Replacement, Open the clamp: crwdns2935265:03crwdnd2935265:02crwdnd2935265:02crwdne2935265:0
    • Partially open clamp B on the tool holder by pulling the plastic latch away from the tool holder.

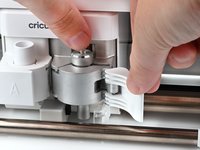
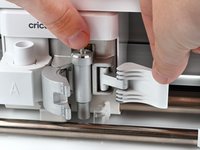
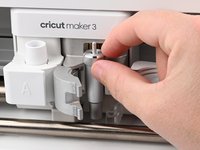
  4. Cricut Maker 3 Blade Housing Replacement: crwdns2935265:04crwdnd2935265:01crwdnd2935265:02crwdne2935265:0 Cricut Maker 3 Blade Housing Replacement: crwdns2935265:04crwdnd2935265:02crwdnd2935265:02crwdne2935265:0
    • While holding the blade housing in the tool holder, fully open clamp B by pulling the plastic latch to the right.

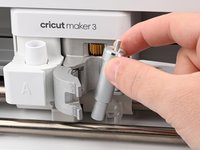
  5. Cricut Maker 3 Blade Housing Replacement, Remove the blade housing: crwdns2935265:05crwdnd2935265:01crwdnd2935265:02crwdne2935265:0 Cricut Maker 3 Blade Housing Replacement, Remove the blade housing: crwdns2935265:05crwdnd2935265:02crwdnd2935265:02crwdne2935265:0
    • Grab the blade housing by the top and remove it from the tool holder.

crwdns2915888:0crwdne2915888:0

To reassemble your device, follow these instructions in reverse order.

Repair didn’t go as planned? Try some basic troubleshooting, or ask our Answers community for help.

Spencer Pennington

crwdns2935283:009/09/23crwdne2935283:0

18,924 crwdns2915208:0crwdne2915208:0

crwdns2935297:0114crwdne2935297:0

crwdns2915084:0crwdne2915084:0

iFixit crwdns2935289:0iFixitcrwdne2935289:0

Staff

crwdns2931471:0121crwdne2931471:0

crwdns2935297:020,360crwdne2935297:0

crwdns2947412:00crwdne2947412:0

crwdns2917038:0crwdne2917038:0

crwdns2936625:0crwdne2936625:0:

crwdns2936751:024crwdne2936751:0 2

crwdns2936753:07crwdne2936753:0 8

crwdns2936753:030crwdne2936753:0 27

crwdns2942667:0crwdne2942667:0 146