crwdns2933423:0crwdne2933423:0

Creality CR 10s Pro V2 Nozzle Replacement

crwdns2942213:0crwdne2942213:0

  1. Creality CR 10s Pro V2 Nozzle Replacement, Nozzle: crwdns2935265:01crwdnd2935265:01crwdnd2935265:03crwdne2935265:0 Creality CR 10s Pro V2 Nozzle Replacement, Nozzle: crwdns2935265:01crwdnd2935265:02crwdnd2935265:03crwdne2935265:0 Creality CR 10s Pro V2 Nozzle Replacement, Nozzle: crwdns2935265:01crwdnd2935265:03crwdnd2935265:03crwdne2935265:0
    • Using a 2 mm hex key, remove the two screws that secure the fan cover.

    • While removing the screws, hold the fan cover with one hand to prevent it from falling once it's detached.

    • Position the fan cover in a way that doesn't damage the external wires.

    • Remove the silicone sock from the extruder nozzle.

  2. Creality CR 10s Pro V2 Nozzle Replacement: crwdns2935265:02crwdnd2935265:01crwdnd2935265:03crwdne2935265:0 Creality CR 10s Pro V2 Nozzle Replacement: crwdns2935265:02crwdnd2935265:02crwdnd2935265:03crwdne2935265:0 Creality CR 10s Pro V2 Nozzle Replacement: crwdns2935265:02crwdnd2935265:03crwdnd2935265:03crwdne2935265:0
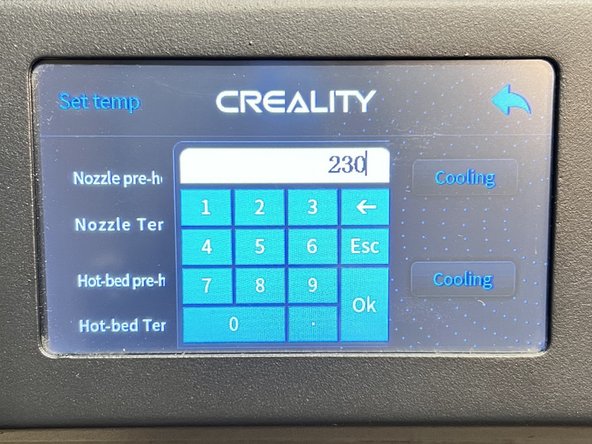
    • Go to your LCD Screen >Temp > Manual >Nozzle Pre-Heat.

    • Pre-heat the nozzle to 230C.

    • The heat will loosen the nozzle so it can be unscrewed.

  3. Creality CR 10s Pro V2 Nozzle Replacement: crwdns2935265:03crwdnd2935265:01crwdnd2935265:02crwdne2935265:0 Creality CR 10s Pro V2 Nozzle Replacement: crwdns2935265:03crwdnd2935265:02crwdnd2935265:02crwdne2935265:0
    • The equipment is hot! Be careful when working with the metals parts so you don't burn yourself.

    • Once the nozzle is sufficiently heated, use an adjustable crescent wrench to firmly hold the heater block.

    • With the other hand, use the tappit wrench to unscrew the nozzle.

    • Allow the printer to cool down.

  4. Creality CR 10s Pro V2 Nozzle Replacement: crwdns2935265:04crwdnd2935265:01crwdnd2935265:02crwdne2935265:0 Creality CR 10s Pro V2 Nozzle Replacement: crwdns2935265:04crwdnd2935265:02crwdnd2935265:02crwdne2935265:0
    • Hot Equipment!

    • Once the heater block is cooled down, slightly thread the new nozzle onto the heater block.

    • Manually set the nozzle pre-heat to 230C and finish threading the new nozzle.

    • Be careful to not over-tighten the nozzle. Overtightening can also damage the heater block or the nozzle.

  5. Creality CR 10s Pro V2 Nozzle Replacement: crwdns2935265:05crwdnd2935265:01crwdnd2935265:01crwdne2935265:0
    • Using the 2 mm hex key, replace the fan cover to the extruder.

    • It is important to relevel the print bed after changing the nozzle. Such change can affect the distance between the nozzle and the print bed.

crwdns2915888:0crwdne2915888:0

To ensure the nozzle replacement has been followed correctly, calibrate your 3D printer.

Angelina Jimenez

crwdns2935283:005/24/23crwdne2935283:0

121 crwdns2915208:0crwdne2915208:0

crwdns2935295:0crwdne2935295:0

crwdns2915084:0crwdne2915084:0

University of North Texas, Team 2-11, Kilpatrick Summer 2023 crwdns2935289:0University of North Texas, Team 2-11, Kilpatrick Summer 2023crwdne2935289:0

UNT-KILPATRICK-SU23S2G11

crwdns2934841:01crwdne2934841:0

crwdns2935303:01crwdne2935303:0

crwdns2944067:00crwdne2944067:0

crwdns2917038:0crwdne2917038:0

crwdns2936625:0crwdne2936625:0:

crwdns2936751:024crwdne2936751:0 2

crwdns2936753:07crwdne2936753:0 11

crwdns2936753:030crwdne2936753:0 42

crwdns2942667:0crwdne2942667:0 261