crwdns2933423:0crwdne2933423:0

Control Box Opening Procedure

crwdns2862623:0crwdne2862623:0
crwdns2942641:0crwdne2942641:0

crwdns2942213:0crwdne2942213:0

  1. Control Box Opening Procedure, Disconnect the spark plug: crwdns2935265:01crwdnd2935265:01crwdnd2935265:02crwdne2935265:0 Control Box Opening Procedure, Disconnect the spark plug: crwdns2935265:01crwdnd2935265:02crwdnd2935265:02crwdne2935265:0
    • Before you begin, disconnect the spark plug connector from the spark plug.

  2. Control Box Opening Procedure, Remove the control box cover panel: crwdns2935265:02crwdnd2935265:01crwdnd2935265:01crwdne2935265:0
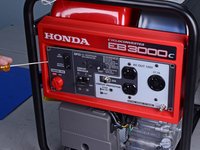
    • Use a Phillips #2 screwdriver to remove the five 15 mm screws securing the control box cover.

  3. Control Box Opening Procedure: crwdns2935265:03crwdnd2935265:01crwdnd2935265:03crwdne2935265:0 Control Box Opening Procedure: crwdns2935265:03crwdnd2935265:02crwdnd2935265:03crwdne2935265:0 Control Box Opening Procedure: crwdns2935265:03crwdnd2935265:03crwdnd2935265:03crwdne2935265:0
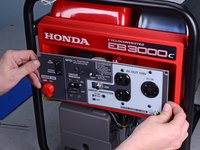
    • Use a flathead screwdriver to pry and loosen the control panel from the control box.

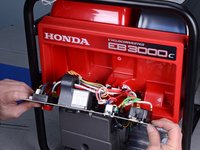
    • Tilt the control panel down so the rear of the panel is accessible.

crwdns2915888:0crwdne2915888:0

To reassemble your device, follow these instructions in reverse order.

Tarun Thiruma

crwdns2935283:011/20/19crwdne2935283:0

38,086 crwdns2915208:0crwdne2915208:0

crwdns2935297:0134crwdne2935297:0

crwdns2947412:00crwdne2947412:0

crwdns2917038:0crwdne2917038:0

crwdns2936625:0crwdne2936625:0:

crwdns2936751:024crwdne2936751:0 0

crwdns2936753:07crwdne2936753:0 0

crwdns2936753:030crwdne2936753:0 1

crwdns2942667:0crwdne2942667:0 21