crwdns2915892:0crwdne2915892:0
Sticky keys? Simply just want to get rid of your keyboard? Here's how.
crwdns2942213:0crwdne2942213:0
-
-
Locate the battery and the battery tabs on the bottom of the Compaq Mini.
-
-
-
Push both tabs inward simultaneously and slide the battery out.
-
-
-
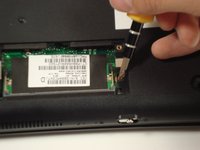
Use a Philips #0 screwdriver to unscrew the two screws covering the memory compartment on the bottom of the laptop and remove the cover.
-
-
-
-
Push out the side tabs simultaneously and pull out the old RAM module.
-
-
-
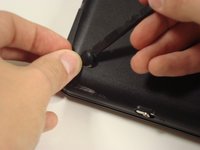
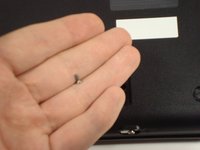
Remove the rubber pads located on the corners of your Compaq Mini.
-
-
-
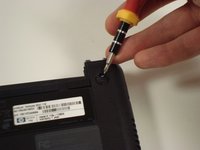
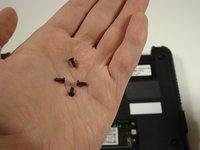
Unscrew all the corner screws. There are four total, one under each rubber pad.
-
-
-
Unscrew the screw for the bottom case located in the RAM compartment.
Falta um passo, pois nos modelos COMPAQ MINI 110, existe um parafuso que segura o teclado, que se encontra bem escondido dentro da cavidade que encaixa a bateria.
-
-
-
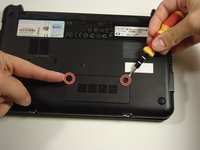
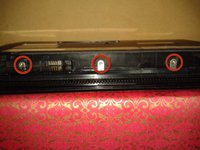
Remove the three screws in the silver tabs at the back of the keyboard.
-
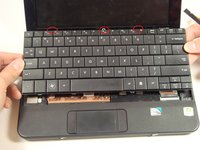
Lift the keyboard away from the laptop.
3 screws in red circles are actually on metal tabs in the battery compartment, 1 deeper than the other 2. There is a keyboard symbol for each of the 3 screws.
Step 8B: Lift out keyboard by pushing upwards on the 2 accessible metal tabs. This is the most difficult step. Lack of Quality Control during assembly may prevent the kevboard from lifting out without breaking!!
This step may be performed after battery removal. Use care when removing ribbon cable: the white clips holding the black plastic "keeper" are fragile. Reassembly possible without white clips; however, jostling may cause the ribbon to come free.
-


To reassemble your device, follow these instructions in reverse order.
To reassemble your device, follow these instructions in reverse order.
crwdns2935221:0crwdne2935221:0
crwdns2935229:04crwdne2935229:0
crwdns2915084:0crwdne2915084:0

Cal Poly, Team 22-2, Maness Fall 2010 crwdns2935289:0Cal Poly, Team 22-2, Maness Fall 2010crwdne2935289:0
CPSU-MANESS-F10S22G2
crwdns2931471:06crwdne2931471:0
crwdns2935297:020crwdne2935297:0
crwdns2947412:03crwdne2947412:0
hi, steps 5 and 6 are not needed. not sure about removing RAM either. If I look on my removed keyboard, all I see are three places for screws - those located nearby battery socket.
I think steps 3,4,5,6,7 are not needed! The essential problem in removing the keyboard is not shown: how to lift the keyboard! Use the flat side or back of a screwdriver to push the metal strips shown in step 8 up (in the direction of the keyboard) to lift the keyboard. Put your fingers under the edge of the keyboard and pull gently but firmly. There is some resistance of the holding cover.
Thank you so much for the link!
Alex -