crwdns2915892:0crwdne2915892:0
A guide on how to remove the Top Cover of your Compaq Evo N1000v laptop.
crwdns2942213:0crwdne2942213:0
-
-
Flip the laptop over with the rear panel facing forward.
-
-
-
Using a TR8 Torx screwdriver, remove the two T8 Torx screws that secure the LED cover to the base enclosure.
-
-
-
Flip the laptop back over with the front facing forward. Open the screen.
-
-
-
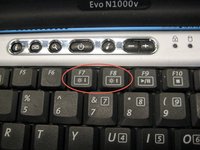
Locate the F1 and F2 keys near the top left corner of the keyboard.
-
-
-
While holding the F1 and F2 keys, insert a spudger between the keys into the notch in the LED cover. Lift up.
-
-
-
Locate the Scroll and Pause keys near the top right corner of the keyboard.
-
-
-
While holding the Scroll and Pause keys, insert a spudger between the keys into the notch in the LED cover. Lift up.
-
-
-
Insert a spudger between the F7 and F8 keys. Lift up to remove the LED cover.
-
-
-
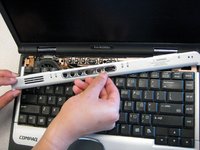
Lift the back edge of the keyboard and pull towards the screen.
-
-
-
-
Pull the cable and lift up to release.
-
-
-
Disconnect the cable connecting the fan to the system board.
-
-
-
Remove the four screws from the heat sink.
-
-
-
Pull the the heat sink up and out of the computer.
-
-
-
Close the laptop and flip it so the rear panel is facing up.
-
-
-
Using the TR8 Torx screwdriver, remove the six screws from the back case.
-
-
-
Remove the battery.
-
Remove the screw from the metal support on the case edge with a Torx T8 screwdriver.
-
Flip the laptop over again so the top is facing up.
-
Open the laptop screen and face it towards you.
-
-
-
Lift the the palm rest up from the front edge of the laptop and swing it towards the screen.
-
-
-
Turn the laptop bottom side up.
-
-
-
Remove the two TM 2.5mm x 8.0mm screws that secure the top cover to the base.
-
-
-
Turn the base top side up with the front facing forward.
-
-
-
Remove the three TM 2.5 mm x 5.0 mm screws that secure the top cover to the base.
-
-
-
Lift the top cover straight up about one inch, then slide forward until the microphone cable is exposed.
-
Disconnect the microphone cable from the system board.
-


To reassemble your device, follow these instructions in reverse order.
crwdns2935287:0crwdne2935287:0

Cal Poly, Team 29-74, Johann Spring 2010 crwdns2935289:0Cal Poly, Team 29-74, Johann Spring 2010crwdne2935289:0
CPSU-JOHANN-S10S29G74
crwdns2931471:03crwdne2931471:0
crwdns2935297:014crwdne2935297:0