crwdns2915892:0crwdne2915892:0
Carpal Tunnel Syndrome is one of the worst outcomes that comes from poor wrist placement. Wrist placement that comes from typing on a keyboard, or more specifically, on a laptop keyboard. The purpose of the palm rest is to ensure proper wrist posture, and its purpose is dedicated to ensuring that no lifelong inconveniences come of it.
In this guide, you will be guided step by step in order to properly disassemble and replace the palm rest for a Compaq Evo N1000v.
There is no special skillset required for this fix, besides a slight learning curve that comes with the learning the surface-level intricacies that come with opening up a laptop.
crwdns2942213:0crwdne2942213:0
-
-
Flip the laptop over with the rear panel facing forward.
-
-
-
Using a TR8 Torx screwdriver, remove the two T8 Torx screws that secure the LED cover to the base enclosure.
-
-
-
Flip the laptop back over with the front facing forward. Open the screen.
-
-
-
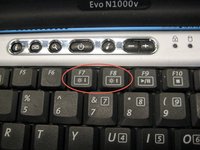
Locate the F1 and F2 keys near the top left corner of the keyboard.
-
-
-
While holding the F1 and F2 keys, insert a spudger between the keys into the notch in the LED cover. Lift up.
-
-
-
Locate the Scroll and Pause keys near the top right corner of the keyboard.
-
-
-
-
While holding the Scroll and Pause keys, insert a spudger between the keys into the notch in the LED cover. Lift up.
-
-
-
Insert a spudger between the F7 and F8 keys. Lift up to remove the LED cover.
-
-
-
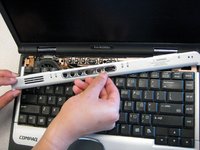
Lift the back edge of the keyboard and pull towards the screen.
-
-
-
Pull the cable and lift up to release.
-
-
-
Close the laptop and flip it so the rear panel is facing up.
-
-
-
Using the TR8 Torx screwdriver, remove the six screws from the back case.
-
-
-
Remove the battery.
-
Remove the screw from the metal support on the case edge with a Torx T8 screwdriver.
-
Flip the laptop over again so the top is facing up.
-
Open the laptop screen and face it towards you.
-
-
-
Lift the the palm rest up from the front edge of the laptop and swing it towards the screen.
-


To reassemble your device, follow these instructions in reverse order.
To reassemble your device, follow these instructions in reverse order.
crwdns2935221:0crwdne2935221:0
crwdns2935227:0crwdne2935227:0
crwdns2915084:0crwdne2915084:0

Cal Poly, Team 29-74, Johann Spring 2010 crwdns2935289:0Cal Poly, Team 29-74, Johann Spring 2010crwdne2935289:0
CPSU-JOHANN-S10S29G74
crwdns2931471:03crwdne2931471:0
crwdns2935297:014crwdne2935297:0