crwdns2915892:0crwdne2915892:0
The Video Interface Controller (VIC) is is the graphics chip for the C64.
crwdns2942213:0crwdne2942213:0
-
-
1. Remove three 6.75mm ph2 screw heads from the casing
-
-
-
2. Split the case of the C64 open by pulling up on the case towards you
Good advice, but is there a reliable way of keeping the clips intact?
And probably never will fill it out.
-
-
-
-
1. Detach the multi-colored wire bundles that's connected to the motherboard
-
-
-
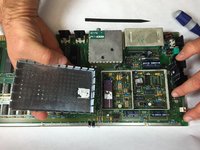
2. Without using any tools prop up the metal VIC plate with both hands to expose the VIC chip.
-
-
-
3. Use a Phillips screwdriver to pry up the VIC chip. Then, use your hands and with small pressure pull it away to remove it from the motherboard.
Carful with that removal, you can easily bend legs or put too much stress on the chip itself. Also much preferred to use a *flat* screwdriver and make sure to not bruise any traces on the motherboard. The proper way to do it is to also remove the metal frame around that area, then use a chip removal tool if available - or at least be able to lift the chip carefully from both sides evenly.
I concur; the photo in question offers limited guidance. Upon closer examination of the second image, where the chip has been removed, it becomes evident that there are visible traces on the board. Furthermore, the angle at which the screwdriver is positioned suggests that force may have been applied directly to the board, creating an impression of potential leverage.
-


To reassemble your device, follow these instructions in reverse order.
To reassemble your device, follow these instructions in reverse order.
crwdns2935221:0crwdne2935221:0
crwdns2935229:02crwdne2935229:0
crwdns2915084:0crwdne2915084:0

USF Tampa, Team 13-6, Staggers Fall 2014 crwdns2935289:0USF Tampa, Team 13-6, Staggers Fall 2014crwdne2935289:0
USFT-STAGGERS-F14S13G6
crwdns2931471:04crwdne2931471:0
crwdns2935297:015crwdne2935297:0
crwdns2947410:01crwdne2947410:0
It's awesome to see that people care enough about these machines to make repair guides about them! Great job!