crwdns2933423:0crwdne2933423:0

Comfort Zone CZ6C Power Cable Replacement

crwdns2942213:0crwdne2942213:0

  1. Comfort Zone CZ6C Power Cable Replacement, Power Cable: crwdns2935265:01crwdnd2935265:01crwdnd2935265:03crwdne2935265:0 Comfort Zone CZ6C Power Cable Replacement, Power Cable: crwdns2935265:01crwdnd2935265:02crwdnd2935265:03crwdne2935265:0 Comfort Zone CZ6C Power Cable Replacement, Power Cable: crwdns2935265:01crwdnd2935265:03crwdnd2935265:03crwdne2935265:0
    • Make sure to unplug the Comfort Zone CZ6C before cutting any wires.

    • Before attempting to replace your power cable, learn how to solder using the How To Solder and Desolder Corrections Guide.

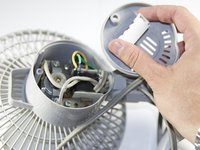
    • Start with the fan on its back. Unscrew the back panel to expose the internal wiring.

  2. Comfort Zone CZ6C Power Cable Replacement: crwdns2935265:02crwdnd2935265:01crwdnd2935265:03crwdne2935265:0 Comfort Zone CZ6C Power Cable Replacement: crwdns2935265:02crwdnd2935265:02crwdnd2935265:03crwdne2935265:0 Comfort Zone CZ6C Power Cable Replacement: crwdns2935265:02crwdnd2935265:03crwdnd2935265:03crwdne2935265:0
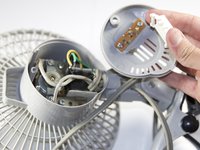
    • Unscrew the yellow cap that connects the black wire and the gray power cord wire. Then, unwind the tied wires and pull them apart.

  3. Comfort Zone CZ6C Power Cable Replacement: crwdns2935265:03crwdnd2935265:01crwdnd2935265:02crwdne2935265:0 Comfort Zone CZ6C Power Cable Replacement: crwdns2935265:03crwdnd2935265:02crwdnd2935265:02crwdne2935265:0
    • Remove the plastic cover on the switch by pulling it apart from the back panel.

  4. Comfort Zone CZ6C Power Cable Replacement: crwdns2935265:04crwdnd2935265:01crwdnd2935265:01crwdne2935265:0
    • Use the soldering iron with caution. Don't touch the tip of the soldering iron to avoid the risk of injury.

    • This step can be made easier with the help of a partner to hold the wiring while you desolder the connection.

    • Disconnect the gray power wire from the switch by desoldering the connection.

  5. Comfort Zone CZ6C Power Cable Replacement: crwdns2935265:05crwdnd2935265:01crwdnd2935265:01crwdne2935265:0
    • Strip the end of the gray power cord.

    • Then solder the end of the gray power cord to the switch.

crwdns2915888:0crwdne2915888:0

To reassemble your device, follow these instructions in reverse order.

Nishanth Dara

crwdns2935283:004/08/15crwdne2935283:0

141 crwdns2915208:0crwdne2915208:0

crwdns2935295:0crwdne2935295:0

crwdns2915084:0crwdne2915084:0

Cal Poly, Team 17-5, Forte Spring 2015 crwdns2935289:0Cal Poly, Team 17-5, Forte Spring 2015crwdne2935289:0

CPSU-FORTE-S15S17G5

crwdns2931471:04crwdne2931471:0

crwdns2935297:05crwdne2935297:0

crwdns2944067:00crwdne2944067:0

crwdns2917038:0crwdne2917038:0

crwdns2936625:0crwdne2936625:0:

crwdns2936751:024crwdne2936751:0 0

crwdns2936753:07crwdne2936753:0 4

crwdns2936753:030crwdne2936753:0 19

crwdns2942667:0crwdne2942667:0 2,855