crwdns2933423:0crwdne2933423:0

Chromo Inc. T2 Internal Speaker Replacement

crwdns2942213:0crwdne2942213:0

  1. Chromo Inc. T2 Internal Speaker Replacement, Removing the Casing: crwdns2935265:01crwdnd2935265:01crwdnd2935265:03crwdne2935265:0 Chromo Inc. T2 Internal Speaker Replacement, Removing the Casing: crwdns2935265:01crwdnd2935265:02crwdnd2935265:03crwdne2935265:0 Chromo Inc. T2 Internal Speaker Replacement, Removing the Casing: crwdns2935265:01crwdnd2935265:03crwdnd2935265:03crwdne2935265:0
    • Using your Plastic Opening Tool, place it in between the screen and the case. Slowly move it around the casing while prying in a downward motion to undo the hinges holding the two together and separate the two parts.

  2. Chromo Inc. T2 Internal Speaker Replacement, Turn it around: crwdns2935265:02crwdnd2935265:01crwdnd2935265:01crwdne2935265:0
    • After separating the case and screen, turn your screen face down so you can see the internal parts!

  3. Chromo Inc. T2 Internal Speaker Replacement, Removing the Tape: crwdns2935265:03crwdnd2935265:01crwdnd2935265:03crwdne2935265:0 Chromo Inc. T2 Internal Speaker Replacement, Removing the Tape: crwdns2935265:03crwdnd2935265:02crwdnd2935265:03crwdne2935265:0 Chromo Inc. T2 Internal Speaker Replacement, Removing the Tape: crwdns2935265:03crwdnd2935265:03crwdnd2935265:03crwdne2935265:0
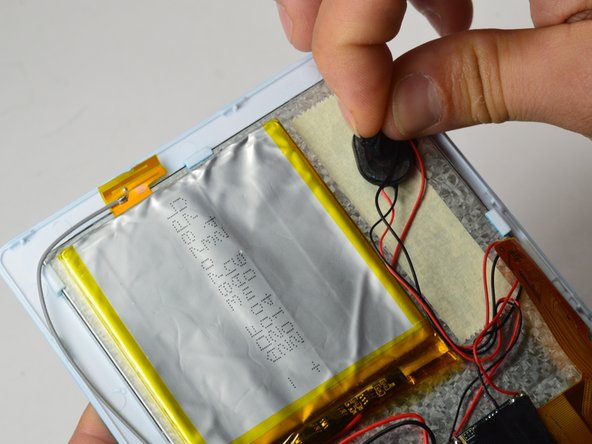
    • Remove two strips of tape: One holding down the wires and the other holding down the internal speaker.

  4. Chromo Inc. T2 Internal Speaker Replacement, Desoldering the Wires and Removing the Speaker: crwdns2935265:04crwdnd2935265:01crwdnd2935265:03crwdne2935265:0 Chromo Inc. T2 Internal Speaker Replacement, Desoldering the Wires and Removing the Speaker: crwdns2935265:04crwdnd2935265:02crwdnd2935265:03crwdne2935265:0 Chromo Inc. T2 Internal Speaker Replacement, Desoldering the Wires and Removing the Speaker: crwdns2935265:04crwdnd2935265:03crwdnd2935265:03crwdne2935265:0
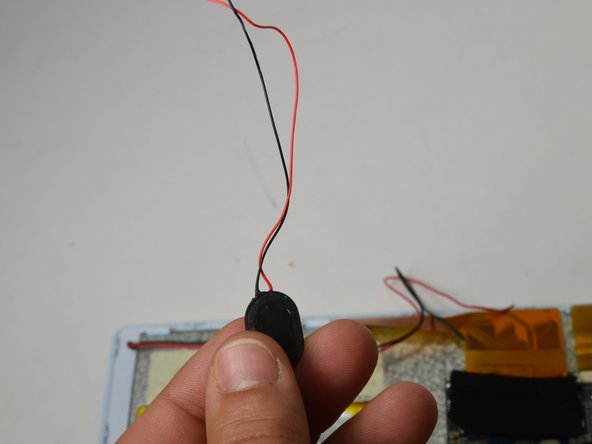
    • Using a Soldering Iron, desolder both speaker wires. Once both wires are desoldered, your Internal Speaker is now ready for replacement!

    • Soldering Iron gets very hot, take care to not touch anywhere on the soldering iron except for the handle!

crwdns2915888:0crwdne2915888:0

To reassemble your device, follow these instructions in reverse order.

Ismael DeLuna

crwdns2935283:001/21/15crwdne2935283:0

637 crwdns2915208:0crwdne2915208:0

crwdns2935297:05crwdne2935297:0

crwdns2915084:0crwdne2915084:0

USF Tampa, Team 15-1, Watkins Winter 2015 crwdns2935289:0USF Tampa, Team 15-1, Watkins Winter 2015crwdne2935289:0

USFT-WATKINS-W15S15G1

crwdns2931471:04crwdne2931471:0

crwdns2935297:06crwdne2935297:0

crwdns2944067:00crwdne2944067:0

crwdns2917038:0crwdne2917038:0

crwdns2936625:0crwdne2936625:0:

crwdns2936751:024crwdne2936751:0 1

crwdns2936753:07crwdne2936753:0 2

crwdns2936753:030crwdne2936753:0 2

crwdns2942667:0crwdne2942667:0 210