crwdns2933423:0crwdne2933423:0

Chromebook x360 14-da0011dx Motherboard Replacement

crwdns2942213:0crwdne2942213:0

  1. Chromebook x360 14-da0011dx Motherboard Replacement, Lower Case: crwdns2935265:01crwdnd2935265:01crwdnd2935265:01crwdne2935265:0
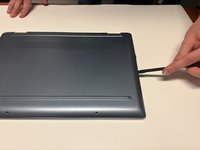
    • Flip the device over with the hinge facing away from you.

    • On the back of the device, remove the two rubber strips on the top and the bottom of the device using a spudger.

  2. Chromebook x360 14-da0011dx Motherboard Replacement: crwdns2935265:02crwdnd2935265:01crwdnd2935265:02crwdne2935265:0 Chromebook x360 14-da0011dx Motherboard Replacement: crwdns2935265:02crwdnd2935265:02crwdnd2935265:02crwdne2935265:0
    • Remove the seven 8.0 mm screws located under the two rubber pads and the screws along the back of the device using a Phillips #1 screwdriver.

  3. Chromebook x360 14-da0011dx Motherboard Replacement: crwdns2935265:03crwdnd2935265:01crwdnd2935265:03crwdne2935265:0 Chromebook x360 14-da0011dx Motherboard Replacement: crwdns2935265:03crwdnd2935265:02crwdnd2935265:03crwdne2935265:0 Chromebook x360 14-da0011dx Motherboard Replacement: crwdns2935265:03crwdnd2935265:03crwdnd2935265:03crwdne2935265:0
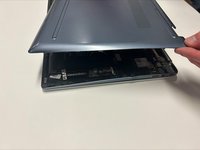
    • Use a spudger to gently pry the edges of the back cover off the device. Slowly work all the way around the device until the panel comes loose.

  4. Chromebook x360 14-da0011dx Motherboard Replacement, Battery: crwdns2935265:04crwdnd2935265:01crwdnd2935265:02crwdne2935265:0 Chromebook x360 14-da0011dx Motherboard Replacement, Battery: crwdns2935265:04crwdnd2935265:02crwdnd2935265:02crwdne2935265:0
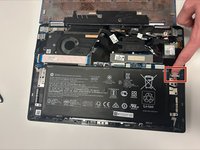
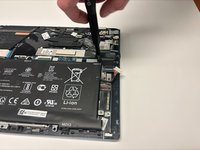
    • Remove the cable attached to the battery.

  5. Chromebook x360 14-da0011dx Motherboard Replacement: crwdns2935265:05crwdnd2935265:01crwdnd2935265:02crwdne2935265:0 Chromebook x360 14-da0011dx Motherboard Replacement: crwdns2935265:05crwdnd2935265:02crwdnd2935265:02crwdne2935265:0
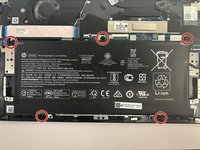
    • Remove the five 3.0 mm screws holding the battery in place using the Phillips #1 screwdriver.

  6. Chromebook x360 14-da0011dx Motherboard Replacement: crwdns2935265:06crwdnd2935265:01crwdnd2935265:01crwdne2935265:0
    • Lift the battery out of the chassis.

  7. Chromebook x360 14-da0011dx Motherboard Replacement, Fan: crwdns2935265:07crwdnd2935265:01crwdnd2935265:01crwdne2935265:0
    • Remove the two 3.0 mm Phillips #1 screws holding the fan in place.

  8. Chromebook x360 14-da0011dx Motherboard Replacement: crwdns2935265:08crwdnd2935265:01crwdnd2935265:02crwdne2935265:0 Chromebook x360 14-da0011dx Motherboard Replacement: crwdns2935265:08crwdnd2935265:02crwdnd2935265:02crwdne2935265:0
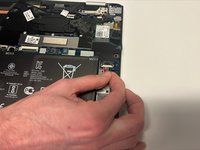
    • Disconnect the fan cable from the motherboard.

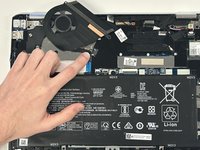
    • Carefully remove the fan from the computer.

    • Be careful when removing the fan, as it sits under one of the CPU heat pipes and tucks under the ribbon cable that runs to the I/O board.

  9. Chromebook x360 14-da0011dx Motherboard Replacement, Motherboard: crwdns2935265:09crwdnd2935265:01crwdnd2935265:03crwdne2935265:0 Chromebook x360 14-da0011dx Motherboard Replacement, Motherboard: crwdns2935265:09crwdnd2935265:02crwdnd2935265:03crwdne2935265:0 Chromebook x360 14-da0011dx Motherboard Replacement, Motherboard: crwdns2935265:09crwdnd2935265:03crwdnd2935265:03crwdne2935265:0
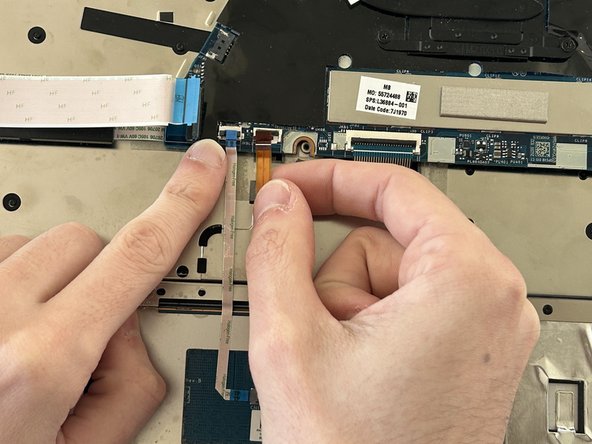
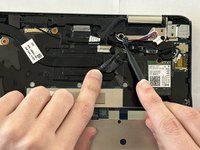
    • Lift the ZIF connector locking flaps, then remove the ribbon cables.

    • There are several small connections for the ribbon cables. Exercise extreme caution when disconnecting the cables.

    • One ribbon cable is on the underside of the motherboard and will be removed later.

  10. Chromebook x360 14-da0011dx Motherboard Replacement: crwdns2935265:010crwdnd2935265:01crwdnd2935265:01crwdne2935265:0
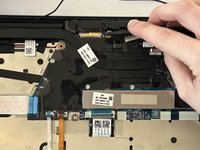
    • Remove the three 3.0 mm Phillips #1 screws holding the motherboard in place.

  11. Chromebook x360 14-da0011dx Motherboard Replacement: crwdns2935265:011crwdnd2935265:01crwdnd2935265:03crwdne2935265:0 Chromebook x360 14-da0011dx Motherboard Replacement: crwdns2935265:011crwdnd2935265:02crwdnd2935265:03crwdne2935265:0 Chromebook x360 14-da0011dx Motherboard Replacement: crwdns2935265:011crwdnd2935265:03crwdnd2935265:03crwdne2935265:0
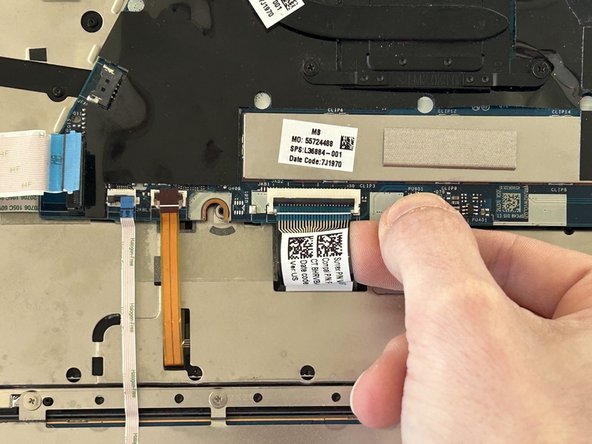
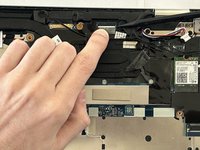
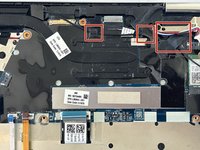
    • Disconnect the cables attached to the Wi-Fi card and motherboard along the top edge.

    • The leftmost connector is a ribbon-style connector with a metal locking bar that must be unlatched.

  12. Chromebook x360 14-da0011dx Motherboard Replacement: crwdns2935265:012crwdnd2935265:01crwdnd2935265:03crwdne2935265:0 Chromebook x360 14-da0011dx Motherboard Replacement: crwdns2935265:012crwdnd2935265:02crwdnd2935265:03crwdne2935265:0 Chromebook x360 14-da0011dx Motherboard Replacement: crwdns2935265:012crwdnd2935265:03crwdnd2935265:03crwdne2935265:0
    • Use a spudger to remove the tape and plastic shielding that secure the wires.

  13. Chromebook x360 14-da0011dx Motherboard Replacement: crwdns2935265:013crwdnd2935265:01crwdnd2935265:01crwdne2935265:0
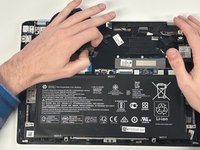
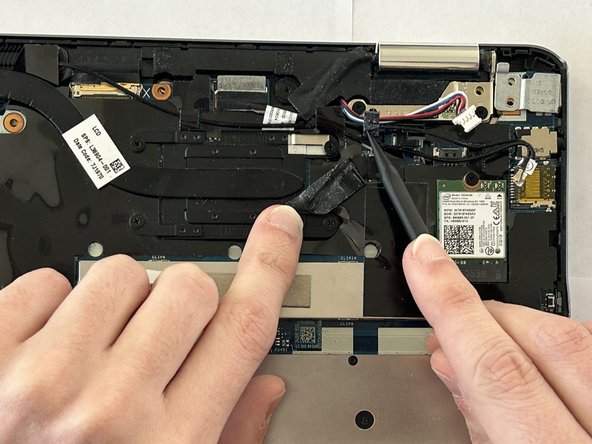
    • Gently lift the motherboard until it is loose.

    • Disconnect the ribbon cable attached to the underside of the motherboard.

    • The locking flap on this ribbon cable must be flipped down to unlock.

  14. Chromebook x360 14-da0011dx Motherboard Replacement: crwdns2935265:014crwdnd2935265:01crwdnd2935265:01crwdne2935265:0
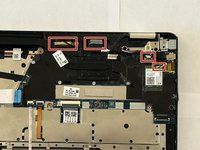
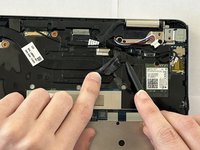
    • Lift the motherboard from the device.

    • Removal of the heat pipes may be necessary for replacement if your new replacement motherboard doesn't have one installed.

crwdns2915888:0crwdne2915888:0

To reassemble your device, follow these instructions in reverse order.

crwdns2935227:0crwdne2935227:0

Jake Williamson

crwdns2935283:002/14/23crwdne2935283:0

559 crwdns2915208:0crwdne2915208:0

crwdns2935297:04crwdne2935297:0

crwdns2915084:0crwdne2915084:0

Western Carolina University, Team 1-2, Virtue Spring 2023 crwdns2935289:0Western Carolina University, Team 1-2, Virtue Spring 2023crwdne2935289:0

WCU-VIRTUE-S23S1G2

crwdns2931471:04crwdne2931471:0

crwdns2935297:06crwdne2935297:0

crwdns2944067:00crwdne2944067:0

crwdns2917038:0crwdne2917038:0

crwdns2936625:0crwdne2936625:0:

crwdns2936751:024crwdne2936751:0 3

crwdns2936753:07crwdne2936753:0 6

crwdns2936753:030crwdne2936753:0 16

crwdns2942667:0crwdne2942667:0 213