crwdns2915892:0crwdne2915892:0
This guide will remove the battery from your ASUS Chromebook Flip C302 and allow for installing a new battery.
crwdns2942213:0crwdne2942213:0
-
-
Turn the Chromebook upside down. You may want to place paper or another soft material between the lid and your work surface, so as not to scratch it.
-
Remove the 10 (6.14 mm) case screws with a T4 Torx driver.
-
-
-
Using a spudger (or prying tool, or fingernail), gently lift the feet at the rear of the laptop (near the hinges). Get underneath the pad, then release the adhesive by sweeping in a circular motion.
-
Store the feet upside down and not sticking to anything―you can likely re-adhere them after replacing the cover.
-
-
-
Use a #00 screwdriver to remove the 3.17 mm screws from beneath the rear feet.
-
-
-
Using a plastic prying tool (avoid metal, as the case is easily scratched), lift the back cover from the case. The underside of a hinge is a good place to start.
-
You'll feel the cover give way, but there are loose clips holding the lid on. Work gently around the lid, prying and moving beyond clips when you encounter them.
-
-
-
-
Pull away the back cover. You now have access to the battery, the write-protect screw, and other components.
-
-
-
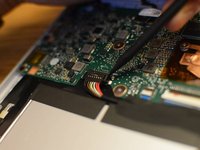
Locate the battery connector. With the large silver/black battery facing you, the connector is just above it, in the middle-left. But first we must remove some tape.
-
-
crwdns2935267:0crwdne2935267:0Tweezers$4.99
-
Using a spudger or other ESD-safe plastic tool, pry the thick plastic tape and foam top off the connector, just above the multi-colored leading to the connector.
-
You may use tweezers, or fingers, to get a better grip on the tape, but be cautious not to touch metal or electrical components, as the battery is still attached.
-
-
-
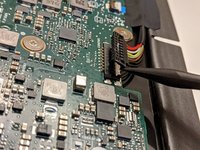
Using a spudger or prying tool (but no metal), gently pry one side of the connector up from the board.
-
After one side has popped loose from its socket, repeat the procedure with the other side, until the connector is loose.
-
-
-
Following the wires from the connector back to the battery, you'll find a piece of thick electrical tape about halfway up the wires. Using tweezers, peel up and remove this sticky tape with slow, even force.
-
-
-
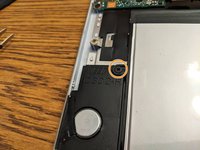
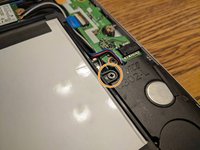
Look for Phillips #0 screws to the left and right of the battery, in small bump-outs to attach the battery to the speakers on both sides. Remove these screws.
-
-
-
Pulling from the bottom (near the hinges), gently lift and pull the battery out.
-


To reassemble your device, follow these instructions in reverse order. Be sure to replace all the tap and foam pads―they help protect delicate cables and components from impacts.
crwdns2935221:0crwdne2935221:0
crwdns2935229:039crwdne2935229:0

crwdns2947412:020crwdne2947412:0
Thank you so much for this guide - worked great. My repair might not have been successful without this guide.
This was my first experience trying anything like this and it was PERFECT - AWESOME experience. This saved me over $500 from buying a new Chromebook. Thanks again!!
Me too - very straightforward, worked perfectly. Many thanks!
Thank you for this! I used this along with some tools I bought from you guys from an iPad repair and changed out the battery in 15 minutes. It saved me from buying a new Chromebook.
So I needed to replace the battery and the one on your link did nnot give any results so I found a battery online to buy- whihc arrived and I replaced using your guide.But the chroebook says battery doe snot exist, there is noicon.I have tried a frimware update, hard reset everything. when I put back theold battery it finds it, but the replacement it does not recognise. Now I am worried the battery I bought they sent me was faulty? as when I run a battery_firmware check it gives :
Battery info:
OEM name:
Model number:
Chemistry : OTD0
Serial number:
Design capacity: 5065 mAh
Last full charge: 0 mAh
Design output voltage 7700 mV
Cycle count 1
Present voltage 0 mV
Present current 0 mA
Remaining capacity 0 mAh
Flags 0x00
So now I am at a loss at what to do other than chuckitall in the bin and buy a new one? any ideas greatfully recieved. Thanks,