crwdns2915892:0crwdne2915892:0
In order to remove and replace the circuit board, the back panel must first be removed by taking out the two screws on the back of the device. To reduce the chances of damaging the meter, remove the battery as soon as the back cover is removed. Next, the four screws that secure the circuit board must be removed. This will free the circuit board to be removed and replaced.
crwdns2942213:0crwdne2942213:0
-
-
Place the meter face down, and the back panel and screws can be seen.
-
-
-
Unscrew the two 9mm screws on the back panel using a #0 Phillips screwdriver.
-
-
-
-
Remove the back panel of the device by lifting upward.
-
Remove the battery from the meter before continuing.
-
-
-
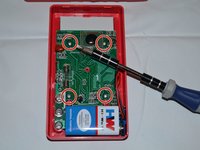
Remove the four 7mm Phillips screws holding the circuit board in place.
-
-
-
Gently lift the circuit board away from the device casing.
-


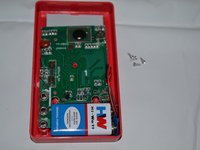

To reassemble your device, follow these instructions in reverse order.
crwdns2935221:0crwdne2935221:0
crwdns2935229:06crwdne2935229:0
crwdns2935287:0crwdne2935287:0

Clemson, Team 2-4, Benson Fall 2014 crwdns2935289:0Clemson, Team 2-4, Benson Fall 2014crwdne2935289:0
CLEM-BENSON-F14S2G4
crwdns2931471:04crwdne2931471:0
crwdns2935297:06crwdne2935297:0
crwdns2947410:01crwdne2947410:0
What is the little dial on the circuit board on the upper right that has numbers 1 through 3 on it and it can be adjusted thank you