crwdns2915892:0crwdne2915892:0
If the device is unable to turn on, it may be necessary to replace the battery. This guide will show how to remove the old battery, and how to replace it with a new one.
crwdns2942213:0crwdne2942213:0
-
-
Place the meter face down, and the back panel and screws can be seen.
-
-
-
Unscrew the two 9mm screws on the back panel using a #0 Phillips screwdriver.
-
-
-
Remove the back panel of the device by lifting upward.
-
Remove the battery from the meter before continuing.
-
-
-
-
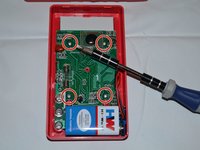
Remove the four 7mm Phillips screws holding the circuit board in place.
-
-
-
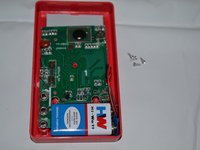
Gently lift the circuit board away from the device casing.
-
-
-
After removing the outer casing and motherboard of the device, locate the attachment site of the battery to the motherboard.
-
-
-
Unsnap the battery from its attachment plate.
-


To reassemble your device, follow these instructions in reverse order.
To reassemble your device, follow these instructions in reverse order.
crwdns2935221:0crwdne2935221:0
crwdns2935229:04crwdne2935229:0
crwdns2915084:0crwdne2915084:0

Clemson, Team 2-4, Benson Fall 2014 crwdns2935289:0Clemson, Team 2-4, Benson Fall 2014crwdne2935289:0
CLEM-BENSON-F14S2G4
crwdns2931471:04crwdne2931471:0
crwdns2935297:06crwdne2935297:0
crwdns2947412:06crwdne2947412:0
My case was glued or welded together. I thought it was going to break elsewhere first
No need to remove the board. Just use a screwdriver to pop the battery connector off
In at least some of these meters, the caution label has been applied upside-down, so that it covers the screw holes.
The top of the panel has two tabs engaged (can be seen by carefully examining photos above). After screws are freed, lift the bottom edge first to allow tabs to disengage. Also, routing of battery clip wires is critical; take care that they clear the case edges.
Can't get 2nd screw out!!
I had a spring in mine, and when my grandson took it apart to change battery, I don’t know where the spring came out
Thanks a bunch! Still getting views in 2024!