
Casio LK-170 Key Replacement

crwdns2959932:0crwdnd2959932:0Samantha Bakercrwdnd2959932:0crwdnd2959932:0crwdnd2959932:03crwdnd2959932:0crwdne2959932:0
crwdns2959936:0Kul 30, 2017crwdne2959936:0
crwdns2869540:0crwdne2869540:0: 3,2 mil
crwdns2959988:0crwdne2959988:0
- crwdns2959990:0crwdne2959990:0
- 3
- crwdns2959992:0crwdne2959992:0
- 20
- crwdns2959994:0crwdne2959994:0
- 98
- crwdns2959996:0crwdne2959996:0
- 3.178
crwdns2955950:0crwdne2955950:0: 3
crwdns2960002:01crwdne2960002:0, crwdns2960008:02crwdne2960008:0
crwdns2960000:0crwdne2960000:0crwdns2959984:0crwdne2959984:0: 2 3
crwdns2959974:02crwdne2959974:0
crwdns2959970:03crwdne2959970:0
crwdns2959986:0crwdne2959986:0: 1 2
crwdns2959980:01crwdne2959980:0
crwdns2959978:02crwdne2959978:0
crwdns2915892:0crwdne2915892:0
crwdns2959928:0crwdne2959928:0 ↓Key's stuck or broken? No problem. Replace sets of keys in no time with the help of a screwdriver.
crwdns2959930:0crwdne2959930:0
crwdns2943215:0crwdne2943215:0

-
-
-
You will begin by removing 4 screws on each side of the piano, circled in red.
-
You will then remove the four screws that are a little hidden, circled in orange.
-
Next, remove the two screws in the middle of piano, as well as the three screws on the top of the piano, circled in yellow.
 crwdns2952109:0crwdne2952109:0
-
-
-
After flipping the keyboard over to the front, carefully remove the the front panel from the back panel of the keyboard using your hands.
-
You should now see the screws holding the keys in place.
-
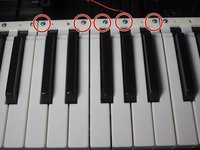
With a JIS-1 bit, unscrew the five screws in the section with the key you want to replace.
-
-
-
-
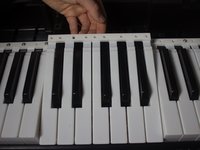
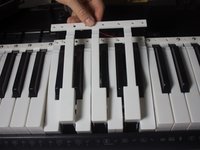
You will be able to pick up the white keys with your hands and remove them.
-
-




To reassemble your device, follow these instructions in reverse order.
crwdns2935221:0crwdne2935221:0
crwdns2935229:02crwdne2935229:0

crwdns2935287:0crwdne2935287:0

Cal Poly, Team 13-2, Banghart Winter 2017 crwdns2935289:0Cal Poly, Team 13-2, Banghart Winter 2017crwdne2935289:0
CPSU-BANGHART-W17S13G2
crwdns2931471:03crwdne2931471:0
crwdns2935297:060crwdne2935297:0
crwdns2947412:02crwdne2947412:0
This guide also works for the Casio LK-175.
The keys are in small groups and you will need to purchase the correct ones. Unfortunately, the ones I received from a seller did not match. I think he thought the part was compatible between my keyboard and the one he pulled them from. I very carefully tried super-gluing the key back onto it's section and so far so good (a few hours). Hopefully, the repair will hold.
Thank you for the guide Samantha.
Steve Ferrel - crwdns2934203:0crwdne2934203:0 crwdns2950251:0crwdne2950251:0
Do you know if this exposes the circuit board(s)? I need to open my Casio LK175 to figure out why it's only working with batteries. I need to test the power adapter with a load...but the easiest way to do that would probably be measuring the voltage on the pins inside the board.
Thanks for posting this BTW. I saw so many screws on the bottom. I figured a lot of em were holding the keys. I was afraid to open it up, because I figured I'd mess it up. This is very helpful!
Heather Hodge - crwdns2934203:0crwdne2934203:0 crwdns2950251:0crwdne2950251:0
