crwdns2915892:0crwdne2915892:0
This guide provides the process of replacing the battery for a Casio G-Shock G8900A-1CR watch.
Although this G-Shock model incorporates a solar cell to extend battery life, there comes a point when the battery reaches its expected lifespan of around 10 years. This can cause issues such as the LED malfunctioning or the watch ceasing to function altogether. At this point, replacing the battery becomes essential to safeguard the watch from potential damage.
crwdns2942213:0crwdne2942213:0
-
-
Use a Phillips #00 screwdriver to unscrew the four 2.0mm screws on the back cover of the watch.
-
-
crwdns2935267:0crwdne2935267:0Tweezers$4.99
-
Remove the back cover.
-
Use tweezers to remove the rubber gasket.
-
-
-
Use tweezers to remove the rubber cover.
-
-
-
-
Use tweezers to press in the gap in the opening of the battery protection.
-
Raise the battery protection.
-
-
-
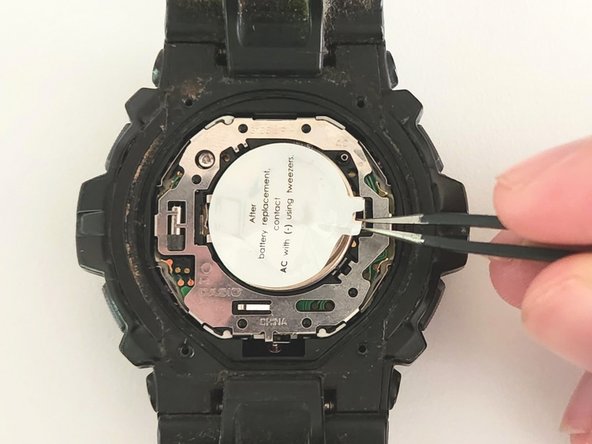
Use tweezers to remove the old CR2016 3V battery.
-
-
-
Insert the new CR2016 3V battery into the compartment.
-
Close the battery protection by gently pressing on it.
-
-
-
Put the rubber gasket and cover back in their original position, and tighten the four 2.0mm screws using a Phillips #00 screwdriver.
-
-
-
Press the [ADJUST] button until the seconds starts blinking.
-
Press the [MODE] button to go through the settings until you get to the hour, minute, and seconds adjustment.
-
Press the [FORWARD] button to scroll forwards, for example, from 9 to 10 o'clock.
-
Press the [REVERSE] button to scroll backwards, for example, from 10 to 9 o'clock.
-


When you need to dispose of your CR2016 3V battery, please take them to a battery recycling center, use a battery drop-off location, or arrange a battery pick-up through your local government's website.
When you need to dispose of your CR2016 3V battery, please take them to a battery recycling center, use a battery drop-off location, or arrange a battery pick-up through your local government's website.

crwdns2915084:0crwdne2915084:0

York University, Team 2-12, O'Regan Fall 2023 crwdns2935289:0York University, Team 2-12, O'Regan Fall 2023crwdne2935289:0
YORK-O'REGAN-F23S2G12
crwdns2934841:01crwdne2934841:0
crwdns2935303:01crwdne2935303:0