crwdns2933423:0crwdne2933423:0

Casio CTK-501 Speaker Replacement

crwdns2942213:0crwdne2942213:0

  1. Casio CTK-501 Speaker Replacement, Bottom Panel: crwdns2935265:01crwdnd2935265:01crwdnd2935265:02crwdne2935265:0 Casio CTK-501 Speaker Replacement, Bottom Panel: crwdns2935265:01crwdnd2935265:02crwdnd2935265:02crwdne2935265:0
    • Flip the keyboard over so that the bottom is facing up.

    • Remove the twenty-seven 12 mm screws from the dark-grey panel using a Phillips #2 screwdriver.

  2. Casio CTK-501 Speaker Replacement: crwdns2935265:02crwdnd2935265:01crwdnd2935265:01crwdne2935265:0
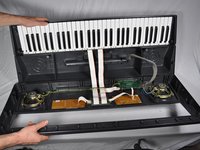
    • Remove the bottom panel by lifting and pulling it towards yourself.

  3. Casio CTK-501 Speaker Replacement: crwdns2935265:03crwdnd2935265:01crwdnd2935265:02crwdne2935265:0 Casio CTK-501 Speaker Replacement: crwdns2935265:03crwdnd2935265:02crwdnd2935265:02crwdne2935265:0
    • Flip open the top half of the keyboard.

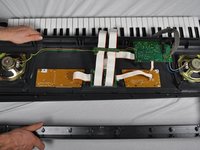
    • Set the keyboard onto the bottom half with the internal parts facing up.

    • Be careful not to let the bottom drop.

  4. Casio CTK-501 Speaker Replacement, Speaker: crwdns2935265:04crwdnd2935265:01crwdnd2935265:01crwdne2935265:0
    • Plug in the soldering iron and place somewhere safe to avoid burning yourself or causing a fire.

    • Completely unscrew and remove all four screws in the corners of the speaker.

  5. Casio CTK-501 Speaker Replacement: crwdns2935265:05crwdnd2935265:01crwdnd2935265:01crwdne2935265:0
    • Pull the speaker out of the keyboard and set on a flat surface to solder safely.

  6. Casio CTK-501 Speaker Replacement: crwdns2935265:06crwdnd2935265:01crwdnd2935265:01crwdne2935265:0
    • Be careful when removing the wires and avoid dripping solder on yourself or the keyboard.

    • Touch soldering iron to solder over the end of the wires, and when the solder melts, pull the wires away from the speaker.

    • Remove the speaker and replace with a new one.

  7. Casio CTK-501 Speaker Replacement: crwdns2935265:07crwdnd2935265:01crwdnd2935265:01crwdne2935265:0
    • Strip the wires if you need more clean metal to solder to the speaker.

    • Use the soldering iron to melt the solder over the wire to connect them to the speaker.

  8. Casio CTK-501 Speaker Replacement: crwdns2935265:08crwdnd2935265:01crwdnd2935265:01crwdne2935265:0
    • Completely screw in the screws back into the original positions on the corner of the speaker.

crwdns2915888:0crwdne2915888:0

To reassemble your device, follow these instructions in reverse order.

crwdns2935227:0crwdne2935227:0

Jimmy Winne

crwdns2935283:010/04/12crwdne2935283:0

578 crwdns2915208:0crwdne2915208:0

crwdns2935297:06crwdne2935297:0

crwdns2915084:0crwdne2915084:0

Cal Poly, Team 9-16, Amido Fall 2012 crwdns2935289:0Cal Poly, Team 9-16, Amido Fall 2012crwdne2935289:0

CPSU-AMIDO-F12S9G16

crwdns2931471:04crwdne2931471:0

crwdns2935297:06crwdne2935297:0

crwdns2917034:0crwdne2917034:0

I have a Casio ctk 691 Keyboard and it’s not Turning up is working is coming on but my volume slider is not working

Jacameron Bussey - crwdns2934203:0crwdne2934203:0

crwdns2917038:0crwdne2917038:0

crwdns2936625:0crwdne2936625:0:

crwdns2936751:024crwdne2936751:0 1

crwdns2936753:07crwdne2936753:0 2

crwdns2936753:030crwdne2936753:0 6

crwdns2942667:0crwdne2942667:0 6,432