crwdns2933423:0crwdne2933423:0

Canon PowerShot SX530 HS Back Panel Assembly

crwdns2942213:0crwdne2942213:0

  1. Canon PowerShot SX530 HS Back Panel Assembly, Canon PowerShot SX530 HS Back Panel Assembly: crwdns2935265:01crwdnd2935265:01crwdnd2935265:02crwdne2935265:0 Canon PowerShot SX530 HS Back Panel Assembly, Canon PowerShot SX530 HS Back Panel Assembly: crwdns2935265:01crwdnd2935265:02crwdnd2935265:02crwdne2935265:0
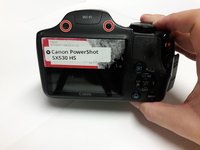
    • Flip over the camera.

    • Use a Phillips PH000 to remove the two 4mm screws near the center of the camera.

    • Use a Phillips PH000 to remove the two 6mm screws on the ends of the camera.

  2. Canon PowerShot SX530 HS Back Panel Assembly: crwdns2935265:02crwdnd2935265:01crwdnd2935265:02crwdne2935265:0 Canon PowerShot SX530 HS Back Panel Assembly: crwdns2935265:02crwdnd2935265:02crwdnd2935265:02crwdne2935265:0
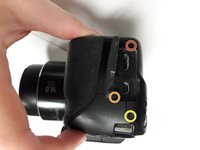
    • Locate the left side of the camera.

    • Use a Philips PH000 to remove the two 6mm screws.

  3. Canon PowerShot SX530 HS Back Panel Assembly: crwdns2935265:03crwdnd2935265:01crwdnd2935265:02crwdne2935265:0 Canon PowerShot SX530 HS Back Panel Assembly: crwdns2935265:03crwdnd2935265:02crwdnd2935265:02crwdne2935265:0
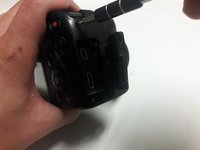
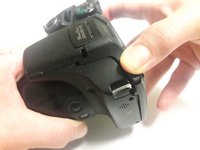
    • Rotate the camera to the side with the removable cover containing the HDMI and mini USB ports.

    • Use the Phillips PH000 to remove the 7mm screw located next to the HDMI port. This screw has red loctite.

    • Use the Phillips PH000 to remove the 4mm screw near the USB port.

    • Use the Phillips PH000 to remove the 7.4mm screw near the USB port.

  4. Canon PowerShot SX530 HS Back Panel Assembly: crwdns2935265:04crwdnd2935265:01crwdnd2935265:03crwdne2935265:0 Canon PowerShot SX530 HS Back Panel Assembly: crwdns2935265:04crwdnd2935265:02crwdnd2935265:03crwdne2935265:0 Canon PowerShot SX530 HS Back Panel Assembly: crwdns2935265:04crwdnd2935265:03crwdnd2935265:03crwdne2935265:0
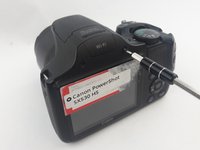
    • Rotate the camera to locate the side with the LCD screen.

    • Use a Phillips PH000 to remove the two 6mm screws above the LCD screen.

    • Once the screws are out the back panel, it is ready to be taken off. Grip the backside of the camera and pull it away evenly on every side. The backside must come off straight from the front.

crwdns2915888:0crwdne2915888:0

To reassemble your device, follow these instructions in reverse order.

crwdns2935229:02crwdne2935229:0

Xavier Patrick

crwdns2935283:002/02/17crwdne2935283:0

481 crwdns2915208:0crwdne2915208:0

crwdns2935297:03crwdne2935297:0

crwdns2915084:0crwdne2915084:0

USF Tampa, Team 16-4, Blackwell Spring 2017 crwdns2935289:0USF Tampa, Team 16-4, Blackwell Spring 2017crwdne2935289:0

USFT-BLACKWELL-S17S16G4

crwdns2931471:04crwdne2931471:0

crwdns2935297:09crwdne2935297:0

crwdns2944067:00crwdne2944067:0

crwdns2917038:0crwdne2917038:0

crwdns2936625:0crwdne2936625:0:

crwdns2936751:024crwdne2936751:0 0

crwdns2936753:07crwdne2936753:0 1

crwdns2936753:030crwdne2936753:0 5

crwdns2942667:0crwdne2942667:0 921