crwdns2942213:0crwdne2942213:0
-
-
There are a total of 6 (3mm) external screws that will need to be removed; 2 on the left side, 2 on the bottom, and 2 on the right side.
-
1.) Remove the 2 screws on the left side
-
2.) Remove the 2 screws on the bottom of the camera.
-
3.) Remove the 2 screws on the right side of the camera.
-
-
-
Use spludger tool or small flathead screw driver to gently lift and remove back face plate.
-
-
-
After removing exterior screws, gently lift off the front face plate.
-
-
-
After removing the front faceplate you will find 4 (3mm) screws on the interior.
-
Remove all 4 interior screws.
-
-
-
-
Remove 1 (6 mm) Screw from the bottom of the silver metal plate. The screw is also silver
-
-
-
With blue spludger tool gently lift the metal plate from the face of the camera.
-
The plate is held by a piece of double sided tape so there will be a bit of resistance.
-
-
-
Remove 3 (3 mm) screws from the top surface of the motherboard.
-
You will notice that there is one on the top, and 2 on the bottom in a triangular shape.
-
-
crwdns2935267:0crwdne2935267:0Tweezers$4.99
-
Gently remove the ribbon cable from the top of the motherboard with a pair of tweezers.
-
-
-
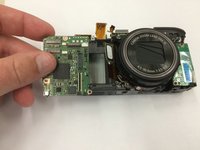
Use the blue spludger tool to gently unplug the last ribbon cable that is attached to the motherboard.
-
-
-
Remove the motherboard with your fingers.
-


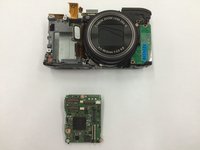
To reassemble your device, follow these instructions in reverse order.
crwdns2935221:0crwdne2935221:0
crwdns2935229:03crwdne2935229:0
crwdns2935287:0crwdne2935287:0

Sam Houston State, Team 11-8, Blackburne Winter 2015 crwdns2935289:0Sam Houston State, Team 11-8, Blackburne Winter 2015crwdne2935289:0
SHSU-BLACKBURNE-W15S11G8
crwdns2931471:02crwdne2931471:0
crwdns2935297:04crwdne2935297:0
crwdns2947412:02crwdne2947412:0
Where is the internal clock/calendar battery located?
Internal clock battery is under circuit board on right side of lens as seen in photo for Step 9. See 2:48 - 3:19 in this video: https://www.youtube.com/watch?v=Awmm6hDm....