crwdns2915892:0crwdne2915892:0
This guide walks you through how to replace a broken LCD screen on your Canon PowerShot SX160 IS by disassembling a portion of the camera to access the non operational piece.
crwdns2942213:0crwdne2942213:0
-
-
Unscrew the 2-4.8mm black screws from the front of the camera using a #0 Phillips head screw driver.
-
Unscrew the 2-4.8mm black screws from the side of the camera using a #0 Phillips head screw driver.
-
Unscrew the 3-4.8mm black screws from the bottom of the camera using a #0 Phillips head screw driver.
-
-
-
Use your hand to gently separate the back panel from the camera.
-
Continue to pull the panel until it becomes completely detached from the camera.
-
-
-
-
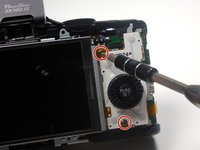
Unscrew the 3-3.75mm silver screws from the function wheel panel of the camera using a #0 Phillips head screw driver.
-
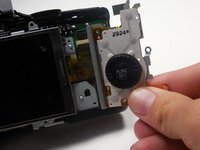
Remove the function wheel panel from the camera and set aside.
-
-
-
Unlatch the LCD ribbon connector from the camera by gently lifting up on the ribbon while pulling away from the camera.
-
-
-
Using your hand, pull the LCD screen away from the camera and replace.
-


Congratulations, you have successfully replaced your LCD screen. To reassemble your device, follow these instructions in reverse order.
Congratulations, you have successfully replaced your LCD screen. To reassemble your device, follow these instructions in reverse order.
crwdns2935221:0crwdne2935221:0
crwdns2935229:02crwdne2935229:0
crwdns2915084:0crwdne2915084:0

Colorado Springs, Team 2-3, Panko Spring 2015 crwdns2935289:0Colorado Springs, Team 2-3, Panko Spring 2015crwdne2935289:0
UCCS-PANKO-S15S2G3
crwdns2931471:03crwdne2931471:0
crwdns2935297:06crwdne2935297:0