crwdns2933423:0crwdne2933423:0
crwdns2947577:0crwdnd2947577:0crwdne2947577:0

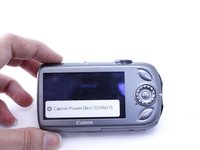
Canon PowerShot SD960 IS LCD Screen Replacement

crwdns2942213:0crwdne2942213:0

    1. Canon PowerShot SD960 IS LCD Screen Replacement, Battery: crwdns2935265:01crwdnd2935265:01crwdnd2935265:01crwdne2935265:0
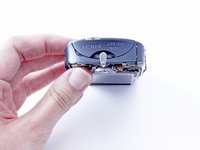
      • Turn the camera over so that the bottom of the camera is facing up.

      crwdns2952109:0crwdne2952109:0

      crwdns2917038:0crwdne2917038:0

    2. Canon PowerShot SD960 IS LCD Screen Replacement: crwdns2935265:02crwdnd2935265:01crwdnd2935265:02crwdne2935265:0 Canon PowerShot SD960 IS LCD Screen Replacement: crwdns2935265:02crwdnd2935265:02crwdnd2935265:02crwdne2935265:0
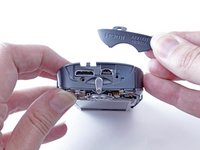
      • Apply slight pressure to the battery door and slide your finger over the release button in the direction of the arrows to open the battery door.

      • The battery door will open, allowing you to access the battery.

      crwdns2952109:0crwdne2952109:0

      crwdns2917038:0crwdne2917038:0

    3. Canon PowerShot SD960 IS LCD Screen Replacement: crwdns2935265:03crwdnd2935265:01crwdnd2935265:01crwdne2935265:0
      • Push the the orange battery lock back to release the battery.

      • Remove the battery.

      crwdns2952109:0crwdne2952109:0

      crwdns2917038:0crwdne2917038:0

    1. Canon PowerShot SD960 IS LCD Screen Replacement, LCD Screen: crwdns2935265:04crwdnd2935265:01crwdnd2935265:01crwdne2935265:0
      • Working on your electronic device while it is powered on can result in electric shock. Power off, unplug, and remove the battery of your device before continuing.

      • Close the battery door, and turn the camera over so that the bottom of the camera is facing up.

      • Using a PH000 screwdriver, remove the two 5.5mm screws.

      crwdns2952109:0crwdne2952109:0

      crwdns2917038:0crwdne2917038:0

    2. Canon PowerShot SD960 IS LCD Screen Replacement: crwdns2935265:05crwdnd2935265:01crwdnd2935265:01crwdne2935265:0
      • Turn the camera over to the side

      • Remove the two 4mm PH000 screws from the side of the camera.

      crwdns2952109:0crwdne2952109:0

      crwdns2917038:0crwdne2917038:0

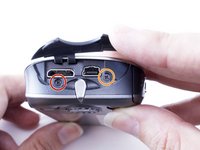
    3. Canon PowerShot SD960 IS LCD Screen Replacement: crwdns2935265:06crwdnd2935265:01crwdnd2935265:02crwdne2935265:0 Canon PowerShot SD960 IS LCD Screen Replacement: crwdns2935265:06crwdnd2935265:02crwdnd2935265:02crwdne2935265:0
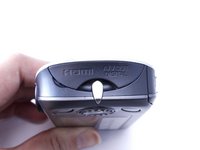
      • Turn camera over to the data port side with the panel that reads A/V Out.

      • Lift open the latch that covers the camera's data ports.

      • Remove the one 2.4mm PH000 screw on the left.

      • Remove the one 4mm PH000 screw on the right.

      crwdns2952109:0crwdne2952109:0

      crwdns2917038:0crwdne2917038:0

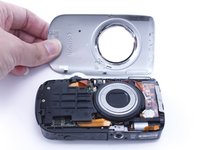
    4. Canon PowerShot SD960 IS LCD Screen Replacement: crwdns2935265:07crwdnd2935265:01crwdnd2935265:02crwdne2935265:0 Canon PowerShot SD960 IS LCD Screen Replacement: crwdns2935265:07crwdnd2935265:02crwdnd2935265:02crwdne2935265:0
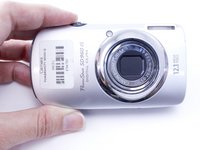
      • Turn the camera over so the lens is facing up.

      • Remove the front cover.

      crwdns2952109:0crwdne2952109:0

      crwdns2917038:0crwdne2917038:0

    5. Canon PowerShot SD960 IS LCD Screen Replacement: crwdns2935265:08crwdnd2935265:01crwdnd2935265:02crwdne2935265:0 Canon PowerShot SD960 IS LCD Screen Replacement: crwdns2935265:08crwdnd2935265:02crwdnd2935265:02crwdne2935265:0
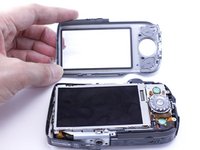
      • Turn the camera over so that the screen is facing up.

      • Remove the back cover.

      crwdns2952109:0crwdne2952109:0

      crwdns2917038:0crwdne2917038:0

    6. Canon PowerShot SD960 IS LCD Screen Replacement: crwdns2935265:09crwdnd2935265:01crwdnd2935265:02crwdne2935265:0 Canon PowerShot SD960 IS LCD Screen Replacement: crwdns2935265:09crwdnd2935265:02crwdnd2935265:02crwdne2935265:0
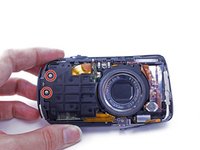
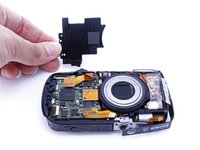
      • Turn the camera over so the lens is facing up.

      • Remove two 2.4mm PH000 screws from the plate on the front of camera.

      • Gently remove the plate.

      crwdns2952109:0crwdne2952109:0

      crwdns2917038:0crwdne2917038:0

    7. Canon PowerShot SD960 IS LCD Screen Replacement: crwdns2935265:010crwdnd2935265:01crwdnd2935265:02crwdne2935265:0 Canon PowerShot SD960 IS LCD Screen Replacement: crwdns2935265:010crwdnd2935265:02crwdnd2935265:02crwdne2935265:0
      • Turn the camera over to the data port side again.

      • After removing the front panel in the previous step, the AV/OUT panel should be free to remove. Gently slide out the A/V panel.

      crwdns2952109:0crwdne2952109:0

      crwdns2917038:0crwdne2917038:0

    8. Canon PowerShot SD960 IS LCD Screen Replacement: crwdns2935265:011crwdnd2935265:01crwdnd2935265:02crwdne2935265:0 Canon PowerShot SD960 IS LCD Screen Replacement: crwdns2935265:011crwdnd2935265:02crwdnd2935265:02crwdne2935265:0
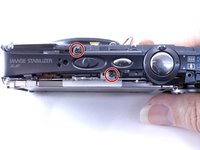
      • Turn the camera over so the top panel that reads "Image Stabilizer" is facing up.

      • Remove the two 2.4mm PH000 screws from the top of the camera to the left of the power on/off switch.

      • Gently remove the panel from the side of the camera.

      crwdns2952109:0crwdne2952109:0

      crwdns2917038:0crwdne2917038:0

    9. Canon PowerShot SD960 IS LCD Screen Replacement: crwdns2935265:012crwdnd2935265:01crwdnd2935265:02crwdne2935265:0 Canon PowerShot SD960 IS LCD Screen Replacement: crwdns2935265:012crwdnd2935265:02crwdnd2935265:02crwdne2935265:0
      • Turn the camera over so the screen is facing up.

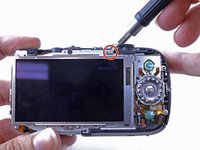
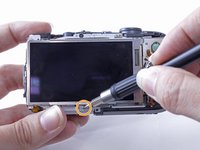
      • Remove one 3.2mm PH000 screw from the top of the LCD screen.

      • Remove one 3.2mm PH000 screw from the bottom of the LCD screen.

      crwdns2952109:0crwdne2952109:0

      crwdns2917038:0crwdne2917038:0

    10. Canon PowerShot SD960 IS LCD Screen Replacement: crwdns2935265:013crwdnd2935265:01crwdnd2935265:02crwdne2935265:0 Canon PowerShot SD960 IS LCD Screen Replacement: crwdns2935265:013crwdnd2935265:02crwdnd2935265:02crwdne2935265:0
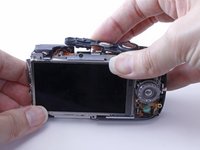
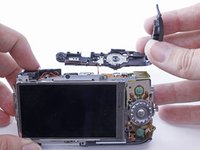
      • When you remove the top panel it will remain attached by a small orange cable. You can leave the cable attached; it will not obstruct you from completing the following steps.

      • Gently remove the top panel.

      crwdns2952109:0crwdne2952109:0

      crwdns2917038:0crwdne2917038:0

    11. Canon PowerShot SD960 IS LCD Screen Replacement: crwdns2935265:014crwdnd2935265:01crwdnd2935265:01crwdne2935265:0
      • Remove two 3.2mm PH000 screws on the side of the camera, to the right of the button that reads "Func. Set."

      crwdns2952109:0crwdne2952109:0

      crwdns2917038:0crwdne2917038:0

    12. Canon PowerShot SD960 IS LCD Screen Replacement: crwdns2935265:015crwdnd2935265:01crwdnd2935265:02crwdne2935265:0 Canon PowerShot SD960 IS LCD Screen Replacement: crwdns2935265:015crwdnd2935265:02crwdnd2935265:02crwdne2935265:0
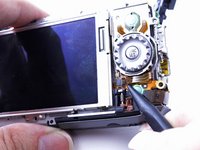
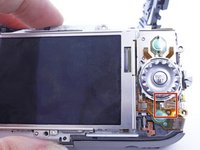
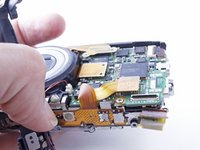
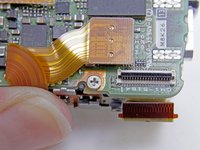
      • Use a nylon spudger to flip open the teeth holding the small, orange data cable in place.

      • Gently remove the small, orange data cable. The cable should now hang free.

      crwdns2952109:0crwdne2952109:0

      crwdns2917038:0crwdne2917038:0

    13. Canon PowerShot SD960 IS LCD Screen Replacement: crwdns2935265:016crwdnd2935265:01crwdnd2935265:01crwdne2935265:0
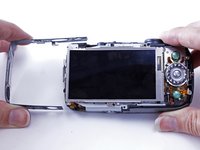
      • Once the data cable is removed, the panel to the right of the LCD screen with the button that reads "Func. Set" will be free to remove.

      • Gently remove the panel to the right of the LCD screen.

      crwdns2952109:0crwdne2952109:0

      crwdns2917038:0crwdne2917038:0

    14. Canon PowerShot SD960 IS LCD Screen Replacement: crwdns2935265:017crwdnd2935265:01crwdnd2935265:02crwdne2935265:0 Canon PowerShot SD960 IS LCD Screen Replacement: crwdns2935265:017crwdnd2935265:02crwdnd2935265:02crwdne2935265:0
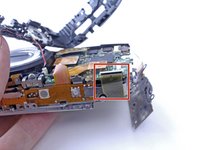
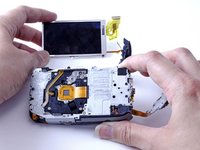
      • Locate the large, yellow data cable by turning the camera over so the lens is facing up.

      • Find where the data cable connects on the front of the camera.

      crwdns2952109:0crwdne2952109:0

      crwdns2917038:0crwdne2917038:0

    15. Canon PowerShot SD960 IS LCD Screen Replacement: crwdns2935265:018crwdnd2935265:01crwdnd2935265:02crwdne2935265:0 Canon PowerShot SD960 IS LCD Screen Replacement: crwdns2935265:018crwdnd2935265:02crwdnd2935265:02crwdne2935265:0
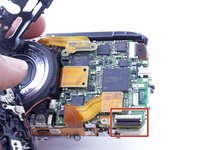
      • Use a nylon spudger to flip open the teeth that are holding the large, yellow data cable in place.

      • Gently remove the data cable.

      crwdns2952109:0crwdne2952109:0

      crwdns2917038:0crwdne2917038:0

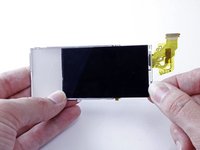
    16. Canon PowerShot SD960 IS LCD Screen Replacement: crwdns2935265:019crwdnd2935265:01crwdnd2935265:03crwdne2935265:0 Canon PowerShot SD960 IS LCD Screen Replacement: crwdns2935265:019crwdnd2935265:02crwdnd2935265:03crwdne2935265:0 Canon PowerShot SD960 IS LCD Screen Replacement: crwdns2935265:019crwdnd2935265:03crwdnd2935265:03crwdne2935265:0
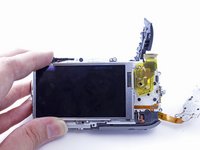
      • Turn the camera over so the screen is facing up.

      • Remove the LCD screen.

      crwdns2952109:0crwdne2952109:0

      crwdns2917038:0crwdne2917038:0

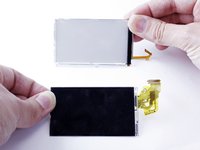
    17. Canon PowerShot SD960 IS LCD Screen Replacement: crwdns2935265:020crwdnd2935265:01crwdnd2935265:03crwdne2935265:0 Canon PowerShot SD960 IS LCD Screen Replacement: crwdns2935265:020crwdnd2935265:02crwdnd2935265:03crwdne2935265:0 Canon PowerShot SD960 IS LCD Screen Replacement: crwdns2935265:020crwdnd2935265:03crwdnd2935265:03crwdne2935265:0
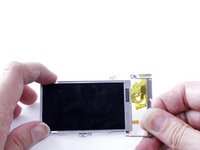
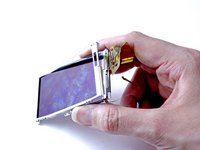
      • To remove the casing around the LCD screen, begin by removing the top of the casing (which is in two pieces). First, remove the small hinge on the right side.

      • Then, remove the rest of the casing.

      • The top of the LCD screen casing should now be removed.

      crwdns2952109:0crwdne2952109:0

      crwdns2917038:0crwdne2917038:0

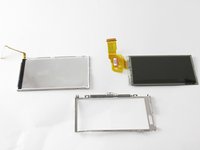
    18. Canon PowerShot SD960 IS LCD Screen Replacement: crwdns2935265:021crwdnd2935265:01crwdnd2935265:03crwdne2935265:0 Canon PowerShot SD960 IS LCD Screen Replacement: crwdns2935265:021crwdnd2935265:02crwdnd2935265:03crwdne2935265:0 Canon PowerShot SD960 IS LCD Screen Replacement: crwdns2935265:021crwdnd2935265:03crwdnd2935265:03crwdne2935265:0
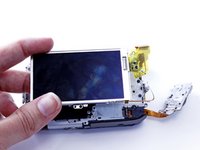
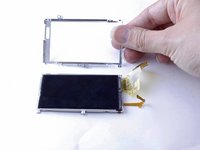
      • Carefully slide out the LCD screen from the back part of the casing.

      • You should now have three components: The back of the LCD screen casing, the LCD screen, and the front of the LCD screen casing.

      • The LCD screen is now removed and can be replaced or set aside to access other camera components.

      crwdns2952109:0crwdne2952109:0

      crwdns2917038:0crwdne2917038:0

crwdns2915888:0crwdne2915888:0

To reassemble your device, follow these instructions in reverse order.

crwdns2935221:0crwdne2935221:0

crwdns2935229:03crwdne2935229:0

Kacy Ewing

crwdns2935283:009/15/16crwdne2935283:0

253 crwdns2915208:0crwdne2915208:0

crwdns2935295:0crwdne2935295:0

crwdns2935287:0crwdne2935287:0

University of North Texas, Team 1-4, Campbell Fall 2016 crwdns2935289:0University of North Texas, Team 1-4, Campbell Fall 2016crwdne2935289:0

UNT-CAMPBELL-F16S1G4

crwdns2931471:02crwdne2931471:0

crwdns2935297:015crwdne2935297:0

crwdns2947412:00crwdne2947412:0

crwdns2917038:0crwdne2917038:0

crwdns2936625:0crwdne2936625:0:

crwdns2936751:024crwdne2936751:0 0

crwdns2936753:07crwdne2936753:0 5

crwdns2936753:030crwdne2936753:0 37

crwdns2942667:0crwdne2942667:0 1,514