crwdns2933423:0crwdne2933423:0

Canon PowerShot SD500 Digital ELPH Image Sensor Replacement

crwdns2942213:0crwdne2942213:0

  1. Canon PowerShot SD500 Digital ELPH Image Sensor Replacement, Battery: crwdns2935265:01crwdnd2935265:01crwdnd2935265:01crwdne2935265:0
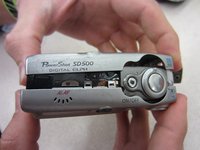
    • Slide open the battery cover.

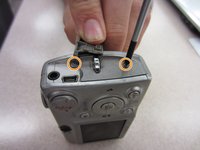
    • Push the small orange tab to the side so the battery can be removed.

  2. Canon PowerShot SD500 Digital ELPH Image Sensor Replacement: crwdns2935265:02crwdnd2935265:01crwdnd2935265:02crwdne2935265:0 Canon PowerShot SD500 Digital ELPH Image Sensor Replacement: crwdns2935265:02crwdnd2935265:02crwdnd2935265:02crwdne2935265:0
    • Slide the battery out of the battery compartment.

  3. Canon PowerShot SD500 Digital ELPH Image Sensor Replacement, Front and Rear Casing: crwdns2935265:03crwdnd2935265:01crwdnd2935265:02crwdne2935265:0 Canon PowerShot SD500 Digital ELPH Image Sensor Replacement, Front and Rear Casing: crwdns2935265:03crwdnd2935265:02crwdnd2935265:02crwdne2935265:0
    • Two Phillips screws need to be removed using a #00 Phillips screwdriver. The upper screw is under the USB port cover, which can simply be pulled away gently from the casing. the lower screw is visible on the panel.

    • The screws are different sizes. The .125 inch screw is located under the USB port cover. The 0.85 inch screw goes in the lower hole on the panel.

    • When looking at the back of the camera, these two screws are on the right panel of the camera.

  4. Canon PowerShot SD500 Digital ELPH Image Sensor Replacement: crwdns2935265:04crwdnd2935265:01crwdnd2935265:01crwdne2935265:0
    • Remove the right side cover from the camera casing.

  5. Canon PowerShot SD500 Digital ELPH Image Sensor Replacement: crwdns2935265:05crwdnd2935265:01crwdnd2935265:01crwdne2935265:0
    • Remove a .07 inch Phillips screw using a #00 Phillips screwdriver.

  6. Canon PowerShot SD500 Digital ELPH Image Sensor Replacement: crwdns2935265:06crwdnd2935265:01crwdnd2935265:01crwdne2935265:0
    • Remove two .085 inch Phillips screws from the left side of the camera using a #00 Philips screwdriver.

  7. Canon PowerShot SD500 Digital ELPH Image Sensor Replacement: crwdns2935265:07crwdnd2935265:01crwdnd2935265:01crwdne2935265:0
    • Remove the left side cover from the camera.

  8. Canon PowerShot SD500 Digital ELPH Image Sensor Replacement: crwdns2935265:08crwdnd2935265:01crwdnd2935265:01crwdne2935265:0
    • Remove three .15 inch Phillips screws from the bottom of the camera using a #00 Phillips screwdriver.

  9. Canon PowerShot SD500 Digital ELPH Image Sensor Replacement: crwdns2935265:09crwdnd2935265:01crwdnd2935265:02crwdne2935265:0 Canon PowerShot SD500 Digital ELPH Image Sensor Replacement: crwdns2935265:09crwdnd2935265:02crwdnd2935265:02crwdne2935265:0
    • Once the casing is unscrewed, hold the camera with one side facing down, and lift the opposite face of the casing to open it.

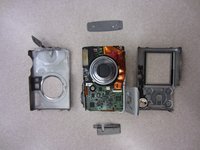
    • Remove the internal camera components and layout out all pieces on a clean surface.

    • The front and back cover may require gentle rocking to remove.

  10. Canon PowerShot SD500 Digital ELPH Image Sensor Replacement, Button Contact Panel: crwdns2935265:010crwdnd2935265:01crwdnd2935265:01crwdne2935265:0
    • Carefully wedge the pry tool under the ribbon in the ribbon gate.

    • Gently remove the ribbon from the ribbon gate by pulling it away from the gate with the pry tool.

    • Be careful not to damage the ribbon.

  11. Canon PowerShot SD500 Digital ELPH Image Sensor Replacement: crwdns2935265:011crwdnd2935265:01crwdnd2935265:01crwdne2935265:0
    • Gently press the ribbon back to get access to a Phillips screw behind it.

    • Be careful not to damage the ribbon.

    • Unscrew two .125 inch long Phillips screws using a #00 Philips screwdriver.

  12. Canon PowerShot SD500 Digital ELPH Image Sensor Replacement: crwdns2935265:012crwdnd2935265:01crwdnd2935265:03crwdne2935265:0 Canon PowerShot SD500 Digital ELPH Image Sensor Replacement: crwdns2935265:012crwdnd2935265:02crwdnd2935265:03crwdne2935265:0 Canon PowerShot SD500 Digital ELPH Image Sensor Replacement: crwdns2935265:012crwdnd2935265:03crwdnd2935265:03crwdne2935265:0
    • Remove the ribbon with a pry tool by gently pulling it out of the ribbon gate tab.

    • Be careful not to damage the ribbon.

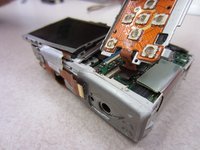
    • Pull the button board away from the rest of the camera.

  13. Canon PowerShot SD500 Digital ELPH Image Sensor Replacement, LCD: crwdns2935265:013crwdnd2935265:01crwdnd2935265:01crwdne2935265:0
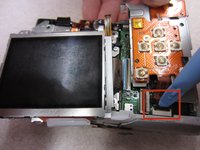
    • Unscrew one .113 inch Phillips screw using a #00 Phillips screwdriver.

  14. Canon PowerShot SD500 Digital ELPH Image Sensor Replacement: crwdns2935265:014crwdnd2935265:01crwdnd2935265:01crwdne2935265:0
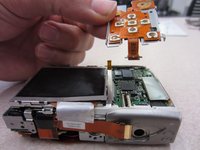
    • Lift the LCD screen up and away from the tab that holds it in place on the face of the camera.

    • Be careful, the LCD screen is still connect to the camera by a ribbon cable.

  15. Canon PowerShot SD500 Digital ELPH Image Sensor Replacement: crwdns2935265:015crwdnd2935265:01crwdnd2935265:02crwdne2935265:0 Canon PowerShot SD500 Digital ELPH Image Sensor Replacement: crwdns2935265:015crwdnd2935265:02crwdnd2935265:02crwdne2935265:0
    • Gently press the pry tool under the ribbon gate and lift up to free the ribbon connecting the LCD to the circuit board.

    • Be careful not to damage the ribbon.

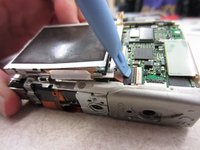
    • The LCD can now be completely removed from the camera.

  16. Canon PowerShot SD500 Digital ELPH Image Sensor Replacement, Image Sensor: crwdns2935265:016crwdnd2935265:01crwdnd2935265:01crwdne2935265:0
    • Place the pry tool under ribbon gate and gently lift it up, disconnecting the ribbon.

  17. Canon PowerShot SD500 Digital ELPH Image Sensor Replacement: crwdns2935265:017crwdnd2935265:01crwdnd2935265:01crwdne2935265:0
    • Unscrew three .15 inch Phillips screws from the back of the camera using a #00 Phillips screwdriver.

  18. Canon PowerShot SD500 Digital ELPH Image Sensor Replacement: crwdns2935265:018crwdnd2935265:01crwdnd2935265:02crwdne2935265:0 Canon PowerShot SD500 Digital ELPH Image Sensor Replacement: crwdns2935265:018crwdnd2935265:02crwdnd2935265:02crwdne2935265:0
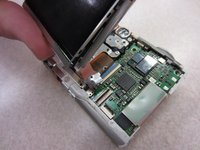
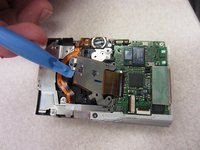
    • Use the pry tool to gently lift the image sensor away from the rest of the camera.

    • Be careful not to damage the image sensor as you pry it up.

crwdns2915888:0crwdne2915888:0

To reassemble your device, follow these instructions in reverse order.

Taylor Shields

crwdns2935283:010/13/14crwdne2935283:0

846 crwdns2915208:0crwdne2915208:0

crwdns2935297:08crwdne2935297:0

crwdns2915084:0crwdne2915084:0

Clemson, Team 2-1, Benson Fall 2014 crwdns2935289:0Clemson, Team 2-1, Benson Fall 2014crwdne2935289:0

CLEM-BENSON-F14S2G1

crwdns2931471:04crwdne2931471:0

crwdns2935297:09crwdne2935297:0

crwdns2944067:00crwdne2944067:0

crwdns2917038:0crwdne2917038:0

crwdns2936625:0crwdne2936625:0:

crwdns2936751:024crwdne2936751:0 0

crwdns2936753:07crwdne2936753:0 0

crwdns2936753:030crwdne2936753:0 10

crwdns2942667:0crwdne2942667:0 239