crwdns2933423:0crwdne2933423:0

Canon PowerShot SD1200 IS Motherboard

crwdns2942213:0crwdne2942213:0

  1. Canon PowerShot SD1200 IS Motherboard, Front and Rear Covers: crwdns2935265:01crwdnd2935265:01crwdnd2935265:01crwdne2935265:0
    • Remove the battery.

  2. Canon PowerShot SD1200 IS Motherboard: crwdns2935265:02crwdnd2935265:01crwdnd2935265:03crwdne2935265:0 Canon PowerShot SD1200 IS Motherboard: crwdns2935265:02crwdnd2935265:02crwdnd2935265:03crwdne2935265:0 Canon PowerShot SD1200 IS Motherboard: crwdns2935265:02crwdnd2935265:03crwdnd2935265:03crwdne2935265:0
    • Remove the two screws from the side of the camera casing with the strap. (4mm Phillips 00)

    • Remove the two screws from the bottom of the camera. (4mm Phillips 00)

    • Remove the two screws from the right side of the camera opposite the strap. (2mm Phillips 00)

  3. Canon PowerShot SD1200 IS Motherboard: crwdns2935265:03crwdnd2935265:01crwdnd2935265:02crwdne2935265:0 Canon PowerShot SD1200 IS Motherboard: crwdns2935265:03crwdnd2935265:02crwdnd2935265:02crwdne2935265:0
    • Pull off the front cover.

    • If the top of the cover sticks, use gentle downward pressure on the retention clips above the lens to release.

    • Remove the back cover.

  4. Canon PowerShot SD1200 IS Motherboard, Motherboard: crwdns2935265:04crwdnd2935265:01crwdnd2935265:01crwdne2935265:0
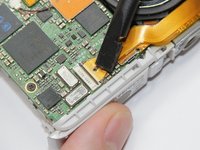
    • Remove the microphone connector by gripping it with the tool and gently, with a wiggling motion, pull it out.

    • Pull the connector straight out by the white connector. Pulling on the wires will damage them.

  5. Canon PowerShot SD1200 IS Motherboard: crwdns2935265:05crwdnd2935265:01crwdnd2935265:01crwdne2935265:0
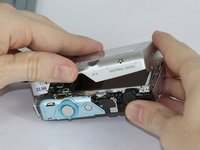
    • Lift off the mechanical shutter button assembly.

  6. Canon PowerShot SD1200 IS Motherboard: crwdns2935265:06crwdnd2935265:01crwdnd2935265:02crwdne2935265:0 Canon PowerShot SD1200 IS Motherboard: crwdns2935265:06crwdnd2935265:02crwdnd2935265:02crwdne2935265:0
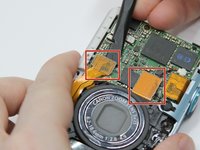
    • Use the spudger to lift the tab on the Zero Insertion Force (ZIF) connector located at the bottom of the motherboard.

    • Be sure you are prying up on the hinged retaining flap, not the connector itself.

    • Slide out the ribbon cable.

    • Use the spudger to pry up each side of the Flat-Topped Connectors

  7. Canon PowerShot SD1200 IS Motherboard: crwdns2935265:07crwdnd2935265:01crwdnd2935265:01crwdne2935265:0
    • Remove the press fit ribbon cable by prying upward with spudger tool.

    • It is not necessary to remove the Lens or Flash Assemblies to remove the motherboard.

  8. Canon PowerShot SD1200 IS Motherboard: crwdns2935265:08crwdnd2935265:01crwdnd2935265:01crwdne2935265:0
    • Remove the bottom right screw from the motherboard. (4mm Phillips 00)

    • Remove top and lower left black screws from the motherboard. (2.5mm Phillips 00)

  9. Canon PowerShot SD1200 IS Motherboard: crwdns2935265:09crwdnd2935265:01crwdnd2935265:01crwdne2935265:0
    • Lift out the motherboard.

crwdns2915888:0crwdne2915888:0

To reassemble your device, follow these instructions in reverse order.

Jeff Casper

crwdns2935283:009/15/16crwdne2935283:0

848 crwdns2915208:0crwdne2915208:0

crwdns2935297:07crwdne2935297:0

crwdns2915084:0crwdne2915084:0

USF Tampa, Team 17-5, Blackwell Fall 2016 crwdns2935289:0USF Tampa, Team 17-5, Blackwell Fall 2016crwdne2935289:0

USFT-BLACKWELL-F16S17G5

crwdns2931471:03crwdne2931471:0

crwdns2935297:07crwdne2935297:0

crwdns2944067:00crwdne2944067:0

crwdns2917038:0crwdne2917038:0

crwdns2936625:0crwdne2936625:0:

crwdns2936751:024crwdne2936751:0 0

crwdns2936753:07crwdne2936753:0 3

crwdns2936753:030crwdne2936753:0 10

crwdns2942667:0crwdne2942667:0 403