crwdns2915892:0crwdne2915892:0
The 1.8 inch LCD Screen is the main method of interaction between the user and the camera. If the screen malfunctions, it may be useful to replace it. New screens can be bought here
crwdns2942213:0crwdne2942213:0
-
-
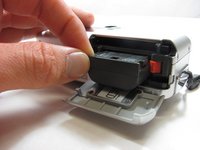
Place camera LCD side up and press up on the battery door.
-
Let it swing open until you can see the battery inside.
-
-
-
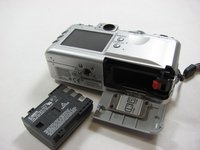
Press down on the orange plastic.
-
This will gently eject the battery from its compartment.
-
-
-
Holding the edges, slide out the battery.
-
-
-
Look at the camera from the side with the lanyard and 4 screws.
-
Remove the two 3.4 mm screws on the metallic colored part.
-
-
-
Remove the 3mm screw on the top left.
-
Now remove the 5.3mm screw on the bottom.
-
-
-
Place the camera LCD side down.
-
Remove the two 5.3mm screws by the battery door.
-
-
-
Remove the four 3.4mm screws on the bottom of the camera around the tripod mount.
-
-
-
Stand the camera back up.
-
Remove the two 3.6mm screws on the side with the A/V Out port.
-
-
-
-
Lift open the rubber flap covering the A/V Out port.
-
Remove the 3.4mm screw in the center.
-
-
-
Use a spudger and gently open up the front panel of the camera.
-
-
-
There will be a brown plastic piece keeping the thin plastic ribbon in place.
-
Use the spudger to pull out the brown plastic piece attached to the orange plastic.
-
-
crwdns2935267:0crwdne2935267:0Tweezers$4.99
-
Use a pair of tweezers and remove the metal piece inside the camera.
-
-
-
Disconnect the two plastic ribbons on the lower half of the right motherboard.
-
-
-
Remove the two 3.4mm screws on the right motherboard.
-
-
-
Disconnect the two wired plugs below the flash.
-
-
-
Disconnect the wired plug at the bottom of the right motherboard.
-
-
crwdns2935267:0crwdne2935267:0Tweezers$4.99
-
Use a pair of tweezers to pull the right motherboard away from the main body of the camera.
-
-
-
Using a spudger, gently separate the back panel from the rest of the camera and remove it.
-
-
-
Remove the 2.6mm screw on the bottom of the camera located directly under the LCD screen.
-
This screw should be holding two pieces of orange film down.
-
-
-
Disconnect the film from the bottom of the camera under the LCD Screen.
-
-
-
Remove the 3.3mm screw on the bottom left of the LCD screen.
-
-
-
Remove the 2.4mm screw located just to the upper right of the LCD Screen.
-


To reassemble your device, follow these instructions in reverse order.
To reassemble your device, follow these instructions in reverse order.
crwdns2935221:0crwdne2935221:0
crwdns2935227:0crwdne2935227:0
crwdns2915084:0crwdne2915084:0

Cal Poly, Team 7-34, Maness Spring 2012 crwdns2935289:0Cal Poly, Team 7-34, Maness Spring 2012crwdne2935289:0
CPSU-MANESS-S12S7G34
crwdns2931471:05crwdne2931471:0
crwdns2935297:06crwdne2935297:0