crwdns2933423:0crwdne2933423:0
crwdns2947577:0crwdnd2947577:0crwdne2947577:0

Canon PowerShot S50 LCD Screen Replacement

crwdns2942213:0crwdne2942213:0

    1. Canon PowerShot S50 LCD Screen Replacement, Battery: crwdns2935265:01crwdnd2935265:01crwdnd2935265:02crwdne2935265:0 Canon PowerShot S50 LCD Screen Replacement, Battery: crwdns2935265:01crwdnd2935265:02crwdnd2935265:02crwdne2935265:0
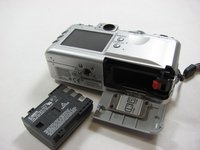
      • Place camera LCD side up and press up on the battery door.

      • Let it swing open until you can see the battery inside.

      crwdns2952109:0crwdne2952109:0

      crwdns2917038:0crwdne2917038:0

    2. Canon PowerShot S50 LCD Screen Replacement: crwdns2935265:02crwdnd2935265:01crwdnd2935265:01crwdne2935265:0
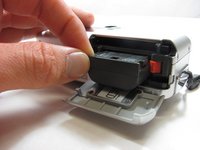
      • Press down on the orange plastic.

      • This will gently eject the battery from its compartment.

      crwdns2952109:0crwdne2952109:0

      crwdns2917038:0crwdne2917038:0

    3. Canon PowerShot S50 LCD Screen Replacement: crwdns2935265:03crwdnd2935265:01crwdnd2935265:02crwdne2935265:0 Canon PowerShot S50 LCD Screen Replacement: crwdns2935265:03crwdnd2935265:02crwdnd2935265:02crwdne2935265:0
      • Holding the edges, slide out the battery.

      crwdns2952109:0crwdne2952109:0

      crwdns2917038:0crwdne2917038:0

    1. Canon PowerShot S50 LCD Screen Replacement, Front Panel/Battery Door: crwdns2935265:04crwdnd2935265:01crwdnd2935265:01crwdne2935265:0
      • Look at the camera from the side with the lanyard and 4 screws.

      • Remove the two 3.4 mm screws on the metallic colored part.

      crwdns2952109:0crwdne2952109:0

      crwdns2917038:0crwdne2917038:0

    2. Canon PowerShot S50 LCD Screen Replacement: crwdns2935265:05crwdnd2935265:01crwdnd2935265:01crwdne2935265:0
      • Remove the 3mm screw on the top left.

      • NOTE: When reassembling, it is helpful to put the top screw back in before placing the front cover back on the camera.

      • Now remove the 5.3mm screw on the bottom.

      crwdns2952109:0crwdne2952109:0

      crwdns2917038:0crwdne2917038:0

    3. Canon PowerShot S50 LCD Screen Replacement: crwdns2935265:06crwdnd2935265:01crwdnd2935265:01crwdne2935265:0
      • Place the camera LCD side down.

      • Remove the two 5.3mm screws by the battery door.

      crwdns2952109:0crwdne2952109:0

      crwdns2917038:0crwdne2917038:0

    4. Canon PowerShot S50 LCD Screen Replacement: crwdns2935265:07crwdnd2935265:01crwdnd2935265:01crwdne2935265:0
      • Remove the four 3.4mm screws on the bottom of the camera around the tripod mount.

      • Make sure to keep these screws separate from the previous 5.3 mm screws.

      crwdns2952109:0crwdne2952109:0

      crwdns2917038:0crwdne2917038:0

    5. Canon PowerShot S50 LCD Screen Replacement: crwdns2935265:08crwdnd2935265:01crwdnd2935265:01crwdne2935265:0
      • Stand the camera back up.

      • Remove the two 3.6mm screws on the side with the A/V Out port.

      crwdns2952109:0crwdne2952109:0

      crwdns2917038:0crwdne2917038:0

    6. Canon PowerShot S50 LCD Screen Replacement: crwdns2935265:09crwdnd2935265:01crwdnd2935265:01crwdne2935265:0
      • Lift open the rubber flap covering the A/V Out port.

      • Remove the 3.4mm screw in the center.

      • During reassembly, put the A/V out rubber door on before replacing the front panel of the camera

      crwdns2952109:0crwdne2952109:0

      crwdns2917038:0crwdne2917038:0

    7. Canon PowerShot S50 LCD Screen Replacement: crwdns2935265:010crwdnd2935265:01crwdnd2935265:01crwdne2935265:0
      • Use a spudger and gently open up the front panel of the camera.

      • A thin plastic ribbon will stay connected by a brown piece to front panel of the camera.

      crwdns2952109:0crwdne2952109:0

      crwdns2917038:0crwdne2917038:0

    8. Canon PowerShot S50 LCD Screen Replacement: crwdns2935265:011crwdnd2935265:01crwdnd2935265:01crwdne2935265:0
      • There will be a brown plastic piece keeping the thin plastic ribbon in place.

      • Use the spudger to pull out the brown plastic piece attached to the orange plastic.

      crwdns2952109:0crwdne2952109:0

      crwdns2917038:0crwdne2917038:0

    9. Canon PowerShot S50 LCD Screen Replacement: crwdns2935265:012crwdnd2935265:01crwdnd2935265:01crwdne2935265:0
      crwdns2935267:0crwdne2935267:0
      Tweezers
      $4.99
      • Use a pair of tweezers and remove the metal piece inside the camera.

      crwdns2952109:0crwdne2952109:0

      crwdns2917038:0crwdne2917038:0

    10. Canon PowerShot S50 LCD Screen Replacement: crwdns2935265:013crwdnd2935265:01crwdnd2935265:01crwdne2935265:0
      • Remove the battery door

      • NOTE: Putting this back on requires aligning the spring on the back of the door with the hole on the camera

      crwdns2952109:0crwdne2952109:0

      crwdns2917038:0crwdne2917038:0

    1. Canon PowerShot S50 LCD Screen Replacement, Right Motherboard: crwdns2935265:014crwdnd2935265:01crwdnd2935265:01crwdne2935265:0
      • Disconnect the two plastic ribbons on the lower half of the right motherboard.

      • NOTE: You will have to lift up the brown plastic piece in order to pull out the second ribbon wire.

      crwdns2952109:0crwdne2952109:0

      crwdns2917038:0crwdne2917038:0

    2. Canon PowerShot S50 LCD Screen Replacement: crwdns2935265:015crwdnd2935265:01crwdnd2935265:01crwdne2935265:0
      • Remove the two 3.4mm screws on the right motherboard.

      crwdns2952109:0crwdne2952109:0

      crwdns2917038:0crwdne2917038:0

    3. Canon PowerShot S50 LCD Screen Replacement: crwdns2935265:016crwdnd2935265:01crwdnd2935265:01crwdne2935265:0
      • Disconnect the two wired plugs below the flash.

      crwdns2952109:0crwdne2952109:0

      crwdns2917038:0crwdne2917038:0

    4. Canon PowerShot S50 LCD Screen Replacement: crwdns2935265:017crwdnd2935265:01crwdnd2935265:01crwdne2935265:0
      • Disconnect the wired plug at the bottom of the right motherboard.

      crwdns2952109:0crwdne2952109:0

      crwdns2917038:0crwdne2917038:0

    5. Canon PowerShot S50 LCD Screen Replacement: crwdns2935265:018crwdnd2935265:01crwdnd2935265:01crwdne2935265:0
      crwdns2935267:0crwdne2935267:0
      Tweezers
      $4.99
      • Use a pair of tweezers to pull the right motherboard away from the main body of the camera.

      crwdns2952109:0crwdne2952109:0

      crwdns2917038:0crwdne2917038:0

    1. Canon PowerShot S50 LCD Screen Replacement, Outer Casing: crwdns2935265:019crwdnd2935265:01crwdnd2935265:01crwdne2935265:0
      • Using a spudger, gently separate the back panel from the rest of the camera and remove it.

      crwdns2952109:0crwdne2952109:0

      crwdns2917038:0crwdne2917038:0

    1. Canon PowerShot S50 LCD Screen Replacement, LCD Screen: crwdns2935265:020crwdnd2935265:01crwdnd2935265:01crwdne2935265:0
      • Remove the 2.6mm screw on the bottom of the camera located directly under the LCD screen.

      • This screw should be holding two pieces of orange film down.

      • When replacing this screw, make sure that the orange film is secure below it before screwing it in.

      crwdns2952109:0crwdne2952109:0

      crwdns2917038:0crwdne2917038:0

    2. Canon PowerShot S50 LCD Screen Replacement: crwdns2935265:021crwdnd2935265:01crwdnd2935265:01crwdne2935265:0
      • Disconnect the film from the bottom of the camera under the LCD Screen.

      crwdns2952109:0crwdne2952109:0

      crwdns2917038:0crwdne2917038:0

    3. Canon PowerShot S50 LCD Screen Replacement: crwdns2935265:022crwdnd2935265:01crwdnd2935265:01crwdne2935265:0
      • Remove the 3.3mm screw on the bottom left of the LCD screen.

      crwdns2952109:0crwdne2952109:0

      crwdns2917038:0crwdne2917038:0

    4. Canon PowerShot S50 LCD Screen Replacement: crwdns2935265:023crwdnd2935265:01crwdnd2935265:01crwdne2935265:0
      • Remove the 2.4mm screw located just to the upper right of the LCD Screen.

      crwdns2952109:0crwdne2952109:0

      crwdns2917038:0crwdne2917038:0

    5. Canon PowerShot S50 LCD Screen Replacement: crwdns2935265:024crwdnd2935265:01crwdnd2935265:01crwdne2935265:0
      • Gently remove the LCD Screen.

      crwdns2952109:0crwdne2952109:0

      crwdns2917038:0crwdne2917038:0

crwdns2915888:0crwdne2915888:0

To reassemble your device, follow these instructions in reverse order.

crwdns2935221:0crwdne2935221:0

crwdns2935227:0crwdne2935227:0

Jacob

crwdns2935283:003/29/12crwdne2935283:0

16 crwdns2915208:0crwdne2915208:0

crwdns2935297:03crwdne2935297:0

crwdns2935287:0crwdne2935287:0

Cal Poly, Team 7-34, Maness Spring 2012 crwdns2935289:0Cal Poly, Team 7-34, Maness Spring 2012crwdne2935289:0

CPSU-MANESS-S12S7G34

crwdns2931471:05crwdne2931471:0

crwdns2935297:042crwdne2935297:0

crwdns2947412:00crwdne2947412:0

crwdns2917038:0crwdne2917038:0

crwdns2936625:0crwdne2936625:0:

crwdns2936751:024crwdne2936751:0 1

crwdns2936753:07crwdne2936753:0 11

crwdns2936753:030crwdne2936753:0 42

crwdns2942667:0crwdne2942667:0 2,092